• Home
  • New? Start Here!
  • Holidays
  • Parties
  • Contact
  • Facebook
  • Twitter
  • Pinterest
  • Google+
  • Instagram

Creative Kid Snacks

make fun of lunch!

  • Breakfasts
  • Lunches
  • Dinner
  • Snacks
  • Desserts

Resurrection Day Breakfast

March 21, 2014 by Amy Hudson

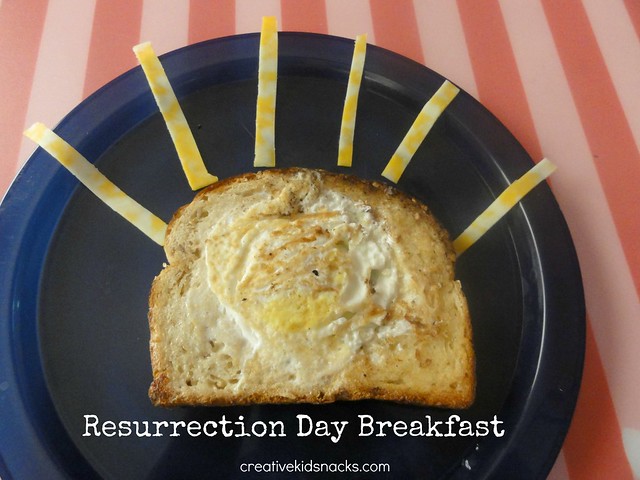
Today I have a little breakfast to celebrate the Easter story.  Make a fun little breakfast to celebrate Jesus’ resurrection from the dead!  An egg-in-toast is a great way to portray the empty tomb and this breakfast will be a great way to talk about this great story.

Ingredients:

1 slice of bread

1 egg

1 slice of cheese

1 T butter

Directions:

Heat a skillet.  Use a cookie cutter or cup to cut a large circle in a slice of bread.  Butter the bread and place onto skillet.  Crack an egg into the skillet and let cook several minutes until bottom of egg is firm enough to flip.  Flip bread and egg once to briefly cook the other side of the bread and egg, and then serve.  The egg looks like the light shining out of the tomb, and sliced cheese strips look like more light coming from the tomb because Jesus has risen from the dead.

Read the Story

Matthew 28

After the Sabbath, at dawn on the first day of the week, Mary Magdalene and the other Mary went to look at the tomb.

2 There was a violent earthquake, for an angel of the Lord came down from heaven and, going to the tomb, rolled back the stone and sat on it. 3 His appearance was like lightning, and his clothes were white as snow. 4 The guards were so afraid of him that they shook and became like dead men.

5 The angel said to the women, “Do not be afraid, for I know that you are looking for Jesus, who was crucified. 6 He is not here; he has risen, just as he said. Come and see the place where he lay. 7 Then go quickly and tell his disciples: ‘He has risen from the dead and is going ahead of you into Galilee. There you will see him.’ Now I have told you.”

8 So the women hurried away from the tomb, afraid yet filled with joy, and ran to tell his disciples. 9 Suddenly Jesus met them. “Greetings,” he said. They came to him, clasped his feet and worshiped him. 10 Then Jesus said to them, “Do not be afraid. Go and tell my brothers to go to Galilee; there they will see me.”

Talk About It

Some questions to ask the kids include:

What do you think the women said to themselves after they saw that the tomb was empty?

What do you think the other disciples thought when the women told them that Jesus was risen from the dead?

Why were the guards so afraid?  How would you feel if you were a guard?

How do you think the disciples felt when they saw Jesus on after he had risen?

What does this story teach us about Jesus?

Pray a Prayer of Thanksgiving

This would be a great chance to thank God together for sending Jesus to die for us and for raising Him from the dead because of His great power.  Thank Him for forgiving our sins through Jesus’ death on the cross, and thank God for this story.  Jesus’ resurrection proves that He was who He said He was.

Act It Out

Have each child choose a character to be and act out this story.  Characters could include the guards, angels, Jesus, women, or the disciples.

What other ideas do you have to teach kids about the Easter Story?  Please share your comments and links below!

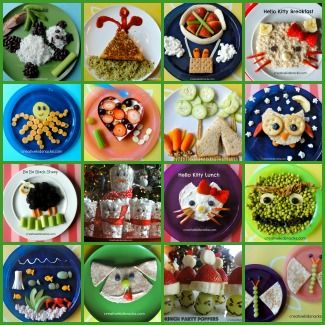
Also, check out our other cute Easter Snacks in this collection!

Easter Snacks to Make with the Kids

Filed Under: biblical, breakfasts, cheese, Easter, eggs, holidays Tagged With: Biblical, Breakfasts, cheese, Easter, Egg, Holidays

Toy Story Alien Snack

March 19, 2014 by Amy Hudson

Toy Story 3 is one of the highest rated movies on Rotten Tomatoes, a movie review website my husband checks religiously before we go out to see a movie.  Kids love the excitement, adventure, and charming characters in this movie.  Even my little girls love  the Woody doll that Grandma keeps at her house, and both have stopped to play with the Buzz Lightyear in the toy aisle.

One of the funniest characters in the Toy Story movie, in my opinion, is the three-eyed alien.  I can just picture him saying, “Ooooh, the Claaaaaaw” like he does in the first movie.  I smile just thinking about it.  In case you’re not familiar with this character, he looks like this:

(image source)

We decided to make this guy for a snack the other day.  We used green grapes, white cheese, blueberries, and raisins.  Take a look.

Toy Story Alien Snack

Ingredients:

Green Grapes (approx. 20)
3 blueberries
white cheese sliced into ovals (could use string cheese, or sliced white cheese like provolone or mozaraella)
3 raisins

Directions:

Slice green grapes in half and arrange on plate in an oval shape as shown.  Slice one of the grapes into tall triangles to look like ears, and slice a small circle out of the cross-section of a grape to be the circle on top of your alien’s head.  Slice blueberries in half, and arrange on top of grapes as shown for a mouth.  Add 3 slices of cheese cut into oval shapes for eyes, and add raisins.  Enjoy!

Check Out the Rest of Our Kids Movie Snacks

Winnie the Pooh

Mickey Mouse

Lion King

Nemo

Shrek

Tangled

Monster’s Inc

Peter Pan

Up

Filed Under: blueberries, cheese, grapes, movies Tagged With: blueberries, cheese, grapes, movies, raisin

End of the Rainbow Fruit Salad

March 17, 2014 by Amy Hudson

One of the primary goals I have as a mom is to teach my kids to love eating healthy food.  The reason we share our creative and healthy snacks here is to give parents plenty of ideas on how to present a healthy meal in a FUN way.

I also love sharing other resources that are out there so that you, dear reader, can have a great arsenal of tricks up your sleeve to encourage your kids along their journey of  nourishing their bodies by learning to make healthy food choices.  As kids get older, not only do they have more independence when it comes to preparing their own meals, they also develop more specific tastes.  Sometimes, kids can decide that they do not like something that they used to really enjoy eating.  It’s in situations like this that you need to pull out a secret tool for getting them to eat healthy.

Kitchen Club Kids has created a collection of story books that contain healthy recipes for kids.  The recipes are designed to be able to be prepared by kids of any age.  Each recipe is full of healthy ingredients like fruits and vegetables.  The objective is to create an experience for children in reading a fun story, planning a recipe out, making the recipe, and then enjoying a healthy snack!  Sounds like a total win to me!

Kitchen Club Kids sent us the End of the Rainbow Fruit Salad book to try out share our thoughts with you.  Here was our experience:

The day the book arrived at our doorstep, the girls saw that it was a new book for them.  The colors and images immediately grabbed their attention.  Grace, (almost 6), read the story to herself and then to her younger sister.  She asked if we were going to make the fruit salad from the book that day.  I told her that we were going to do a special shopping trip first to collect the ingredients for the salad, and that she would be in charge of making the grocery list!  This was a great way to give her even more ownership of the experience.

Shopping for Ingredients

We took the list Grace had written up and went to our local grocery store.  The items that are checked off in the photo above are the items we had on hand already in the house.  She listed every ingredient in the recipe on her paper, then checked to see what we had and what we still needed.

The girls loved going shopping for their own ingredients to make their own special recipe.  I know that Grace felt just like her mommy here, because she has been on many grocery runs with me as I go through my own list.  Shopping was a fun and vital part of the fun of this recipe-making experience for us.

Preparing the Ingredients

Back at home, Grace read the story one more time as we collected each item needed for our fruit salad.  We made sure each item was on the table ready to go as it was mentioned in the book.


Making the Salad

We lined the ingredients up on the table from right to left in the order they appeared in the story.  I did the cutting and slicing, and they did the rest! 
One of the most interesting ingredients in this fruit salad recipe is papaya.  Do you know that, in all of my years of being crazy for fruits and veggies, I have never purchased papaya?  The girls were fascinated by the big, shiny black seeds inside.  They loved scooping them out on their own.  Papaya tastes AMAZING, by the way! 

The combination of ingredients in this fruit salad recipe is absolutely delicious.  Some of the items in the recipe are not ones that I typically add to fruit salad, (like kiwi, papaya, and cherries), but I must say that the flavor combination is absolutely delicious!  The colors are beautiful too!  The kids could help me make this fruit salad again and again.  It would be fun to make it for a wedding or baby shower.

Time to Eat

The girls and I LOVED this yummy salad.  Grace was thrilled to have completed this delicious project basically all by herself.

A Family Affair

I mentioned recently in one of my Instagram photos that I was struck by how fast time is going, and that some days I wish I could just hit the pause button.  As my girls grow up, I am realizing how important it is to “fill their love tank” each day by giving them some focused attention and really listening to how they feel.  An experience like this is a bonding opportunity as well as a time to create a beautiful, healthy dish we can be proud of.  Make sure you head over to Kitchen Club Kids to learn more about them, and maybe pick up a couple copies of their healthy recipe story books!

Filed Under: books

Breakfast Made Beautiful

February 25, 2014 by Amy Hudson

Here at Creative Kid Snacks, we make a lot of funny food and plate art.  Breakfast can be made to look like Hello Kitty, The Very Hungry Caterpillar, a snail, a whale, or even Mickey Mouse.

Sometimes, however, a simple yet beautiful presentation is all it takes for your children to know that they are special and that you value spending time with them in the morning.  This breakfast would be sweet to serve in the morning after a sleepover party, or as a tea party meal.  Perhaps a Saturday morning family breakfast?  It would also be a great way to simply say, I am glad we get to spend the day together.

This breakfast features healthy, vitamin-packed fruits and protein-rich eggs.  Eating a meal like this for breakfast will help the kids to have the energy they need throughout the whole morning.

Ingredients:

Fresh fruit (grapes, strawberries, raspberries, and blueberries)

Eggs and country ham

Cheddar cheese (optional for the scrambled eggs)

Directions:

Scramble eggs and diced country ham.  Top with cheddar cheese if desired.  Spoon into small bowl or ramekin in the center of a plate.  Slice grapes and strawberries in half so that they will lay flat on the plate.  Arrange them in a beautiful floral pattern around the eggs – or use any design you like.  The end result will be a beautifully appealing, healthy breakfast.

Health Benefits of this Dish:

Eggs are considered to be one of the most perfect sources of protein.  Protein is vital for kids to enjoy sustained energy throughout the day and build muscle as they grow.  Some people worry about the cholesterol found in eggs.  As I learned from this Cholesterol article by The Exercise Coach (where I love to work out), cholesterol is not what causes heart disease.  I was surprised to learn that it is actually sugar, which causes inflammation, which leads towards all of the problems related to heart disease.  It is far better for you to eat an egg than to eat a bowl of sugary cereal.  SOO much better!

Raspberries are higher in fiber than even blueberries.  They are a great source of antioxidants, and can even help to regulate your mood.  Check out this article to learn more.

Blueberries are another antioxidant-rich superfood, boasting a low glycemic index, and providing an excellent source of vitamin K.  Read more here.

Did you enjoy today’s snack?  Learn more about this blog here.

Filed Under: blueberries, breakfasts, eggs, grapes, ham, raspberries, strawberries Tagged With: blueberries, Breakfasts, Eggs, grapes, ham, Raspberries, Strawberries, super healthy

Volcano Lunch

February 8, 2014 by Amy Hudson

My daughter (5 years old), is really into volcanoes.  She likes to study them, watch videos online about them, and find out all about how they work.  For awhile, she was saying that she wanted to be a geologist when she grew up!  We had made a volcano lunch last year, (click right here to see it), but I decided it was time for an upgrade to that version.

Volcano Lunch

Volcano Lunch - creative way to teach kids about how volcanoes work during lunch time!

This updated version of our volcano has more veggies and healthy ingredients than our first one.  The volcano itself is a grilled cheese sandwich (well, the equivalent of half of a sandwich as it was sliced into a triangle shape) – and this is because my girls are just crazy about grilled cheese.  I try to buy organic cheddar cheese and minimally processed bread to use in their sandwiches.  Place thinly sliced red pepper atop the volcano to look like lava.  Fresh red bell pepper is packed with vitamins and has a sweet, refreshing taste that my kids really like.  The “ground” beneath the volcano is made up of avocado, which is a great source of healthy fat and considered a superfood.  A sliced boiled egg as the sun in the sky will provide some good protein, and thin strips of baby carrot provide the sun’s rays.

Make Your Own Volcano

 When my daughter Grace first heard about lava on a Disney show called “Little Einsteins”, she suddenly wanted to know everything about it.   I explained to her how a volcano works, talked about the magma underneath the earth’s surface and all of the details about how pressure forms inside the volcano until it erupts.  She asked tons of questions, and that evening when we got home she asked to watch videos of lava.


Thanks to Youtube, we were able to see all kinds of lava flows.  This was one of my favorite ones (if your kiddo is into volcanoes too).  Or, check out these great general videos on how volcanoes work.

After several days on the lava bandwagon, I had the idea to actually make a volcano with her.  Why not right?

 Here is what we made, followed by some instructions on how to make your own:

Volcano Lunch - creative way to teach kids about how volcanoes work during lunch time!

Materials to gather:

Cardboard

Plastic (disposable) cup, cut down to half it’s original height

2 teaspoons baking soda

4-5 drops of red food coloring

1/4 – 1/2 cup vinegar (any kind)

Large surface to catch the flowing “lava”

Directions:

First, build a “volcano”.   

We used a cardboard box, (rolled up and taped together), but you could mold one out of play-dough, use paper maché, or even a mound of real dirt.

Next, place a small cup inside the top hole.  The cup should sit snugly in the opening at the top of the volcano.  I used a plastic cup that I cut to be shorter (about the size of a cup measurement).  The cup is where your explosion ingredients are mixed.

Add 2 teaspoons of baking soda.

Next, add 4-5 drops of red food coloring.

Finally, take about 1/4 cup of vinegar and slowly pour into cup over the baking soda.  

The explosion fizzes out and runs all the way down the volcano.

The “lava” is red because the food coloring mixes with the baking soda as the eruption happens so no need to mix the food coloring all the way through.

Have fun learning all about volcanoes, and then eating one!

Volcano Lunch - creative way to teach kids about how volcanoes work during lunch time!

Tell me what some of your favorite “experiments” or learning activities are for the kiddos.  I know you all have great ideas!  Feel free to link to a post you wrote about it in your comment.  I’d love to check it out!

Filed Under: lunches, nature, Science, volcano Tagged With: avocado, carrots, education, Eggs, Lunches, nature, red pepper, Science, teaching and learning, volcano

Healthy Peacock Snack

January 28, 2014 by Amy Hudson

A cute little peacock is a wonderful way to serve all sorts of colorful, healthy food by using it in his beautiful tail.  Awhile back we made this version of a peacock, but I thought he was due for an upgrade!  This version is even healthier than the other, as it is grain free and features veggies that are packed with vitamins and lots of great fiber.

Healthy Peacock Snack

A cute way to serve veggies and hummus!  Get the kids excited to eat healthy food this way!  Many more ideas on creativekidsnacks.com - great resource!

To make this snack, all you will need will be hummus, and some beautifully colored vegetables.  Simply chop up some veggies (we used carrots, cucumber, celery, and red pepper) and spoon your hummus into a plastic baggie.  You will snip the end off of one corner of the plastic baggie to use as a piping bag, and you will draw the peacock’s body with it.  Use the simple shape shown above.  You can check out our Cucumber and Hummus Cupcake post to get more details about this step and see hummus used in another creative way!

Next, arrange your veggies as shown for the tail.  Use two thin slices of a baby carrot for feet, several thin slices of red pepper for head feathers, and an almond for an eye.

I liked the idea of adding some additional protein to this snack, so I made a little ground out of almonds for our peacock friend to walk on.

A cute way to serve veggies and hummus!  Get the kids excited to eat healthy food this way!  Many more ideas on creativekidsnacks.com - great resource!

Whichever version you create at home, this snack is sure to be a fun and super HEALTHY one!

Make sure you don’t forget to check out:

Cucumber and Hummus Cupcakes

Our favorite ANIMAL snacks

What is your favorite hummus flavor?  Do you go for original or do you love the different versions out there?

Leave a comment below!

Filed Under: Uncategorized Tagged With: animals, Carrot, Celery, cucumber, hummus, peacock, red pepper, super healthy

Today I Ate A Rainbow

January 21, 2014 by Amy Hudson

Healthy eating is a huge deal for us in our house.  One of the reasons I started this blog was to empower moms and dads to present HEALTHY food in creative ways to get the kids excited about eating it.  The habits kids develop at a young age stay with them as they grow older.

Kia, from Today I Ate A Rainbow, is an awesome mom who also believes in healthy eating.  I am so excited to introduce her Today I Ate A Rainbow Kit to you today as a powerful tool to encourage kids along the journey of trying new healthy foods in all the colors of the rainbow.

rainbow kitThe kit includes a great magnetic chart naming lots of foods that represent the various colors of the rainbow.  Kids can see the items within each column and use the rainbow tracking magnets to mark off as they eat foods in each color category.  There are also other achievement cloud magnets included in the kit along with a cute book called “The Rainbow Bunch” to read as a way to introduce the fun new chart into your kitchen!

We received the kit from Kia, and I was so excited to see how my girls would like to use it.  I know my oldest loves to keep track of things on charts, and celebrate achievements, big and small.

Get your kids ASKING to eat their fruits and veggies.  Today I Ate a Rainbow Kit Giveaway ends Monday, January 27, 2014.  Find out how this works, and win one for yourself!

We opened up the kit, and immediately the girls were interested in what was in there.  They looked through the book called “The Rainbow Bunch”, then they started punching out each of the magnets for keeping track of colors as they are eaten.

The magnets are thick and very high quality.  This product is meant to live in the kitchen and withstand lots of touching, picking up, and moving around!

We brought our chart to the fridge, and placed the colored shapes beneath the rainbow chart.  There are four different shapes of each color in the rainbow included in the pack, so that up to four people can keep track of what they’ve eaten.

Right away, the girls talked about what they had already eaten that day (for breakfast), and marked off the colors of foods they ate earlier.  They both looked at the chart and let me know that they (urgently!) needed to eat the rest of the colors.  Grace actually ASKED for spinach and blueberries!  These are two superfoods and I was thrilled to give them to her.

The chart held it’s appeal over the coming days and weeks.  One day, we decided to make these for lunch:

Rainbow Parfait - perfect way to get the kids to eat a rainbow of fruits in one snack!

These healthy parfaits are made out of the following ingredients:

fresh organic strawberries

mango

banana

green grapes

blueberries

plain, organic yogurt (you could substitute Greek for added protein)

Cocounut Chia Granola (optional) – available at Costco

Rainbow Parfait - perfect way to get the kids to eat a rainbow of fruits in one snack!

Slice and prep all of the ingredients on a cutting board.  As the kids prepare to build their own parfait, talk about the colors of the rainbow:

What is the first color of the rainbow? (Red)

What fruit are we using for our red color? (Strawberries)

Can you name some other red foods?

Which one is your favorite?

After each layer of fruit, one scoop of yogurt is placed into the cup.  At the end of the process, add one final scoop of yogurt and allow the kids to scoop their own granola on top with a spoon.  Since we were using PLAIN yogurt, the kids enjoyed the subtle sweetness of the coconut chia granola we found at Costco.  This stuff is delicious.  Read all about the health benefits of Chia to find out why it was a great addition to this snack.

After the snack was complete, the girls marked off the colors they ate on their rainbow chart.   Take a look!

Moms, I HIGHLY recommend getting a Today I Ate A Rainbow Kit for your own home.  Use PROMO CODE: “healthy” to get 25% your purchse!   This is a product that truly works wonders and may be that little motivation your child needs to finally start desiring those wonderful fruits and veggies.  It can’t be stressed enough that the vitamins, antioxidants, phytonutrients, and minerals in fruits and veggies REALLY DO make and keep us healthy.  Dr. Mark Hyman even wrote a book called “Eat Your Medicine”, suggesting that we can actually keep ourselves healthy by getting the necessary immune boosting power from the fruits and veggies we were designed to eat.  Check out his post called Eat Your Medicine: Food As Pharmacology and notice that he, too, suggests getting these medicinal benefits from a rainbow of fruits and veggies.

Win your own Rainbow Kit

Get your kids ASKING to eat their fruits and veggies.  Today I Ate a Rainbow Kit Giveaway ends Monday, January 27, 2014.  Find out how this works, and win one for yourself!

a Rafflecopter giveaway

Take a look at some other creative snacks we’ve made including super healthy fruits and veggies!

Rainbow lunch

Shapes lunch

Baa Baa, Black Sheep

Under the Sea

Butterfly Snack / The Very Hungry Caterpillar (one post)

Cucumber and Hummus Cupcakes

Grover

Snail Breakfast

Filed Under: Uncategorized

Why I Do Themed Birthday Parties

January 17, 2014 by Amy Hudson

(thecelebrationshoppe via Amy on Pinterest)
So, your two year old is about to turn three.  You’ve got about a month before the big day. 


You want to have the birthday party at home, since renting out one of those great bounce houses, dance studios, or fancy makeover places for little ones is way beyond your budget.


How can you make a party at home special while making the planning even easier on yourself?


Do a themed party.


I’ve done themed parties with my girls ever since they started having birthdays.


I decide on a theme based on what the child is interested in at that point, or based upon the time of year it is, and go for it.  Once you choose a theme, invitations are a breeze to pick out or design yourself.


The design of the cake becomes clear.  No more asking yourself, “what do I want the cake to say or look like?”


The decorations become more focused and more fun.  Check out how Manda at Once Upon My Life decorated her house for her child’s “Vintage Circus” themed birthday party.


You can choose party favors quickly and decisively to go along with your theme.  No more wandering the dollar store aisles wondering what the kids might like.


Even the food served is more fun to prepare.  (Check out our healthy birthday party food for Ninja Turtles, Princesses, Daniel Tiger, Minnie Mouse and Strawberry Shortcake).  You can use your creativity with what is served based upon the party theme.


Why Doing Themed Birthday Parties for Kids May Actually Be Easier Than a Non-Themed One. #parenting


Overall, a birthday party is easier and more fun to throw than a non-themed one.  Try it next time and let me know if I’m telling you the truth!


Check out the Pinterest board I created for you with tons of themes for you to try!


Have you done themed birthday parties for your kids?  Which one do you think was your most successful?  I’d love to hear your stories!


Filed Under: Uncategorized Tagged With: Parenting

Daniel Tiger Birthday Party Ideas {Healthy Foods}

January 10, 2014 by Amy Hudson

Lots of kids love Daniel Tiger’s Neighborhood on PBS and Sprout.  The show teaches kids valuable life lessons using simple songs repeated throughout each episode by the characters as they learn a lesson about life.  Many of my friends have children who watch the show, and I know of several people planning a Daniel Tiger themed birthday party for their child’s next celebration.

Healthy Ideas for a Daniel Tiger Birthday Party

Daniel Tiger Clementines

Daniel Tiger Clementine Oranges - perfect healthy snack to serve at a Daniel Tiger Birthday Party!

Kids love to eat clementine oranges.  Make these cute little Daniel Tiger oranges by using a black food marker to draw Daniel Tiger’s face onto each orange.  Start with the eyes, making little arches, then add the eyeballs, nose, whiskers, and mouth.  Draw ears where they are still visible when looking at the orange straight on, and, lastly, add some tiger stripes.  Daniel has three on his forehead and two on his cheeks.  Here’s a closer look:

Daniel Tiger Clementine Oranges - perfect healthy snack to serve at a Daniel Tiger Birthday Party!

Clementies are packed with Vitamin C, and are a great healthy item to put out at a Daniel Tiger Birthday Party.

Katerina KittyKat Bagels

Daniel Tiger Katerina Kittykat - cute open faced bagel snack to serve at a Daniel Tiger Birthday Party

Use mini bagels for kids, or even English muffins as they are a great size and nicely thin – to make Katerina Kittykats.  Spread cream cheese over each bagel, then take a good knife and slice out two ears and the top of her head from the top of the bagel.  Next, slice some green grapes into thin sections, and slice the bottom section off of the oval you will have after slicing.  Lay that onto the bagel for the base of Katerina’s eyes.  Next, add small raisins or dried blueberries to look like Katerina’s eyes.  For her nose and mouth, Add thinly sliced bits of a red apple.  Slice a thin section off of a red apple, then cut a triangle and two thin strips and lay onto bagel to look like Katerina’s nose and mouth.

Prince Wednesday’s Castle

Prince Wednesday's Castle - fun to serve at a Daniel Tiger Birthday Party!

I have shared this castle in the past on this blog as a great idea to make for a Princess themed birthday party, but it would also be great to serve with a little sign in front of the tray that says “Prince Wednesday’s Castle”.  Simply make a simple turkey sandwich, (or PB&J’s to make it easy for a birthday party), and slice little squares out of the top of the sandwich.  Finish the look by adding some cheese on top to look like doors and windows.  If you are serving a larger group, you can skip the flags all together, or use some toothpick flags for a cute presentation.

Prince Wednesday’s Crown

Daniel Tiger Birthday Party Idea:  Prince Wednesday's Crown

These little guys are also from my Princess Birthday Party post, but here is how to make them.

Simply purchase a package of sliced cheddar cheese.  Use a firm cheese, (so not packaged American cheese) so that you will be able to cut it into the shape of little crowns.  I made 6 little crowns to show you, and for those I only needed 3 cheese slices.  Lay 3 slices on top of each other, then slice in half.  Next, on one stack of 3 halves, take your knife and slice little triangles out of the tops.  Carefully separate.  Repeat with the other 3 halves, and continue until you have the desired amount.

More Awesome Daniel Tiger Party Ideas

Easy and pretty Daniel Tiger Pretzel Rods from PBS Parents

Screen shot 2014-01-10 at 3.14.55 PMDaniel Tiger’s Neighborhood Bingo Cards from TrulyBillEve on Etsy

Screen shot 2014-01-10 at 3.22.42 PMI like the idea of serving the food atop a table decorated like the trolley like this mini version from Life at Third Creek Cottage.  You could decorate a large table to look like a trolley by using a large white box or poster boards and drawing the trolley wheels and red dividing columns.

Screen shot 2014-01-10 at 3.19.29 PMDaniel Tiger Masks from PBS Parents

If you enjoyed this post, you might like to check out our other TV Show inspired food, along with our other Birthday Party themed food ideas.

Filed Under: Uncategorized Tagged With: birthday, Birthday Parties, Daniel Tiger's Neighborhood, TV shows

3 kings

December 20, 2013 by Amy Hudson

The 3 kings, or reyes magos as I used to teach about in Spanish class, are an integral part of the Christmas story.  As we celebrate this special time, mixed with all of the fun holiday food we make are those snacks that remind us of the true meaning of Christmas.

Matthew 2: 1 – 12 tells the story of the Magi, or wise men from the east who came to worship Jesus because they saw the star of Bethlehem shining in the sky.
After Jesus was born in Bethlehem in Judea, during the time of King Herod, Magi from the east came to Jerusalem 2 and asked, “Where is the one who has been born king of the Jews? We saw his star when it rose and have come to worship him.”
3 When King Herod heard this he was disturbed, and all Jerusalem with him. 4 When he had called together all the people’s chief priests and teachers of the law, he asked them where the Messiah was to be born. 5 “In Bethlehem in Judea,” they replied, “for this is what the prophet has written:
6 “‘But you, Bethlehem, in the land of Judah,
are by no means least among the rulers of Judah;
for out of you will come a ruler
who will shepherd my people Israel.’”
7 Then Herod called the Magi secretly and found out from them the exact time the star had appeared. 8 He sent them to Bethlehem and said, “Go and search carefully for the child. As soon as you find him, report to me, so that I too may go and worship him.”
9 After they had heard the king, they went on their way, and the star they had seen when it rose went ahead of them until it stopped over the place where the child was. 10 When they saw the star, they were overjoyed. 11 On coming to the house, they saw the child with his mother Mary, and they bowed down and worshiped him. Then they opened their treasures and presented him with gifts of gold, frankincense and myrrh. 12 And having been warned in a dream not to go back to Herod, they returned to their country by another route.
The 3 magi, or 3 kings as they became popularly known, traveled and offered their gifts to baby Jesus.  It is believed that their being called kings is due to Psalms 72:11, “May all kings fall down before him”.
I’ve always been a huge fan of the images that portray this story with a scene that focuses on the starry sky and the men in the forefront of the image as sillouettes.  Here is an example.
(via)
Once I found out that the animal crackers I bought from Target contained camels,  I knew I had to make this snack!
To make the 3 kings snack, I started by placing the camels onto the plate.  Next, I took some deli ham and rolled it into three small triangular shapes to look like the men’s robes.  Next, I took one baby carrot and sliced the round edges off lengthwise so it would lay flat, and cut it into a square for the head.  (I made the head square in order for the crown to look like it lays flat).  Lastly, I cut a slice of cheddar cheese for the large star and the crowns.  It took some patience to slice the little sections out of the top of the slice (for the points on the crowns), but the end result made it all worth it!
Oh, and the stars were made by this trusty method that I love to use:


(Sharing HERE)


Filed Under: 3 wise men, cheese, christmas, yogurt Tagged With: 3 wise men, Biblical, cheese, Christmas, yogurt

« Previous Page
Next Page »

I'm Amy. One of my passions is serving my two little girls healthy, wholesome food in unexpected ways. Lunch time has become a time of learning, imagining, and bonding for us as we use great food to create little works of art... Read More…

facebooktwitterpinterest instagram google+

Tags

animals Apple avocado banana Biblical Birthday Parties blueberries Books Breakfasts carrots Celery cheese Christmas cottage cheese desserts Disney Easter educational Eggs everyday scenes grapes ham history Holidays Lunches movies nature Oatmeal Party Food peanut butter peanut butter sandwich raisin Raspberries Snacks snowman Sports Strawberries super healthy teaching and learning turkey TV shows Valentines Day Weekly Kids Co-op Winter yogurt

Best of

Best Of

Copyright Note

Please feel free to use any of these ideas with your children at home, school, church, or anywhere you are inspired to make fun of lunch. If you would like to share a post on a blog or site, you may use one picture so long as you include a link to the original post. Please do not re-post the whole article or distribute printed-out content without written permission from the original author.

Grab our button!

Creative Kid Snacks Button

© Copyright Creative Kid Snacks · Design & Development by 4th & Market