• Home
  • New? Start Here!
  • Holidays
  • Parties
  • Contact
  • Facebook
  • Twitter
  • Pinterest
  • Google+
  • Instagram

Creative Kid Snacks

make fun of lunch!

  • Breakfasts
  • Lunches
  • Dinner
  • Snacks
  • Desserts

Breakfast Made Beautiful

February 25, 2014 by Amy Hudson

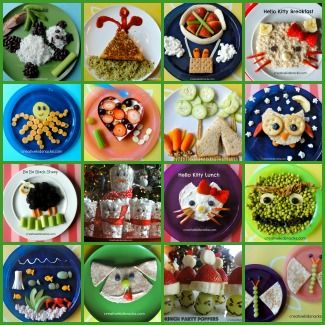
Here at Creative Kid Snacks, we make a lot of funny food and plate art.  Breakfast can be made to look like Hello Kitty, The Very Hungry Caterpillar, a snail, a whale, or even Mickey Mouse.

Sometimes, however, a simple yet beautiful presentation is all it takes for your children to know that they are special and that you value spending time with them in the morning.  This breakfast would be sweet to serve in the morning after a sleepover party, or as a tea party meal.  Perhaps a Saturday morning family breakfast?  It would also be a great way to simply say, I am glad we get to spend the day together.

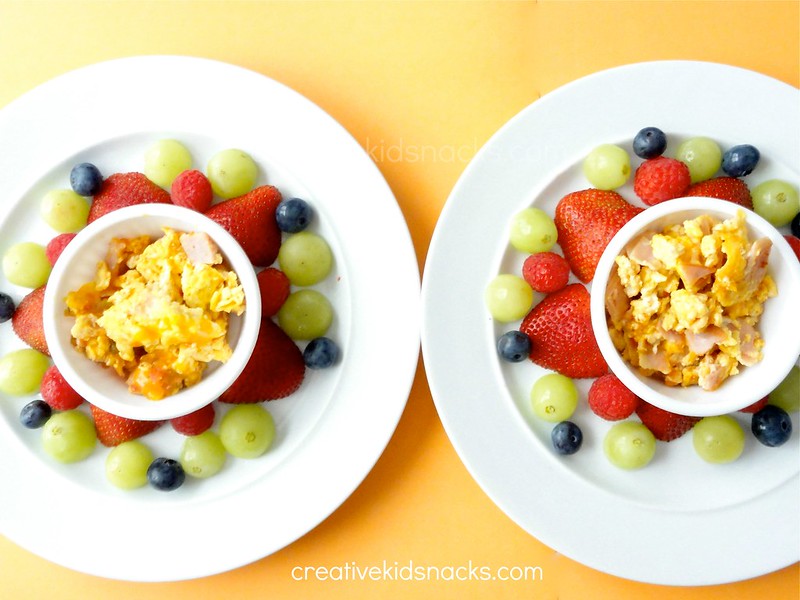
This breakfast features healthy, vitamin-packed fruits and protein-rich eggs.  Eating a meal like this for breakfast will help the kids to have the energy they need throughout the whole morning.

Ingredients:

Fresh fruit (grapes, strawberries, raspberries, and blueberries)

Eggs and country ham

Cheddar cheese (optional for the scrambled eggs)

Directions:

Scramble eggs and diced country ham.  Top with cheddar cheese if desired.  Spoon into small bowl or ramekin in the center of a plate.  Slice grapes and strawberries in half so that they will lay flat on the plate.  Arrange them in a beautiful floral pattern around the eggs – or use any design you like.  The end result will be a beautifully appealing, healthy breakfast.

Health Benefits of this Dish:

Eggs are considered to be one of the most perfect sources of protein.  Protein is vital for kids to enjoy sustained energy throughout the day and build muscle as they grow.  Some people worry about the cholesterol found in eggs.  As I learned from this Cholesterol article by The Exercise Coach (where I love to work out), cholesterol is not what causes heart disease.  I was surprised to learn that it is actually sugar, which causes inflammation, which leads towards all of the problems related to heart disease.  It is far better for you to eat an egg than to eat a bowl of sugary cereal.  SOO much better!

Raspberries are higher in fiber than even blueberries.  They are a great source of antioxidants, and can even help to regulate your mood.  Check out this article to learn more.

Blueberries are another antioxidant-rich superfood, boasting a low glycemic index, and providing an excellent source of vitamin K.  Read more here.

Did you enjoy today’s snack?  Learn more about this blog here.

Filed Under: blueberries, breakfasts, eggs, grapes, ham, raspberries, strawberries Tagged With: blueberries, Breakfasts, Eggs, grapes, ham, Raspberries, Strawberries, super healthy

Volcano Lunch

February 8, 2014 by Amy Hudson

My daughter (5 years old), is really into volcanoes.  She likes to study them, watch videos online about them, and find out all about how they work.  For awhile, she was saying that she wanted to be a geologist when she grew up!  We had made a volcano lunch last year, (click right here to see it), but I decided it was time for an upgrade to that version.

Volcano Lunch

Volcano Lunch - creative way to teach kids about how volcanoes work during lunch time!

This updated version of our volcano has more veggies and healthy ingredients than our first one.  The volcano itself is a grilled cheese sandwich (well, the equivalent of half of a sandwich as it was sliced into a triangle shape) – and this is because my girls are just crazy about grilled cheese.  I try to buy organic cheddar cheese and minimally processed bread to use in their sandwiches.  Place thinly sliced red pepper atop the volcano to look like lava.  Fresh red bell pepper is packed with vitamins and has a sweet, refreshing taste that my kids really like.  The “ground” beneath the volcano is made up of avocado, which is a great source of healthy fat and considered a superfood.  A sliced boiled egg as the sun in the sky will provide some good protein, and thin strips of baby carrot provide the sun’s rays.

Make Your Own Volcano

 When my daughter Grace first heard about lava on a Disney show called “Little Einsteins”, she suddenly wanted to know everything about it.   I explained to her how a volcano works, talked about the magma underneath the earth’s surface and all of the details about how pressure forms inside the volcano until it erupts.  She asked tons of questions, and that evening when we got home she asked to watch videos of lava.


Thanks to Youtube, we were able to see all kinds of lava flows.  This was one of my favorite ones (if your kiddo is into volcanoes too).  Or, check out these great general videos on how volcanoes work.

After several days on the lava bandwagon, I had the idea to actually make a volcano with her.  Why not right?

 Here is what we made, followed by some instructions on how to make your own:

Volcano Lunch - creative way to teach kids about how volcanoes work during lunch time!

Materials to gather:

Cardboard

Plastic (disposable) cup, cut down to half it’s original height

2 teaspoons baking soda

4-5 drops of red food coloring

1/4 – 1/2 cup vinegar (any kind)

Large surface to catch the flowing “lava”

Directions:

First, build a “volcano”.   

We used a cardboard box, (rolled up and taped together), but you could mold one out of play-dough, use paper maché, or even a mound of real dirt.

Next, place a small cup inside the top hole.  The cup should sit snugly in the opening at the top of the volcano.  I used a plastic cup that I cut to be shorter (about the size of a cup measurement).  The cup is where your explosion ingredients are mixed.

Add 2 teaspoons of baking soda.

Next, add 4-5 drops of red food coloring.

Finally, take about 1/4 cup of vinegar and slowly pour into cup over the baking soda.  

The explosion fizzes out and runs all the way down the volcano.

The “lava” is red because the food coloring mixes with the baking soda as the eruption happens so no need to mix the food coloring all the way through.

Have fun learning all about volcanoes, and then eating one!

Volcano Lunch - creative way to teach kids about how volcanoes work during lunch time!

Tell me what some of your favorite “experiments” or learning activities are for the kiddos.  I know you all have great ideas!  Feel free to link to a post you wrote about it in your comment.  I’d love to check it out!

Filed Under: lunches, nature, Science, volcano Tagged With: avocado, carrots, education, Eggs, Lunches, nature, red pepper, Science, teaching and learning, volcano

Resurrection Eggs

February 27, 2013 by Amy Hudson

The following post is something originally seen on my other blog, Sugar and Spice.  I started it in 2011 and it is where I first blogged about the creative snacks I had started making for my daughter.  Those snacks became so popular that they morphed into their own blog, which is Creative Kid Snacks.

I decided to post this entry here today because Easter is coming up, and this idea is a great way to use Easter egg coloring to teach the real Easter story to your kids.  I hope you enjoy!

Are you looking for a way to include the real story of Easter in your egg-coloring this year?
I would highly recommend making Resurrection Eggs!  I had the idea last year to make them and they worked so well as a teaching tool and as a way to incorporate the real Easter story, that they are now a mainstay of our Easter festivities.

To make them you will need:

1) Regular egg-dying supplies (i.e. a kit from the grocery store)
2) Colorful tissue paper (available at the Dollar Store)
3) Glue – any kind
That’s it!
You will make 4 eggs.  As shown in the picture above (from left to right), you will make (1) a passover egg, (2) a cross egg, (3) a tomb with the stone rolling away egg, and (4) a heaven egg.

Process:

1) Dye your eggs first and let them dry.  Choose colors against which the tissue paper you are using will pop.  This coming year I will change the first egg’s backdrop color to a pale orange, I think.
2) Cut out your tissue paper to make the shapes shown above.
 – Passover egg will be a red goblet and a yellow loaf of bread.
 – Cross will be a red cross shape to also represent that Jesus bled while on the cross as our sacrifice
 – The tomb will be a wide square with an archway cut out of the middle.  You will also need a large circle for a boulder.
 – Heaven will be a long blue cloud with yellow beams coming out.
3) Glue tissue paper onto eggs as shown and let dry.

Explanation for each egg:

Passover Egg:  Jesus had a final meal with his disciples called a Passover meal.  He explained to his disciples God’s plan to save the world from their sins through Jesus.  Jesus was going to have to die on a cross.  Jesus told the disciples to eat the bread and remember his body that would be broken for them and drink from the cup and remember the blood that he would shed on the cross.

Cross Egg:  Jesus was crucified on a cross.  The cross is red to show that Jesus bled and died on the cross.  When Jesus died on the cross, he paid the price for our sins by dying in our place.  Jesus never sinned.  He was perfect and took the punishment for all of our sins upon himself so that we could be forgiven.

Tomb Egg:  Jesus’ body was placed in a tomb and it stayed there for 3 days.  On the third day, Jesus rose from the dead!  The stone was rolled away by angels, and when the women came looking for Jesus, the angel said, “He is not here; He has risen!”.  When Jesus rose from the dead it showed that he was who he said he was because he conquered death and that he had the power to forgive us from our sins.

Heaven Egg:  Because of the Easter story, we will be with God in heaven when we die.  Heaven will be a beautiful place filled with joy because we will be with God and see all of his glory!

(You can use your own words, of course, but that is roughly how we explained it last year).

How to involve the kiddos:

1) Ask your child to hand you each shape as you are ready to glue it on.  As you glue it on, explain its meaning.  Repeat this with all 4 eggs.
2) Go over the story again once the eggs are lined up.  Take out your children’s bible (here’s ours), and read the Easter story.  Have the kids point to the eggs being talked about.
3) Before Easter, have your kids tell a friend or relative about the resurrection eggs they made and each of their meanings.
4) On Easter morning, hide the eggs around the house, and have the kids find them and bring them back together before breakfast is served and Easter baskets are invaded.
5) Pray together as a family and thank God for each aspect of the Easter story.
6) Ask your child which egg is their favorite and why.
7) If your child is into hard boiled eggs, allow them to eat that one on Sunday morning as part of breakfast.
Surely you will come up with even more of your own great ideas for the Resurrection Eggs.  I’d love to hear what you do with them if you try them!
Happy (early) Easter to you!

(Sharing HERE)

Did you enjoy today’s snack?  Learn more about this blog here.

Filed Under: biblical, Easter, eggs, holidays Tagged With: Biblical, Easter, Eggs, Holidays

Angels we have heard on high

December 26, 2012 by Amy Hudson

This healthy and fun little snack celebrates the birth of Jesus as recorded in Luke 2:8-14.  Read the story of the angel choir appearing in the heavens to announce that baby Jesus had been born, and then make this snack to continue the celebration!


“And in the same region there were shepherds out in the field, keeping watch over their flock by night. And an angel of the Lord appeared to them, and the glory of the Lord shone around them, and they were filled with great fear.  And the angel said to them, “Fear not, for behold, I bring you good news of great joy that will be for all the people.  For unto you is born this day in the city of David a Savior, who is Christ the Lord.  And this will be a sign for you: you will find a baby wrapped in swaddling cloths and lying in a manger.”  And suddenly there was with the angel a multitude of the heavenly host praising God and saying,
 “Glory to God in the highest,
    and on earth peace among those with whom he is pleased!”  

Luke 2: 8-14


Ingredients:

2 hard boiled eggs
2 baby carrots
1 t cottage cheese
2 raisins
1 strawberry
1/s banana
1 slice white cheese
1 t miracle whip or mayo

Directions:

Slice hard boiled eggs in half lengthwise.  Carefully remove yolk.  Place one half yolk onto top corner of plate for moon.  Place remaining yolk from the 2 eggs into a small bowl and mix with mayo.  Spoon mixture into a zip baggie with a corner sliced off, and set aside. 
Slice bottom off of egg white halves.  Use sliced off section to cut triangular arms/wings for the angels.  Arrange all on the plate as shown. 
Slice baby carrots in half lengthwise.  Slice in half again width-wise.  Use for shepherd’s bodies.  Slice one of the carrot quarters into thin strips for the shepherd’s arms and legs and arrange on the plate as shown. 
Slice little rectangles with tiny triangles sliced out for sheep’s legs.  Top with 1/2 teaspoon of cottage cheese each to look like sheep bodies.
Top angel’s bodies with banana slices for heads, then add raisin eyes and thin strips of strawberry for a smile.  Now take piping bag with egg mixture in it and pipe hair and halo for each angel. 
Use a pizza cutter to slice remaining slice of white cheese into lots of tiny pieces.  Sprinkle around the plate to look like stars.

Nutritional Benefits of this Snack:

Eggs are full of benefits, including being rich in protein, vitamin B, and omega-3’s.  See more about health benefits of eggs here.


Filed Under: banana, biblical, carrots, Easter, eggs Tagged With: Biblical, carrots, cheese, Easter, Eggs, raisins, Snacks

Grover

September 10, 2012 by Amy Hudson

Blueberries are known to be a superfood, containing lots of antioxidants, fiber, and other vitamins that are so beneficial for our kids.  

Why not have a great big serving by creating Grover the monster for our snack?  
This Grover was made on a 6 inch kids plate.  Make the eyes by slicing the sides (lengthwise) off of a hardboiled egg.  Cut a blueberry in half to lay it flat over each eye.  
Next, create Grover’s mouth using raspberries running from one end of the plate to the other.  Raspberries are also full of great vitamins like C, E, and A as well as magnesium and fiber, to name a few.
Add a sliced strawberry in the center of the plate for the nose, and fill the rest of Grover’s face in with blueberries. 
Blueberries are not number one on my daughter’s list of favorite fruits, but she ate every single one in this snack!  It’s truly a snack to feel great about giving to your little one!
Variations:
Use yogurt for the whites of Grover’s eyes 

(Linked HERE) 

Photobucket

Filed Under: blueberries, eggs, Grover, raspberries, snacks, strawberries, TV shows Tagged With: blueberries, Eggs, grover, Raspberries, Snacks, Strawberries, super healthy, TV shows

I'm Amy. One of my passions is serving my two little girls healthy, wholesome food in unexpected ways. Lunch time has become a time of learning, imagining, and bonding for us as we use great food to create little works of art... Read More…

facebooktwitterpinterest instagram google+

Tags

animals Apple avocado banana Biblical Birthday Parties blueberries Books Breakfasts carrots Celery cheese Christmas cottage cheese desserts Disney Easter educational Eggs everyday scenes grapes ham history Holidays Lunches movies nature Oatmeal Party Food peanut butter peanut butter sandwich raisin Raspberries Snacks snowman Sports Strawberries super healthy teaching and learning turkey TV shows Valentines Day Weekly Kids Co-op Winter yogurt

Best of

Best Of

Copyright Note

Please feel free to use any of these ideas with your children at home, school, church, or anywhere you are inspired to make fun of lunch. If you would like to share a post on a blog or site, you may use one picture so long as you include a link to the original post. Please do not re-post the whole article or distribute printed-out content without written permission from the original author.

Grab our button!

Creative Kid Snacks Button

© Copyright Creative Kid Snacks · Design & Development by 4th & Market