• Home
  • New? Start Here!
  • Holidays
  • Parties
  • Contact
  • Facebook
  • Twitter
  • Pinterest
  • Google+
  • Instagram

Creative Kid Snacks

make fun of lunch!

  • Breakfasts
  • Lunches
  • Dinner
  • Snacks
  • Desserts

Daniel and the Lions’ Den

December 16, 2013 by Amy Hudson

Daniel Chapter 6 tells the story of Daniel, a righteous, God-fearing jew who served as a high-ranking government official under king Darius.  Daniel did his job so well that king Darius planned to set him in charge of the whole kingdom.  Some of the other government administrators working alongside Daniel decided to find a way to get rid of Daniel.  They went to king Darius and presented him with the idea for a new law that said the people could pray to no god but the king.  The punishment for doing so would be to be cast into the den of lions.

Daniel heard about the decree, but continued to pray to his God.  He did not hide himself as he did so, but rather prayed in front of an open window, and was caught and charged before the king.  Since the law could not be repealed, the king reluctantly had to allow Daniel to be thrown into the lions’ den.

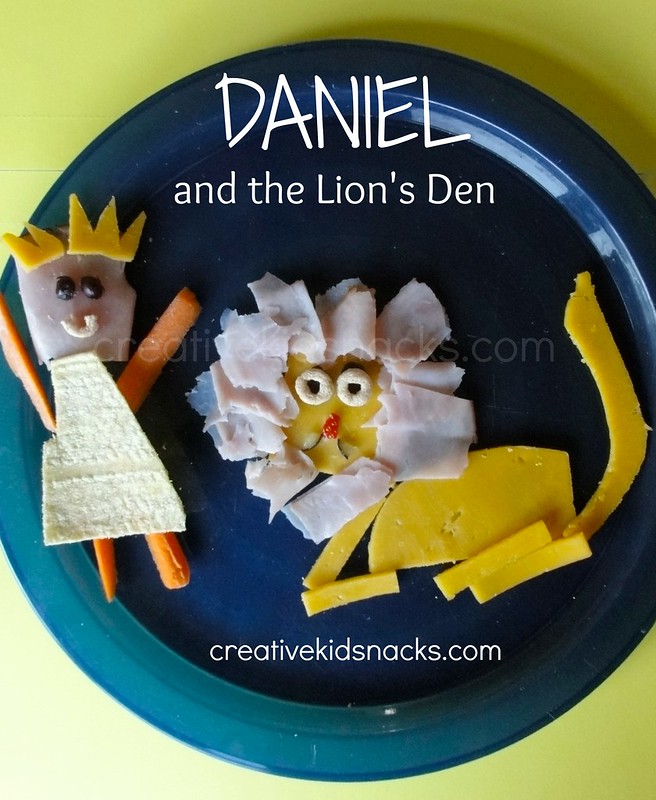
The next morning, the king, after a restless night’s sleep, rushed down to the lions’ den to see if Daniel’s God, whom he had always served so faithfully, had saved him.  When the stone that covered the top of the den was rolled away, the king saw this:

Ingredients:

1 slice cheddar cheese

1 piece sliced ham

1 tortilla

1 baby carrot

3 cheerios

1 black bean

a strawberry

a blueberry

Directions:

Slice the cheese into thin sticks for legs, one square for lion’s head, and body and tail shape as shown.  Slice some small triangles into remaining section for Daniel’s hair.  Fold the sliced ham into a rollup, then slice thin sections and lay around the lion’s head as shown to look like a mane.  Use remaining ham for Daniel’s face.  Slice a black bean in half and use for Daniel’s eyes along with a half of a Cheerio.  Place head atop a body made of carrot sticks and a tortilla.  Add cheerios, strawberry bit, and blueberry sections as shown for lion’s face.

Filed Under: Uncategorized

Gingerbread Man Bubble Bath

December 11, 2013 by Amy Hudson

Is there a cookie that is more Christmas-y than gingerbread?  Here at Creative Kid Snacks, we like to play with our food.  We like to keep our snacks healthy, educational, and fun.  Today’s snack is a Christmastime treat, so we will put it in the dessert category.  While you’re here, you might enjoy checking out some of our other fun Christmas creations!

Gingerbread Man Bubble Bath

Everyone likes a relaxing bubble bath, including gingerbread men.

To make this creation, my girls and I first followed the Betty Crocker gingerbread cookie recipe, and used our gingerbread man cookie cutters to cut them to size.

Next, we used this recipe for royal icing to pipe the sleepy eyes and smile on our gingerbread man’s face.  We chose to use royal icing because it stays put much better than a buttercream.

Once cooled and dried, we placed our gingerbread man into a mug filled with milk.  We used cold milk because we like to eat our cookies with nice cold milk.  If you like, you could also heat up the milk for a real “warm bath” for your gingerbread man.  You could even add a bit of fancy peppermint flavor syrup like you’d get from the coffee shop if you had some on hand!

Making the Bubbles

Next comes the fun part for the kids – making the bubbles!  To make the bubbles, place a straw into your milk and blow!   Blow until you have lots of beautiful white bubbles for your happy gingerbread man’s bubble bath!

Hot Tubbin’ It

You may also like the idea of letting your gingerbread man take a dip in a hot tub of warm cocoa.  Follow all of the same directions as before, but this time, add some hot chocolate mix or chocolate syrup to your warm milk before serving!

Helpful tips:

Make sure the cookie cutter you are using for your gingerbread man has his arms out to the sides as opposed to down closer to his body.  The ourstretched arms help the gingerbread man to rest comfortably in the mug as his arms hang over the sides.

Choose your mug carefully.  Allow enough room for his body to submerge but not too much room or else his feet will float in the milk and he will look like he is ready to fall out backwards from the mug.  If this happens, simply brace your gingerbread man with a straw or even a spoon before serving.

Blessings to your and your family this Christmas season!

Did you enjoy today’s snack?  Don’t forget to check out our Christmas snacks along with some of our other favorites.  You can learn more about this blog HERE.

Give the Gift of Gingerbread Blog Hop and Giveaway
Use the links below to hop from blog to blog 
to see these wonderful gingerbread themed recipes.
1. No Gingerbread Boy and Girl Cookie Pops by Kitchen Fun with My 3 Sons
2. Caramel Cocoa Egg Nog Custard Gingerbread Men by Hungry Happenings
3. Gingerbread Angle Ornament by Haniela’s
4. Gingerbread Men Bubble Bath by Creative Kid Snacks
5. Peeps Gingerbread Men Cookie Pops by Pint Sized Baker
6. Gingerbread Decorating Ideas by Living Locurto
7. Peanuts Gang Gingerbread Men by Sugar Swings
8. Gingerbread House Cookie Bites by The Decorated Cookie
9. Gingerbread Cookie Christmas Trees by Munchkin’ Munchies
10. Gingerbread Men Cookies by The Barefoot Baker
11. Gingerbread Sleigh Ride by the Partiologist
12. Mini Fudge Gingerbread Houses by Hoopla Palooza
13. Chocolate Gingerbread Cake by Bird on a Cake
14. Simple Gingerbread Christmas Trees by Sweet Sugar Belle
15. Gingerbread Cookie Cups by Creative Juice
16. Gingerbread Puppy Chow by Make Bake Celebrate
17. No Bake Gingerbread Heads by Party Pinching
18. Snowboarding Gingerbread Peeps by Sweet Simple Stuff
19. Gingerbread S’More Houses with Boozy Eggnog Marshmallow Filling by 1 Fine Cookie
20.Sugar Plum Gingerbread House by Miss CandiQuick

Thanks to our amazing sponsors, you have a chance to win all of these prizes:

Shabby Apple – Choice of a Dress (from a list) $100 value
Wilton – Gingerbread Decorating Prize Pack $50 value
Cheap Cookie Cutters – $50 Gift Card
Sweet Works – Candy Prize Pack $25 value
Easy Lunchboxes – lunch box set $22 value
Karen’s Cookies – $20 gift card
Sweet Simple Stuff – Cake Pop Prize Pack $20 value
CandiQuick – CandiQuick Prize Pack $25 value
The Give the Gift of Gingerbread Giveaway will run from December 11 through December 17, 2013. Entrants must be US residents, 18 years or older Void where prohibited by law.  Enter via the Rafflecopter entry form below.  One winner will be chosen to win the entire prize pack and will have 48 hours to respond with their mailing information. If the winner does not respond in 48 hours, another winner will be chosen. 
a Rafflecopter giveaway


Follow our sponsors on Facebook too….
Shabby Apple
Cheap Cookie Cutters
Easy Lunchboxes
Candiquik
Wilton
Sweet Simple Stuff
Sweet Works
Karen’s Cookies

Filed Under: christmas, desserts Tagged With: Christmas, desserts

Frosty the Snowman and Friends

December 4, 2013 by Amy Hudson

My girls love the Frosty the Snowman movie.  We have a DVD of the same version that was on TV all the way back in the 80’s when I was a kid.  They love to sing the song, “Frosty the Snowman, was a jolly happy soul . . .”  The other day I decided to make them a snack inspired by their favorite snowman.  (Even though we’ve already made these snowman snacks last year, today’s snowman looks just like Frosty from the movie).

Frosty the Snowman

Ingredients:

3/4 to 1 cup cottage cheese

1-2 baby carrots

1 slice of banana

1 dried blueberry (I buy the large bag available at Costco)

1 fresh blueberry

2 small slices celery

1 dried cranberry

Directions:

Use a small spoon to scoop the cottage cheese onto the center of the plate.  Gently spread it out to make the largest part of Frosty’s body – his tummy.  Next, spoon each leg on and gently slide cottage cheese into shape if needed.  Follow the same process for his arms.  Cottage cheese is great, because it naturally falls into the shape of fingers at the end of an arm.  You won’t have to use your fine motor skills for this step!  Slice one square piece of celery, along with one thin rectangular piece, and place atop Frosty’s head.  Add a dried cranberry to look like a flower.  Slice a small dried blueberry in half and place onto Frosty’s head for eyes.  Slice your fresh blueberry in half, then slice a crescent shape out of one of the halves, and lay that flat onto Frosty’s face for his smile.

Slice a baby carrot in half lengthwise.  Lay one above the other next to Frosty to look like his broomstick.  Slice one banana wheel.  Carefully take your knife and slice thin sections from the wheel.  Place onto plate to be the bottom of the broom.  To make Frosty’s pipe, slice a baby carrot in half lengthwise, then slice one of those halves again (lengthwise), so you have a flat rectangular piece of carrot to work with.  Slice a pipe shape, aiming to get a thin rectangular piece with a squared piece at the end.  Place the pipe right into Frosty’s smile, and he is complete and ready to delight your little ones!

Frosty’s Wife

After I made Frosty for my oldest, I decided to make him a little friend.  She was easier and faster to make than even him.  Meet Mrs. Frosty.

Ingredients:

3/4 cup cottage cheese

2 fresh blueberries

1 red grape

1 dried blueberry

1 small section of celery

1 dried cranberry

1 baby carrot

Directions:

Use a spoon to scoop and carefully shape three cottage cheese circles onto the plate for Mrs. Snowman’s body.  Next, thinly slice a section of celery and place onto plate for her arms.  Slice a dried blueberry in half and place onto her head for eyes.  Slice a dried cranberry in half width-wise and place beneath eyes for Mrs. Snowman’s mouth.  Add two fresh blueberry buttons and a red grape bow.  To make the bow, slice a red grape in half lengthwise, then slice a triangle out of each half and add a remaining sliver of grape for tie of hair bow.  Complete her with a tiny sliver of a baby carrot (proportional to her face), and you are done!

Enjoy!

More Snowman Fun!

If you enjoyed these snowmen, check out our other snowman creations, (our snowman milk chugs are super easy and fun), along with the rest of our Winter and Christmas snacks!

(Linking up HERE)

Filed Under: christmas, holidays, snowman, Winter Tagged With: banana, blueberries, Carrot, Celery, Christmas, cottage cheese, Holidays, snowman, Winter

Ladybug Apples

November 25, 2013 by Amy Hudson

My oldest daughter checked out a great book at her school library recently.  It is a great book all about ladybugs.  The book goes into great detail about ladybugs’ life cycle, body structure, defense mechanisms, uses as natural pest repellants in agriculture, and much more.  I learned a lot after reading this book with her!  In honor of learning all about ladybugs, we decided to make a special treat to eat after lunch.

Ladybug Apples

Ingredients:

1 apple (we used Honeycrisp)

4-6 oz semi sweet chocolate chips

2 cheerios

Directions:

Slice the apple into two halves, just outside the core.  You will have two halves to make into little ladybugs.  Place chocolate chips into a small glass bowl and microwave for one minute, stirring with a rubber spatula at 20 second intervals.  Once chocolate is melted, spoon into a plastic zip baggie and slice a tiny corner off of the bag to use for piping the chocolate.  Pipe a “T” across the back of the ladybug’s back – one central line along the back, and one line to divide what will look like the back from what will look like  the head area.  Fill in the head with chocolate, drizzling it in with the piping bag, then smoothing with a knife, then add little dots around the rest of the back.  Add two cheerio eyes, repeat for the other ladybug, and chill for 10 minutes in the fridge.

Easy, fun, and delicious dessert to celebrate learning new things!  Enjoy!

If you liked these little guys, you may also want to check out our other animal creations.

(Sharing HERE)

Did you enjoy today’s snack?  Learn more about this blog here.


Filed Under: animals, apple, books, desserts, ladybug Tagged With: animals, apples, Books, desserts, ladybug, Snacks

Lion King Sandwich by Gosia at Kiddie Foodies

November 18, 2013 by Amy Hudson

Today I am excited to introduce you to another creative momma who is making fun of lunch!  Gosia, of Kiddie Foodies is here to share a wonderful Lion lunch with us.  I love her attention to detail and creativity!  Make sure to follow her for more inspiration for wonderful ways to feed your children yummy, healthy, and fun food!

Hi, I am Gosia, a mom to a 5 years old princess, Sara, a bright shining star in my life. I am Polish and I’ve been living in Canada for almost 3 years, after 12 years spent in the south of France (sun & sea!).
I love all kinds of DIY, creative things and when my daughter started to try out new foods, I often presented them to her in a funny way to encourage her to try new things. It worked really great and she was really into it. We even played a game imagining what we could create and what we would use to make it: which fruits or veggies. It was a great way for her to discover fruits and veggies, their colors and textures. A lot of food presentation that I share on my blog www.kiddiefoodies.com, is inspired by her activities, crafts, stories or different events in our life. I usually cook the same meal for the whole family, and then just change the ‘presentation’ for my daughter. Kids sometimes need to eat with their eyes first, and if there is something cute on their plate they are more willing to try it. Hope that you’ll come to see my creations and find some inspiration on how to feed your little tummies and have fun at the same time!

Gosia Lamdaouar Kiddie Foodies

I’d like to thank Amy for featuring my post! I hope you will enjoy it!
Blog: www.kiddiefoodies.com
Facebook: http://www.facebook.com/KiddieFoodies
Google+Gosia http://plus.google.com/110342041553507614453/posts
Google+ Kiddie Foodies (page): http://plus.google.com/u/0/115911601356389928150/posts
Pinterest: http://pinterest.com/kiddiefoodies
Twitter: http://twitter.com/KiddieFoodies
Instagram: www.instagram.com/gosia_kiddiefoodies
Bloglovin http://www.bloglovin.com/blog/7288047/kiddie-foodies

Lion King Sandwich

By Gosia

Preparation time: 10min | Servings: 1

Did your kids also cried when they saw The Lion King for the first time?!? My daughter, Sara, did! Every Wednesday morning she has a choir at school. They are learning songs in preparation for a concert they are giving to parents twice a year. Recently they’ve been learning the song from The Lion King , “The lion Sleeps Tonight”. When Sara told me that, I asked her if she wanted to listen to that song and maybe even see the Lion King. She wanted, of course. So I search on YouTube and I found a nice sound track. When it was finished, Sara burst into tears and was crying for at least 20min! She said it was so sad that the lion was dead. It took me another 20min to calm her down and explain all over again what happened in the story and why. To honor the lion, we made this nice lion shaped sandwich and the smile came back on her face.
Lion King shaped sandwich for kids

Ingredients

  • 1-2 slices of bread
  • 1 slice of ham
  • 1 black olive
  • 5 mini carrots
  • 2-3 tablespoons of grated carrot
  • 1-2 slices of orange cheese
  • 1 slice of yellow cheese
  • 1 radish
  • butter
  • chive
  • dill

Preparation

Step1
Cut the bread into the following pieces: one for the head and the other one for the body:
Lion King shaped sandwich for kids step1
Step2
Prepare the following: cut the same shapes from the orange cheese, as you did for the bread in Step1. Cut 2 circles from the radish and cut off ends of the black olive to make the lion’s eyes. Use a small piece of ham and a piece of black olive to make lion’s nose. Cut 2 bigger triangles from the orange cheese and 2 smaller ones from the yellow cheese to make lion’s ears. Use a stripe of radish to make lion’s mouth. Prepare 6 stripes of chive to make his mustache.
Lion King shaped sandwich for kids step2
Step3
Place the bread on a plate and spread it with butter. Cover with the orange cheese. Decorate lion’s head with pieces prepared in Step2, as shown on the picture below. Use grated carrot to make lion’s mane. Place the ears. Make lion’s legs and his tail using mini carrots; cut them if needed to adjust the length. Use a little bit of the grated carrot to decorate the end of the tail. Place the dill on the bottom of the plate to make some grass. Enjoy!
Lion King shaped sandwich for kids step3

Filed Under: guest post Tagged With: Creative Mommas, Guest posts, Kiddie Foodies

Santa Hat Poppers

November 13, 2013 by Amy Hudson

Looking for cute Christmas Party Food?  Today’s Santa Hat Poppers would be the perfect Christmas Party food for kids.  Make these Santa Claus inspired party poppers for your next holiday party or put them out at your next playdate to get the kids excited for Christmas.

By the way, you’ll probably love these other cute Christmas Party food ideas for kids: Grinch Party Poppers, Santa Party Poppers, Popcorn Snowman Cups, Snowman Party Poppers

Santa Hat Poppers

Creative Kid Snacks: Santa Hat Poppers - perfect kids finger food for a Christmas party!

Ingredients: (6 poppers)

10-15 oz block mozzarella cheese (sliced from a large block)

6 fresh strawberries

6 round crackers (Ritz, Toasteds, etc.)

Directions:

Creative Kid Snacks: Santa Hat Poppers - perfect kids finger food for a Christmas party!

Using a large block of mozzarella cheese from the grocery store, slice 1/8- 1/4 inch slices of cheese.  You want the slices to be large enough to be able to punch two hat bases (using 2 inch cookie cutter shown below) out of each slice.

Creative Kid Snacks: Santa Hat Poppers - perfect kids finger food for a Christmas party!

Use a cookie cutter shaped like a flower or a circle (the one shown here is about 2″ wide), and punch out little bases for your Santa hats.  A flower has a cute look once the hats are assembled because it looks like fluffy white fur.

Creative Kid Snacks: Santa Hat Poppers - perfect kids finger food for a Christmas party!

Your bases are now ready!

Creative Kid Snacks: Santa Hat Poppers - perfect kids finger food for a Christmas party!

Slice the stem off of your fresh strawberries.  Try to use strawberries with a width that would allow you to see your cute little hat base and not cover it up entirely, or look too small on the base you made.

Creative Kid Snacks: Santa Hat Poppers - perfect kids finger food for a Christmas party!

I punched one more “flower” or Santa Hat base out than I needed, and sliced the little round edges into semicircles for the tops of Santa’s Hat.

Creative Kid Snacks: Santa Hat Poppers - perfect kids finger food for a Christmas party!

I love to use the little plastic toothpicks from the dollar store.  They are not too sharp, and look adorable to hold these little guys together.  Note:  Make sure the top semicircle of cheese is thick enough to allow the toothpick to go through without the cheese falling apart.  The block mozzarella cheese I used worked great and did not fall apart.  I kept my semicircle cheese hat toppers to at least 1 cm thick.

Creative Kid Snacks: Santa Hat Poppers - perfect kids finger food for a Christmas party!

 Although the Santa Hats look great and are ready to eat by step 5, I would suggest placing a cracker beneath each one.  The saltiness of the cracker tastes great with the cheese, and also the cracker makes for each pick-up from the plate.  This part is optional, but that’s my recommendation.

Your Santa Hat Poppers are now complete and ready to put out at your Christmas party or play date!  The kids will love them!  Mine sure did!

Creative Kid Snacks: Santa Hat Poppers - perfect kids finger food for a Christmas party!

Enjoy!

Make sure you also check out these fun Christmas Snacks and Lunches:

Grinch Party Poppers

Santa Party Poppers

Popcorn Snowman Cups

Snowman Party Poppers

3 Kings Lunch

Baby Jesus in the Manger

5 Healthy Christmas Snacks for Kids

Jingle Bells Lunch

Creative Kid Snacks: Santa Hat Poppers - perfect kids finger food for a Christmas party!

(Sharing HERE)

Did you enjoy today’s snack?  Learn more about this blog here.

Filed Under: cheese, christmas, holidays, strawberries Tagged With: cheese, Christmas, Holidays, Santa Hat Poppers, Strawberries

Hello Kitty Breakfast

November 7, 2013 by Amy Hudson

Hello Kitty has become so popular with little girls lately, and mine are no exception.  We have Hello Kitty pajamas, Hello Kitty purses, Hello Kitty shoes, and even Hello Kitty backpacks.  We also love to celebrate Hello Kitty by making cute snacks.  In the past we’ve made Hello Kitty Sandwich and a Hello Kitty Bagel.  Make sure to  check them out!

Today, we would like to show you our Hello Kitty Breakfast – Hello Kitty Oatmeal

Hello Kitty Breakfast

Creative Kid Snacks: Hello Kitty Breakfast

Ingredients:

1/2 – 3/4 cup cooked oatmeal – (we use instant)

2 fresh strawberries

2 slices banana

2 chocolate chips

Directions:

Arrange your prepared oatmeal on a plate in an oval shape.  Next, slice two ears from a round banana slice by creating a tip like a triangle on each one.  Lay the ears atop the oatmeal at the top corners of the oval you have made.  Next, find a small banana slice and place 3/4 of the way down the oval of oatmeal to be Hello Kitty’s nose.  To make her bow, slice a strawberry in half, then place the tips of the two triangles together to look like a bow.  Slice the bottom tip off of your other strawberry and place in the center of the bow to look like the knot.  Use the remaining strawberry to slice thin whiskers for Hello Kitty.  Place along the sides of the face.  Finally, add two little eyes using chocolate chips.

This breakfast is sure to please any Hello Kitty Fan!

Health Benefits for Kids

Oatmeal is a great choice for breakfast for the kids.  It is filling, full of fiber, and even protein.  Read this article to learn more about all of the health benefits of oatmeal.  Strawberries add a punch of vitamin C and antioxidants, and bananas are a rich source of potassium.

Other Hello Kitty Food

Hello Kitty Bagel Lunch

Hello Kitty Sandwich

(Sharing HERE)

Did you enjoy today’s snack?  Learn more about this blog here.


Filed Under: banana, breakfasts, oatmeal, strawberries, TV shows Tagged With: banana, Breakfasts, Oatmeal, Strawberries, TV shows

Halloween Apples

October 25, 2013 by Amy Hudson

We are into leaves and colors, pumpkin patches, apple orchards, and everything fall.  The girls are looking forward to dressing up in their costumes (they are going to be flamenco dancers this year) and trick-or-treating.  We don’t really get into the scary parts of Halloween because that’s just not our thing, (although we’ve made a spider web and friendly ghost snacks for this season), but we love to combine awesome foods available in autumn with the holiday spirit.  Meet our Halloween apples!
These apples are a great treat for the kids.  Apples are in full harvest in fall and taste great, and adding just a little bit of white chocolate (as opposed to the option of dousing an apple with caramel, then chocolate, then nuts, then sprinkles) makes this a fun and appropriately portion controlled option for kids.

Ingredients:

(to make 3-4 apples, or 6-8 apple halves to serve)
3-4 apples (we used honeycrisp, but granny smith would taste awesome as well)
6-8 oz white chocolate chips
1/2 teaspoon vegetable oil (just a tiny bit)
orange and green food coloring, as desired.

Directions:

Place white chocolate chips in a glass bowl in microwave along with oil.  Heat 1 minute on full power, stirring at 20 second intervals with a plastic spatula.  Avoid using any metal spoons or dishes when working with melted chocolate, as metal conducts heat and can raise the temperature of the chocolate too much, causing it to harden.  Divide chocolate into two small bowls, and color one green and one orange (or desired colors).

We used a real piping bag and small round tip, but you can also use a zip baggie and snip a tiny corner off to use as a piping bag.  Pipe your designs onto your apples.  Allow the small kids to make their own while an adult or older child makes the jack-o-lantern faces, as desired.

Complete the look of your apple-o-lanterns by adding a green pipe cleaner cut in half then twisted to look like stems from a real pumpkin.  We just placed them in the top of the apple, wrapped loosely around the existing stem.

The easiest way to enjoy these guys is to slice them not through the core but just outside of it so they maintain their shape.  You can even make the apples this way in the first place as opposed to decorating them as whole apples standing up, and lying the apples flat on the plate will really allow you to decorate them in any way you wish!

Time to enjoy!  One half slice was the perfect amount for this happy little girl!Did you like these Halloween Apples?  Don’t miss our other Halloween snacks, as the other creative snacks we’ve made with apples:

Valentine’s Day Apples

Teenage Mutant Ninja Turtle Apples

Shrek


(Sharing HERE)

Did you enjoy today’s snack?  Learn more about this blog here.


Filed Under: apple, halloween, holidays Tagged With: Apple, halloween, Holidays

Panda Bear Dinner

October 10, 2013 by Amy Hudson

Sometimes a fun presentation is in order at dinner time.  We all want to serve our kids a healthy and balanced dinner, so why not use the “trick” of an adorable and creative presentation to get them excited to eat a great dinner?  Today’s Panda bear dinner features rice, black beans, meat, and veggies.  Check him out!

Ingredients:

1  cup cooked white rice

1/2 cup black beans, heated

1 stick celery

3 slices of cooked meat (chicken, pork, beef)

3 sugar snap peas

Directions:

Heat black beans and place in a bowl.  Place a spoonful of beans around the plate for Panda’s legs and arms.  Next, fill in the center of the plate with white rice to look like the panda’s tummy.  Panda’s have a thin black section of fur where there neck is, so add a line of black beans above the white tummy where the neck would be.  Spoon some white rice onto the plate for the panda’s head, and arrange two black beans tilted outward for eyes, add a nose, and slice a final black bean into thin strips for the mouth.  Add two small black bean ears.

Now, give your panda some “bamboo” to eat by placing the celery in his hand.  Bamboo is a grass that is crunchy and fibrous, just like celery would be.  Finally, add a little tree on the other side of the panda, layering your strips of meat together and adding some sugar snap pea leaves.

Also, check out this Hot air balloon dinner featuring grilled chicken, corn, red bell pepper, guacamole, cheese, and carrots.  My kids loved it and I’m sure yours will too!

(Sharing HERE)

Did you enjoy today’s snack?  Learn more about this blog here.

Filed Under: animals, bear, black beans, dinner Tagged With: animals, bear, black beans, dinner, Panda bear, rice

Ballerina

September 30, 2013 by Amy Hudson

I have two little ballerinas in the house.  Grace has taken ballet and tap classes for a couple years, and dance has been one of her favorite things to do outside of school.  The recitals, where she gets to wear her costume, complete with poufy tutu, ballerina bun, and makeup – then ending with her getting a bunch of flowers and applause, are the highlight for her.  When recital time came around this last spring, we decided to make a little snack to celebrate it.

Creative Kid Snacks: Ballerina

Ingredients:

1 slice colby jack cheese

1 slice deli ham

1-2 cubes of watermelon

yellow bell pepper

1 dried blueberry

red grape

Directions:

Slice a piece of colby jack cheese into the shape of a ballerina’s head, arms, and torso.  We put the arms in the air as the ballerina twirled on her toes.  Next, lay a thin slice of watermelon cut to the shape of a top onto the ballerina’s chest area.  Add the two legs made from two thin slices of cheese, then lay the deli ham over top to look like a cute tutu.  Add two little toe shoes using bits of watermelon, a hair bun and top of yellow bell pepper, and a watermelon bow.  Slice a dried blueberry in half for her eyes, and add a thinly sliced red grape for her mouth.  So sweet!

Creative Kid Snacks: Ballerina


If you love cheese, make sure to check out our other adorable snacks made with CHEESE!  I’m sure you’ll find a favorite or two!

(Sharing HERE)

Did you enjoy today’s snack?  Learn more about this blog here.

Filed Under: Ballerina, dance, ham, snacks, watermelon Tagged With: Ballerina, dance, everyday scenes, ham, Snacks, Sports, watermelon

« Previous Page
Next Page »

I'm Amy. One of my passions is serving my two little girls healthy, wholesome food in unexpected ways. Lunch time has become a time of learning, imagining, and bonding for us as we use great food to create little works of art... Read More…

facebooktwitterpinterest instagram google+

Tags

animals Apple avocado banana Biblical Birthday Parties blueberries Books Breakfasts carrots Celery cheese Christmas cottage cheese desserts Disney Easter educational Eggs everyday scenes grapes ham history Holidays Lunches movies nature Oatmeal Party Food peanut butter peanut butter sandwich raisin Raspberries Snacks snowman Sports Strawberries super healthy teaching and learning turkey TV shows Valentines Day Weekly Kids Co-op Winter yogurt

Best of

Best Of

Copyright Note

Please feel free to use any of these ideas with your children at home, school, church, or anywhere you are inspired to make fun of lunch. If you would like to share a post on a blog or site, you may use one picture so long as you include a link to the original post. Please do not re-post the whole article or distribute printed-out content without written permission from the original author.

Grab our button!

Creative Kid Snacks Button

© Copyright Creative Kid Snacks · Design & Development by 4th & Market