• Home
  • New? Start Here!
  • Holidays
  • Parties
  • Contact
  • Facebook
  • Twitter
  • Pinterest
  • Google+
  • Instagram

Creative Kid Snacks

make fun of lunch!

  • Breakfasts
  • Lunches
  • Dinner
  • Snacks
  • Desserts

Healthy School Lunches

May 22, 2015 by Amy Hudson

Looking for a washable, divided, insulated, durable lunch box for kids?  Interested in helping your child eat better by packing a larger variety of food in their school lunch?

I was contacted by Planetbox.com to test out one of their really cool products and share my opinion with you.  They have designed a series of lunch boxes that can be used by children and adults alike, with high quality parts that will hold up for many years.  Their products are designed to address what a lot of us are looking for in a lunch box.

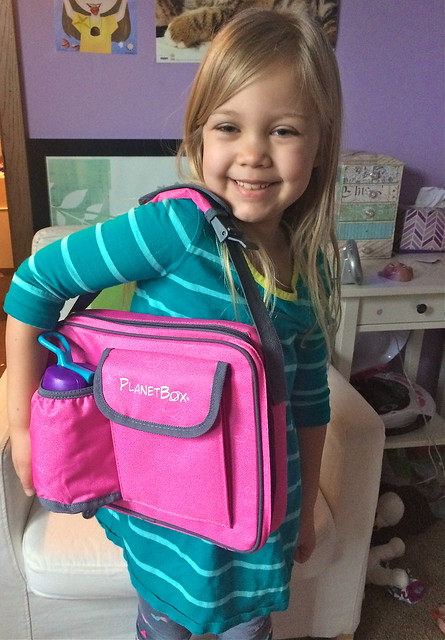
I received one of their best-selling lunch boxes: The Rover.  As soon as it arrived in the mail, my oldest daughter gravitated to it, wanted to look inside, and asked immediately to use it the next day.  I loved how the outside casing has a spot to carry a water bottle, as fitting the water in has been the biggest challenge with the other lunch containers I’ve tried.  I also loved that it is insulated, and has an additional pocket in front where you could place a secret note, an extra cool pack, or utensils.

The main reason I love the PlanetBox is the layout.   Because it has many small sections, I can fill them all with a little bit of a large variety of fruits and veggies.  Such variety in the lunch container makes for a well balanced meal.

I also love the two small containers that come inside the planetbox, which are perfect for yogurt, cereal, soup, or anything else that may not work well in the square openings.

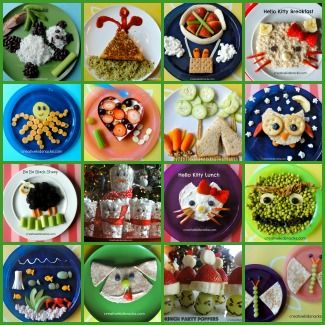
Here are some of the lunches we’ve made in our PlanetBox:

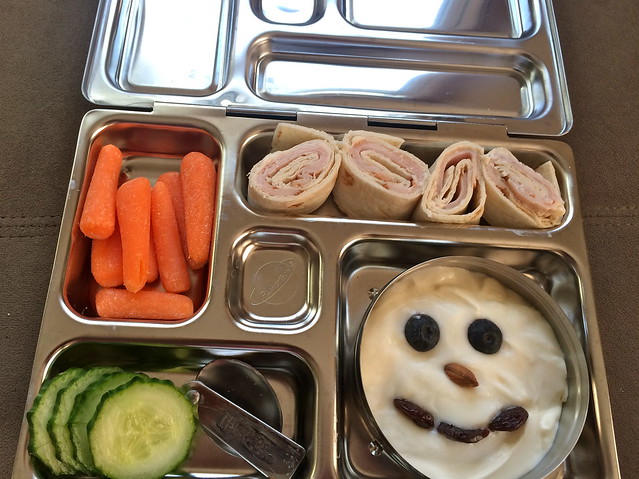
Turkey roll-ups, baby carrots, sliced cucumber, organic yogurt with blueberry eyes, an almond nose, and dried cherries for a mouth.


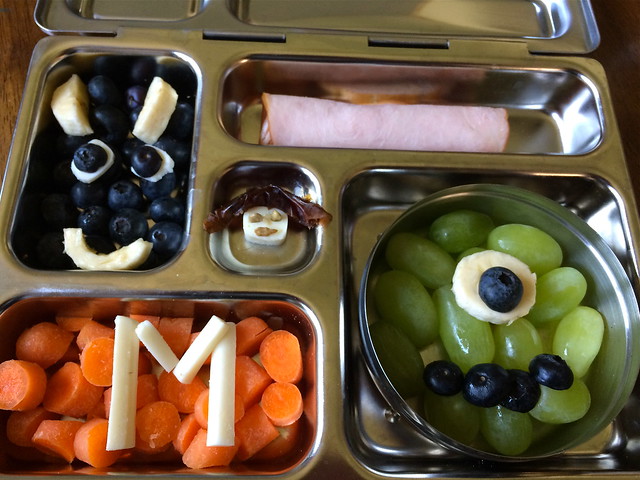
Monster’s Inc themed lunch – blueberry and banana Sully, string cheese, date, and sunflower seed “Boo”, grape, banana, and blueberry Mike, string cheese and carrot Monster’s Inc logo, and a turkey roll.


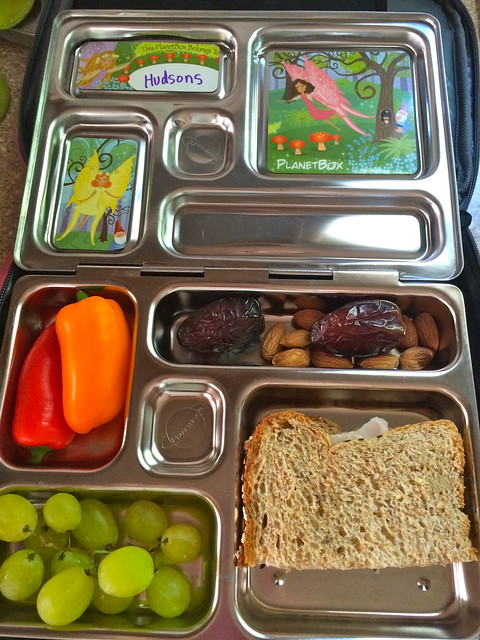
Mini bell peppers, dates and almonds, half turkey sandwich, green grapes.


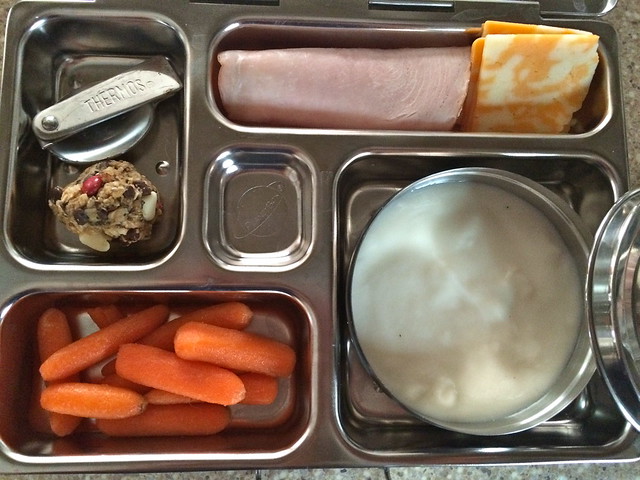
Baby carrots, organic vanilla yogurt, colby jack cheese, turkey roll, and chia energy bites*.


Blueberry Veggie Muffin (from Costco), honey turkey breast (from Costco), carrot sticks, and grapes.


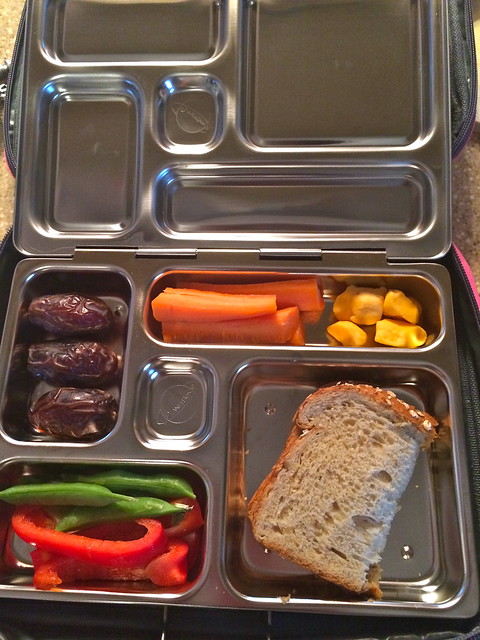
Dates, carrot sticks, Wisonsin cheese curds, turkey sandwich, red bell peppers and snap peas.


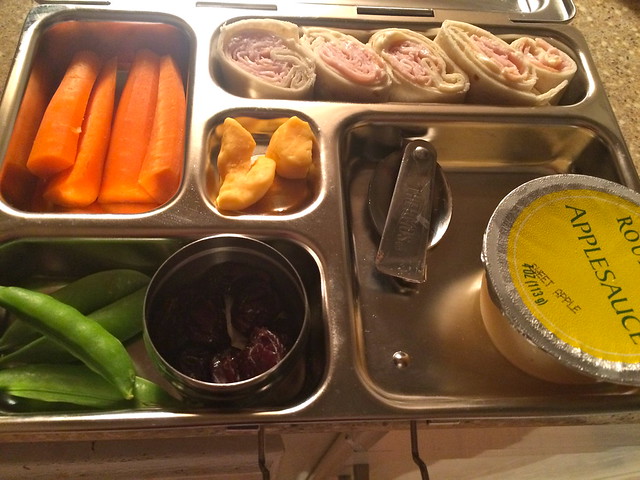
Carrot sticks, turkey wrap pinwheels, cheese curds, snap peas, dried cherries, and applesauce.

You can customize your PlanetBox with adorable magnets and other accessories.   We received very cute fairies, which my 7-year old loves.  Next year both of my little girls will be in school all day, so my soon-to-be kindergartener is very much looking forward to using cool lunch boxes like this to bring her own lunch to school!

Give PlanetBox a try, it’s so fun to pack and send with the kids.  This thing will last you for years, and will not disappoint.  Check out their website for tons more meal ideas and browse their great line of products!

More great school lunch ideas:

100 Days of Real Food (the mother-ship of school lunch ideas!)

Bent On Better Lunches (LOVE her – have for years!)

MamaBelly.com

BunchesoLunches.com

BecomingABentoholic.com

FoodFamilyFun.net

Parents.com (roundup of healthy school lunches and snacks)

* Chia Energy Bites Recipe from Super Healthy Kids (we LOVE this recipe and make it often!)

Filed Under: lunches, school lunches Tagged With: Lunches, school lunches

Volcano Lunch

February 8, 2014 by Amy Hudson

My daughter (5 years old), is really into volcanoes.  She likes to study them, watch videos online about them, and find out all about how they work.  For awhile, she was saying that she wanted to be a geologist when she grew up!  We had made a volcano lunch last year, (click right here to see it), but I decided it was time for an upgrade to that version.

Volcano Lunch

Volcano Lunch - creative way to teach kids about how volcanoes work during lunch time!

This updated version of our volcano has more veggies and healthy ingredients than our first one.  The volcano itself is a grilled cheese sandwich (well, the equivalent of half of a sandwich as it was sliced into a triangle shape) – and this is because my girls are just crazy about grilled cheese.  I try to buy organic cheddar cheese and minimally processed bread to use in their sandwiches.  Place thinly sliced red pepper atop the volcano to look like lava.  Fresh red bell pepper is packed with vitamins and has a sweet, refreshing taste that my kids really like.  The “ground” beneath the volcano is made up of avocado, which is a great source of healthy fat and considered a superfood.  A sliced boiled egg as the sun in the sky will provide some good protein, and thin strips of baby carrot provide the sun’s rays.

Make Your Own Volcano

 When my daughter Grace first heard about lava on a Disney show called “Little Einsteins”, she suddenly wanted to know everything about it.   I explained to her how a volcano works, talked about the magma underneath the earth’s surface and all of the details about how pressure forms inside the volcano until it erupts.  She asked tons of questions, and that evening when we got home she asked to watch videos of lava.


Thanks to Youtube, we were able to see all kinds of lava flows.  This was one of my favorite ones (if your kiddo is into volcanoes too).  Or, check out these great general videos on how volcanoes work.

After several days on the lava bandwagon, I had the idea to actually make a volcano with her.  Why not right?

 Here is what we made, followed by some instructions on how to make your own:

Volcano Lunch - creative way to teach kids about how volcanoes work during lunch time!

Materials to gather:

Cardboard

Plastic (disposable) cup, cut down to half it’s original height

2 teaspoons baking soda

4-5 drops of red food coloring

1/4 – 1/2 cup vinegar (any kind)

Large surface to catch the flowing “lava”

Directions:

First, build a “volcano”.   

We used a cardboard box, (rolled up and taped together), but you could mold one out of play-dough, use paper maché, or even a mound of real dirt.

Next, place a small cup inside the top hole.  The cup should sit snugly in the opening at the top of the volcano.  I used a plastic cup that I cut to be shorter (about the size of a cup measurement).  The cup is where your explosion ingredients are mixed.

Add 2 teaspoons of baking soda.

Next, add 4-5 drops of red food coloring.

Finally, take about 1/4 cup of vinegar and slowly pour into cup over the baking soda.  

The explosion fizzes out and runs all the way down the volcano.

The “lava” is red because the food coloring mixes with the baking soda as the eruption happens so no need to mix the food coloring all the way through.

Have fun learning all about volcanoes, and then eating one!

Volcano Lunch - creative way to teach kids about how volcanoes work during lunch time!

Tell me what some of your favorite “experiments” or learning activities are for the kiddos.  I know you all have great ideas!  Feel free to link to a post you wrote about it in your comment.  I’d love to check it out!

Filed Under: lunches, nature, Science, volcano Tagged With: avocado, carrots, education, Eggs, Lunches, nature, red pepper, Science, teaching and learning, volcano

Turkey

September 18, 2013 by Amy Hudson

Fall is in full swing, and soon it will be Thanksgiving.  Thanksgiving is one of our favorite holidays – great food, family, gratitude, and, best of all, no present-buying frenzy!  Build up anticipation for Thanksgiving with this fun and healthy lunch!

Turkey

Ingredients:

Turkey sandwich (fresh turkey breast, whole wheat bread, and mayo) / Substitute a peanut butter sandwich if desired!

Baby Carrots

1 cashew

1 raisin

1 cube pineapple

2 celery stalks

Directions:

Slice a turkey sandwich into a pear shape as shown above.  Next, arrange baby carrots all around the body to look like tail feathers.  You can also slice carrots in half lengthwise to control portion size or to allow them to lay flat on the plate.  Slice a raisin in half and place onto sandwich for eyes.  Place a cashew beneath the eyes to look like a beak.  Slice a pineapple chunk into two thin strips, then slice two thin triangles and place beneath legs.  Finish off the plate with celery “grass” where the turkey is happily frolicking!

Filed Under: animals, holidays, lunches Tagged With: animals, Holidays, Lunches, Thanksgiving, turkey

Shapes Lunch

August 26, 2013 by Amy Hudson

Lunch and snack time are an important part of the day which can be used for purposes beyond simply providing sustinance for our children.  Why not use this time as an opportunity to teach your child new things?  At Creative Kid Snacks, we are about leveraging meal time to connect with our kids on a deeper level, while serving super healthy food in a fun and engaging way.

Today’s snack can be used to help your child learn to form shapes.  This skill goes beyond simple recognition, (which would be great for a younger child), and extends into the area of fine motor skills.  Read on to see how to do it!

Practice forming shapes during lunch time using superfoods #healty #creative kids food

Step 1:  Create the “examples”

On a plate, form each shape as shown using the following supplies:

Star:  1 baby carrot (sliced into thin strips)

Square:  string cheese sliced in half width-wise, then sliced into 4 flat sections of equal length

Triangle:  blueberries sliced in half so they lie flat on the plate

Oval: Avocado, 2 sliced sections

Heart: Red bell pepper, sliced horizontally accross from standing position.

Step 2:  Provide the kids’ materials

Collect the same ingredients sliced in the way described above and place all onto a plate.  Provide enough for each child to make one of each shape.

Step 3:  Model how each shape is formed, and allow the kids to try!

One shape at a time, show the child how to form the shape using the food.  (Example:  For the triangle, I said “Take one blueberry and lay it on your plate for the tip of the triangle.  Next, take two blueberries and make a row right underneath your first blueberry.  (showing them the second row of blueberries on the example plate), and so on).

Practice forming shapes during lunch time!

Step 4:  Correct any mistakes and praise a job well done

The point of this is to learn the right way to form shapes.  Gently nudge your child along until they correctly make the shape.  If they make a mistake, place the food in the correct place on the plate, hand it back to the child, and have them place it there themselves.  Sometimes it takes patience, and there are some things a younger child might be able to do.  For example, the star was too difficult for my 3 year old to make, but my 5 year old got it with several corrective directions from me.  She was SO proud of herself when she got it!  We snapped a picture of her joy shown below.

Practice forming shapes during lunch time!

Enjoy teaching the kids to form shapes using this delicious and healthy food.

Health Benefits of this snack:

Health benefits of red peppers

Health benefits of avocado

Health benefits of carrots

Health benefits of blueberries

Health benefits of cheese (particularly combining cheese with fruits and veggies as we did in this meal) 

Practice forming shapes during lunch time using superfoods #healty #creative kids food

(Sharing HERE)

Did you enjoy today’s snack?  Learn more about this blog here.

Filed Under: Super healthy Tagged With: educational, Lunches, Shapes, super healthy

Hello Kitty Lunch

February 20, 2013 by Amy Hudson

Hello Kitty is a beloved character that I used to watch when I was a young girl, and who has now made a comeback.  My four year old daughter carries a bright pink Hello Kitty backpack to school with her every day.

With Hello Kitty‘s recent surge of popularity, we had a request by a Facebook friend to share some Hello Kitty inspired food.

Hello Kitty Lunch

Hello Kitty Lunch

Ingredients: 1 half bagel, 2 T whipped cream cheese, 2 blueberries, 1 slice banana, 6 thin slices apple, 1 strawberry, and 1 raspberry.

To create this easy and cute Hello Kitty, I used a half bagel spread with a thin layer of whipped cream cheese.  I cut a small section from the top to create her ears.  Next I added two blueberry eyes, a small banana nose, and thinly sliced apple whiskers.  For her bow, I sliced one strawberry in half for the two sides of the bow, and used a raspberry for the center.

That’s it.  A delicious and fun lunch with a great variety of wonderful fruit.

Here is another Hello Kitty Lunch we’ve created in the past.

hello kitty lunch

See the blog post about this Hello Kitty here.

And coming up soon I have a Hello Kitty Breakfast!  WooHoo!

(Sharing HERE)

Did you enjoy today’s snack?  Learn more about this blog here.

Filed Under: animals, apple, blueberries, hello kitty, lunches, raspberries, strawberries, TV shows Tagged With: animals, Apple, Bagel, Hello Kitty, Lunches, Raspberries, Strawberries, TV shows

Creative Valentine’s Day Snacks for Kids

February 13, 2013 by Amy Hudson

Valentine’s Day can be such a fun day for the kids.  Why not make it even more special by showing your love to them with a creative snack or meal?  Following is some of my favorite Valentine’s Day food that you can serve all day.

6 Cute Valentines Day Snacks for the kids. Can't tell whether the oatmeal one or the apple one is my favorite!

Breakfast

Heart Warming Oatmeal

Heart Oatmeal 16 Cute Valentines Day Snacks for the kids. Can't tell whether the oatmeal one or the apple one is my favorite!

This is a fun and tasty way to start off the day.  Ever since I made this the first time, it has become a staple in our house!  Click here to see how we made it.

Valentine’s Day Pancakes

6 Cute Valentines Day Snacks for the kids. (Snack #3)  Can't tell whether the oatmeal one or the apple one is my favorite!

If your child is a pancake lover, then give them a memorable pancake breakfast using heart shaped cookie cutters to make everyone in your family.  See how this breakfast was made here.

Lunch


The Giving Tree

Giving Tree Lunch  (6 Cute Valentines Day Snacks for the kids. Can't tell whether the oatmeal one or the apple one is my favorite!)

Valentine’s Day is the perfect day to talk about real love and the ways people show it to one another.  Read The Giving Tree by Shel Silverstein and make this adorable lunch to go with it.  See how we made it along with some questions to get your kids talking about love here.


I Love You to the Moon and Back

I love you to the moon and back

Here is another book-inspired lunch.  Check out our post about the message of the story and how to make the snack that goes with it here.

Snacks


I Love You

i love you snack (6 Cute Valentines Day Snacks for the kids. Can't tell whether the oatmeal one or the apple one is my favorite!)

Although I’m categorizing it as a snack, this dish is filling enough to be a lunch for some kids.  With refreshing strawberries, grapes, celery, and calcium rich cheese and yogurt, this dish says I love you in more than one way.  See how to make it here.


Valentine’s Day Apples

6 Cute Valentines Day Snacks for the kids. Can't tell whether the oatmeal one or the apple one is my favorite!

A super fun snack the kids will go nuts over is this simple apple snack.  Use a cookie cutter to slice apples into heart shapes, add some peanut butter and some crunchy cereal – and the kids won’t be able to contain their love for you!  See all the details about this snack here.

We hope you have a great Valentine’s Day!

Filed Under: holidays, Valentines Day Tagged With: Books, Breakfasts, Holidays, Love, Lunches, pancakes, Snacks, Valentines Day

Baby Jesus in the Manger

November 30, 2012 by Amy Hudson

“For to us a child is born, to us a son is given, and the government will be on his shoulders. And he will be called Wonderful Counselor, Mighty God, Everlasting Father, Prince of Peace.”  Isaiah 9:6
The true meaning of Christmas is awesome story of God sending his son Jesus to be born into the world, in a humble stable, to save the world from sin.  
I’ve always loved the way Linus tells the story in the Peanuts Christmas special!


I’ve already shared some of the festive Christmas snacks I’ve made for my kids to get them excited about the season (as if they need any help with that)!  However, the real reason we celebrate Christmas is because Jesus was born!  The miracle of His birth and the story of God’s amazing love for mankind still blows me away. 
Luke 2 tells this awesome story.  Read that or read about the birth of Jesus in the Children’s Bible.  
After that, make this lunch together.

Baby Jesus is a baby carrot sliced in half to lay flat.  He is lying in a manger made of a peanut butter sandwich.  He is wrapped in swaddling clothes of string cheese peeled and wrapped around him.  His eyes are raisins.  The stable is made of carrots sliced to lay flat, and the hay and the star are made of organic colby jack cheese.  I use a pizza slicer to create the thin strips of cheese to look like hay.  The support for the manger is celery shaped like an “x”.

As a finishing touch, Grace and I sang “Away in a Manger” together right before she ate!

(Linking up HERE)


Photobucket

Filed Under: biblical, carrots, cheese, christmas, holidays, lunches, movies, peanut butter sandwich Tagged With: Biblical, carrots, cheese, Christmas, Holidays, Lunches, movies, peanut butter sandwich

Joshua and the battle of Jericho

November 6, 2012 by Amy Hudson

Joshua 6:1-27 tells the story of the great city of Jericho with walls so high and fortified that no adversary could break through.  God called the Israelite leader Joshua to march around the city with the priests blowing their trumpets of ram’s horns in front of the ark of the covenant for six days.  On the seventh day, they were to march around the city seven times and all of the Israelite people were to shout.  When this happened, God told Joshua, the great walls of the city would come crashing down, and, in this way, the Lord would give the city over to His people.
Read this story with your child, or read the story from the children’s bible (HEREis the one we use), and then create this story for lunch!
Build walls using grapes sliced in half, laid flat side down onto the plate.  Next, slice baby carrots in half lengthwise and lay a couple of them down to be the Israelites.  Thinly slice the other half of the baby carrot and cut to shape for arms and legs.  Complete the scene with some green celery grass below the city walls and add two small triangular slices of pineapple for the priest’s horns.  A nice sun in the sky completes the picture.
(By the way, once I saw the photo, I realized that the Jericho guy looks like he’s smiling . . . oops!  That was supposed to be a round mouth saying “oh no!”)
Once this lunch was complete and we retold the story, Grace “tore the walls down” as they fell in the story.  She had fun with that!
Finally, I sliced up the “grass” below the city for her to dip into her peanut butter.
Variations:
Build the wall with other fruit like strawberries, bananas, or blueberries.
Use pineapple for the sun, or cheese for the trumpets.
Enjoy!
Check out our other bible stories HERE.
(Linking up with these fine parties)

Filed Under: biblical, carrots, celery, cheese, grapes, history, lunches, pineapple, snacks Tagged With: Biblical, carrots, Celery, cheese, grapes, history, Lunches, pineapple, Snacks

Brown Bear, Brown Bear, What Do You See?

October 21, 2012 by Amy Hudson

Today’s post features Eric Carle’s beloved Brown Bear, Brown Bear What do you see? story book as well as a learning activity and snack to go with it!
This comes from a series I been calling Read.Play.Eat.  Take a look at the snacks and learning activities I shared for the following children’s books:
Blackout
It Could Always Be Worse
Lousy Rotten Stinkin’ Grapes

READ.

By Eric Carle
This is a story I’ll bet almost all of us have in our libraries!  I remember hearing this book read to me in kindergarten.
Read this story to you child.  Allow them to “fill in the blanks” as you pause when each new page comes.  They will quickly learn to name each new animal as it shows up.
PLAY.
Make some simple animals using a sharpie and some white cardstock.  I simply drew freehand from what I saw in the book.
Go through the story, and have your child color each animal as they appear.
Next, make some “puzzle pieces” by cutting the animals in half.
The goal will be to match each animal’s front to its back.
It will be all the easier with the colors each animal has.
Your child will be delighted to do a puzzle that he or she made themselves.
Another activity to do once the animals have all been matched together is to line them up in order of appearance in the story.
First, see if your child can do it from memory, then “check your answers” by using the book.  If they made mistakes, have them re-arrange the order to learn the right way.
So much fun!
EAT.
Create the Brown Bear of “Brown Bear, Brown Bear” by simply making a peanut butter sandwich, and slicing four legs.  The natural shape of the bread is very close to the shape of the bear in the illustrations in the book.
Next, cut a circle from another piece of bread.  Use two half raisins for the eyes, and some halved almonds for his ears and nose as shown.  So easy!

Filed Under: almonds, animals, bear, books, lunches, peanut butter sandwich, raisin Tagged With: almonds, animals, bear, Books, Lunches, peanut butter sandwich, raisin

Read.Play.Eat: Blackout

October 3, 2012 by Amy Hudson

I’ve mentioned the awesome series going on at Sugar and Spice (my personal blog) on Learning and Literacy.  Each day, one of three cool bloggers share a kids story book along with an activity to go along with it.  Since I can’t resist making creative snacks, I’m also sharing those in each of my posts in this October series.

Here’s a little “teaser” for you to see the lunch I made.  Click the link below to see the great kids’ book that goes with it, along with a learning activity you and your child can try today!

Read
(Click here to see the book)
Play
(Go over to the post to see the learning activity!)
Eat
 
Re-create the rooftop scene by making a building out of a peanut butter sandwich, cutting the crusts into cubes for windows.  Next, slice 2 baby carrots in half and in half again for the main part of the bodies.  Thinly slice the remaining portions for the arms and legs.  We are seeing the people from behind, as shown in the cover of the book above, so no eyes are needed.  
I almost used a full banana for the moon, but it was way too big for the scale of the plate, so I cut a banana to shape.  
Create the stars by using your star icing tube attachment in the corner of a plastic bag.  Fill the bag with a little plain or vanilla yogurt as shown.  If you don’t have a star attachment for icing, just make little dot stars!
 
 
I hope you and your child have fun with this READ.PLAY.EAT activity.

(Did you go see the whole thing?  DO IT) 

Photobucket

Filed Under: banana, books, carrots, learning activity, lunches, peanut butter sandwich, yogurt Tagged With: banana, Books, carrots, learning activity, Lunches, peanut butter sandwich, yogurt

Next Page »

I'm Amy. One of my passions is serving my two little girls healthy, wholesome food in unexpected ways. Lunch time has become a time of learning, imagining, and bonding for us as we use great food to create little works of art... Read More…

facebooktwitterpinterest instagram google+

Tags

animals Apple avocado banana Biblical Birthday Parties blueberries Books Breakfasts carrots Celery cheese Christmas cottage cheese desserts Disney Easter educational Eggs everyday scenes grapes ham history Holidays Lunches movies nature Oatmeal Party Food peanut butter peanut butter sandwich raisin Raspberries Snacks snowman Sports Strawberries super healthy teaching and learning turkey TV shows Valentines Day Weekly Kids Co-op Winter yogurt

Best of

Best Of

Copyright Note

Please feel free to use any of these ideas with your children at home, school, church, or anywhere you are inspired to make fun of lunch. If you would like to share a post on a blog or site, you may use one picture so long as you include a link to the original post. Please do not re-post the whole article or distribute printed-out content without written permission from the original author.

Grab our button!

Creative Kid Snacks Button

© Copyright Creative Kid Snacks · Design & Development by 4th & Market