• Home
  • New? Start Here!
  • Holidays
  • Parties
  • Contact
  • Facebook
  • Twitter
  • Pinterest
  • Google+
  • Instagram

Creative Kid Snacks

make fun of lunch!

  • Breakfasts
  • Lunches
  • Dinner
  • Snacks
  • Desserts

3 kings

December 20, 2013 by Amy Hudson

The 3 kings, or reyes magos as I used to teach about in Spanish class, are an integral part of the Christmas story.  As we celebrate this special time, mixed with all of the fun holiday food we make are those snacks that remind us of the true meaning of Christmas.

Matthew 2: 1 – 12 tells the story of the Magi, or wise men from the east who came to worship Jesus because they saw the star of Bethlehem shining in the sky.
After Jesus was born in Bethlehem in Judea, during the time of King Herod, Magi from the east came to Jerusalem 2 and asked, “Where is the one who has been born king of the Jews? We saw his star when it rose and have come to worship him.”
3 When King Herod heard this he was disturbed, and all Jerusalem with him. 4 When he had called together all the people’s chief priests and teachers of the law, he asked them where the Messiah was to be born. 5 “In Bethlehem in Judea,” they replied, “for this is what the prophet has written:
6 “‘But you, Bethlehem, in the land of Judah,
are by no means least among the rulers of Judah;
for out of you will come a ruler
who will shepherd my people Israel.’”
7 Then Herod called the Magi secretly and found out from them the exact time the star had appeared. 8 He sent them to Bethlehem and said, “Go and search carefully for the child. As soon as you find him, report to me, so that I too may go and worship him.”
9 After they had heard the king, they went on their way, and the star they had seen when it rose went ahead of them until it stopped over the place where the child was. 10 When they saw the star, they were overjoyed. 11 On coming to the house, they saw the child with his mother Mary, and they bowed down and worshiped him. Then they opened their treasures and presented him with gifts of gold, frankincense and myrrh. 12 And having been warned in a dream not to go back to Herod, they returned to their country by another route.
The 3 magi, or 3 kings as they became popularly known, traveled and offered their gifts to baby Jesus.  It is believed that their being called kings is due to Psalms 72:11, “May all kings fall down before him”.
I’ve always been a huge fan of the images that portray this story with a scene that focuses on the starry sky and the men in the forefront of the image as sillouettes.  Here is an example.
(via)
Once I found out that the animal crackers I bought from Target contained camels,  I knew I had to make this snack!
To make the 3 kings snack, I started by placing the camels onto the plate.  Next, I took some deli ham and rolled it into three small triangular shapes to look like the men’s robes.  Next, I took one baby carrot and sliced the round edges off lengthwise so it would lay flat, and cut it into a square for the head.  (I made the head square in order for the crown to look like it lays flat).  Lastly, I cut a slice of cheddar cheese for the large star and the crowns.  It took some patience to slice the little sections out of the top of the slice (for the points on the crowns), but the end result made it all worth it!
Oh, and the stars were made by this trusty method that I love to use:


(Sharing HERE)


Filed Under: 3 wise men, cheese, christmas, yogurt Tagged With: 3 wise men, Biblical, cheese, Christmas, yogurt

Gingerbread Man Bubble Bath

December 11, 2013 by Amy Hudson

Is there a cookie that is more Christmas-y than gingerbread?  Here at Creative Kid Snacks, we like to play with our food.  We like to keep our snacks healthy, educational, and fun.  Today’s snack is a Christmastime treat, so we will put it in the dessert category.  While you’re here, you might enjoy checking out some of our other fun Christmas creations!
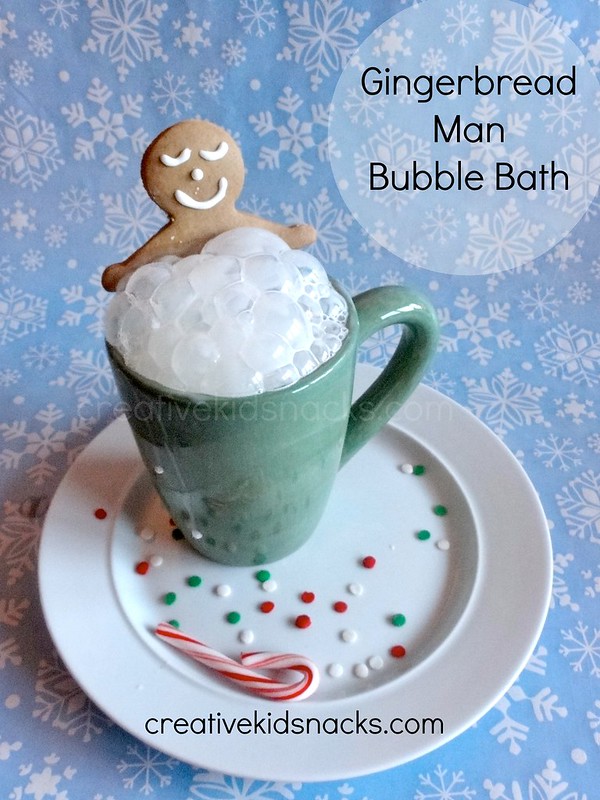
Gingerbread Man Bubble Bath

Everyone likes a relaxing bubble bath, including gingerbread men.

To make this creation, my girls and I first followed the Betty Crocker gingerbread cookie recipe, and used our gingerbread man cookie cutters to cut them to size.

Next, we used this recipe for royal icing to pipe the sleepy eyes and smile on our gingerbread man’s face.  We chose to use royal icing because it stays put much better than a buttercream.

Once cooled and dried, we placed our gingerbread man into a mug filled with milk.  We used cold milk because we like to eat our cookies with nice cold milk.  If you like, you could also heat up the milk for a real “warm bath” for your gingerbread man.  You could even add a bit of fancy peppermint flavor syrup like you’d get from the coffee shop if you had some on hand!
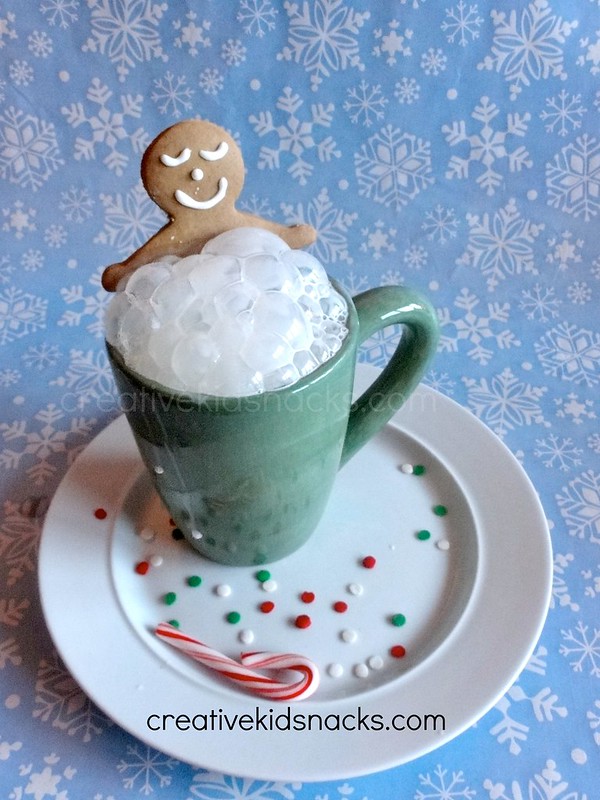
Making the Bubbles

Next comes the fun part for the kids – making the bubbles!  To make the bubbles, place a straw into your milk and blow!   Blow until you have lots of beautiful white bubbles for your happy gingerbread man’s bubble bath!

Hot Tubbin’ It

You may also like the idea of letting your gingerbread man take a dip in a hot tub of warm cocoa.  Follow all of the same directions as before, but this time, add some hot chocolate mix or chocolate syrup to your warm milk before serving!

Helpful tips:

Make sure the cookie cutter you are using for your gingerbread man has his arms out to the sides as opposed to down closer to his body.  The ourstretched arms help the gingerbread man to rest comfortably in the mug as his arms hang over the sides.

Choose your mug carefully.  Allow enough room for his body to submerge but not too much room or else his feet will float in the milk and he will look like he is ready to fall out backwards from the mug.  If this happens, simply brace your gingerbread man with a straw or even a spoon before serving.

Blessings to your and your family this Christmas season!

Did you enjoy today’s snack?  Don’t forget to check out our Christmas snacks along with some of our other favorites.  You can learn more about this blog HERE.

Give the Gift of Gingerbread Blog Hop and Giveaway
Use the links below to hop from blog to blog 
to see these wonderful gingerbread themed recipes.
1. No Gingerbread Boy and Girl Cookie Pops by Kitchen Fun with My 3 Sons
2. Caramel Cocoa Egg Nog Custard Gingerbread Men by Hungry Happenings
3. Gingerbread Angle Ornament by Haniela’s
4. Gingerbread Men Bubble Bath by Creative Kid Snacks
5. Peeps Gingerbread Men Cookie Pops by Pint Sized Baker
6. Gingerbread Decorating Ideas by Living Locurto
7. Peanuts Gang Gingerbread Men by Sugar Swings
8. Gingerbread House Cookie Bites by The Decorated Cookie
9. Gingerbread Cookie Christmas Trees by Munchkin’ Munchies
10. Gingerbread Men Cookies by The Barefoot Baker
11. Gingerbread Sleigh Ride by the Partiologist
12. Mini Fudge Gingerbread Houses by Hoopla Palooza
13. Chocolate Gingerbread Cake by Bird on a Cake
14. Simple Gingerbread Christmas Trees by Sweet Sugar Belle
15. Gingerbread Cookie Cups by Creative Juice
16. Gingerbread Puppy Chow by Make Bake Celebrate
17. No Bake Gingerbread Heads by Party Pinching
18. Snowboarding Gingerbread Peeps by Sweet Simple Stuff
19. Gingerbread S’More Houses with Boozy Eggnog Marshmallow Filling by 1 Fine Cookie
20.Sugar Plum Gingerbread House by Miss CandiQuick

Thanks to our amazing sponsors, you have a chance to win all of these prizes:

Shabby Apple – Choice of a Dress (from a list) $100 value
Wilton – Gingerbread Decorating Prize Pack $50 value
Cheap Cookie Cutters – $50 Gift Card
Sweet Works – Candy Prize Pack $25 value
Easy Lunchboxes – lunch box set $22 value
Karen’s Cookies – $20 gift card
Sweet Simple Stuff – Cake Pop Prize Pack $20 value
CandiQuick – CandiQuick Prize Pack $25 value
The Give the Gift of Gingerbread Giveaway will run from December 11 through December 17, 2013. Entrants must be US residents, 18 years or older Void where prohibited by law.  Enter via the Rafflecopter entry form below.  One winner will be chosen to win the entire prize pack and will have 48 hours to respond with their mailing information. If the winner does not respond in 48 hours, another winner will be chosen. 
a Rafflecopter giveaway


Follow our sponsors on Facebook too….
Shabby Apple
Cheap Cookie Cutters
Easy Lunchboxes
Candiquik
Wilton
Sweet Simple Stuff
Sweet Works
Karen’s Cookies

Filed Under: christmas, desserts Tagged With: Christmas, desserts

Frosty the Snowman and Friends

December 4, 2013 by Amy Hudson

My girls love the Frosty the Snowman movie.  We have a DVD of the same version that was on TV all the way back in the 80’s when I was a kid.  They love to sing the song, “Frosty the Snowman, was a jolly happy soul . . .”  The other day I decided to make them a snack inspired by their favorite snowman.  (Even though we’ve already made these snowman snacks last year, today’s snowman looks just like Frosty from the movie).
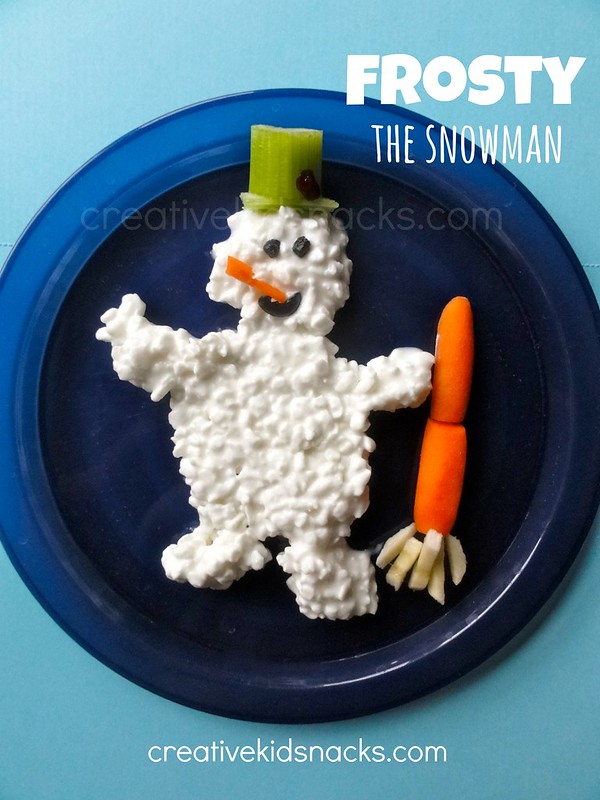
Frosty the Snowman

Ingredients:

3/4 to 1 cup cottage cheese

1-2 baby carrots

1 slice of banana

1 dried blueberry (I buy the large bag available at Costco)

1 fresh blueberry

2 small slices celery

1 dried cranberry

Directions:

Use a small spoon to scoop the cottage cheese onto the center of the plate.  Gently spread it out to make the largest part of Frosty’s body – his tummy.  Next, spoon each leg on and gently slide cottage cheese into shape if needed.  Follow the same process for his arms.  Cottage cheese is great, because it naturally falls into the shape of fingers at the end of an arm.  You won’t have to use your fine motor skills for this step!  Slice one square piece of celery, along with one thin rectangular piece, and place atop Frosty’s head.  Add a dried cranberry to look like a flower.  Slice a small dried blueberry in half and place onto Frosty’s head for eyes.  Slice your fresh blueberry in half, then slice a crescent shape out of one of the halves, and lay that flat onto Frosty’s face for his smile.

Slice a baby carrot in half lengthwise.  Lay one above the other next to Frosty to look like his broomstick.  Slice one banana wheel.  Carefully take your knife and slice thin sections from the wheel.  Place onto plate to be the bottom of the broom.  To make Frosty’s pipe, slice a baby carrot in half lengthwise, then slice one of those halves again (lengthwise), so you have a flat rectangular piece of carrot to work with.  Slice a pipe shape, aiming to get a thin rectangular piece with a squared piece at the end.  Place the pipe right into Frosty’s smile, and he is complete and ready to delight your little ones!

Frosty’s Wife

After I made Frosty for my oldest, I decided to make him a little friend.  She was easier and faster to make than even him.  Meet Mrs. Frosty.
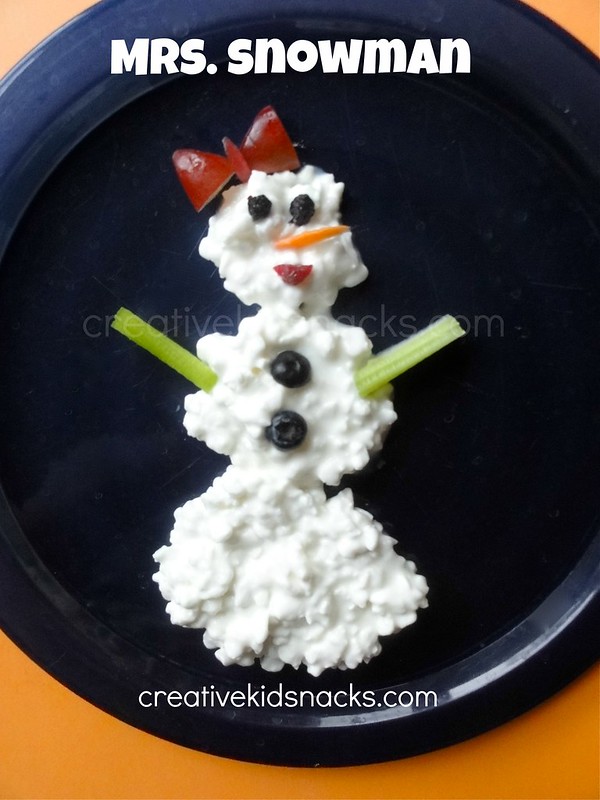
Ingredients:

3/4 cup cottage cheese

2 fresh blueberries

1 red grape

1 dried blueberry

1 small section of celery

1 dried cranberry

1 baby carrot

Directions:

Use a spoon to scoop and carefully shape three cottage cheese circles onto the plate for Mrs. Snowman’s body.  Next, thinly slice a section of celery and place onto plate for her arms.  Slice a dried blueberry in half and place onto her head for eyes.  Slice a dried cranberry in half width-wise and place beneath eyes for Mrs. Snowman’s mouth.  Add two fresh blueberry buttons and a red grape bow.  To make the bow, slice a red grape in half lengthwise, then slice a triangle out of each half and add a remaining sliver of grape for tie of hair bow.  Complete her with a tiny sliver of a baby carrot (proportional to her face), and you are done!

Enjoy!
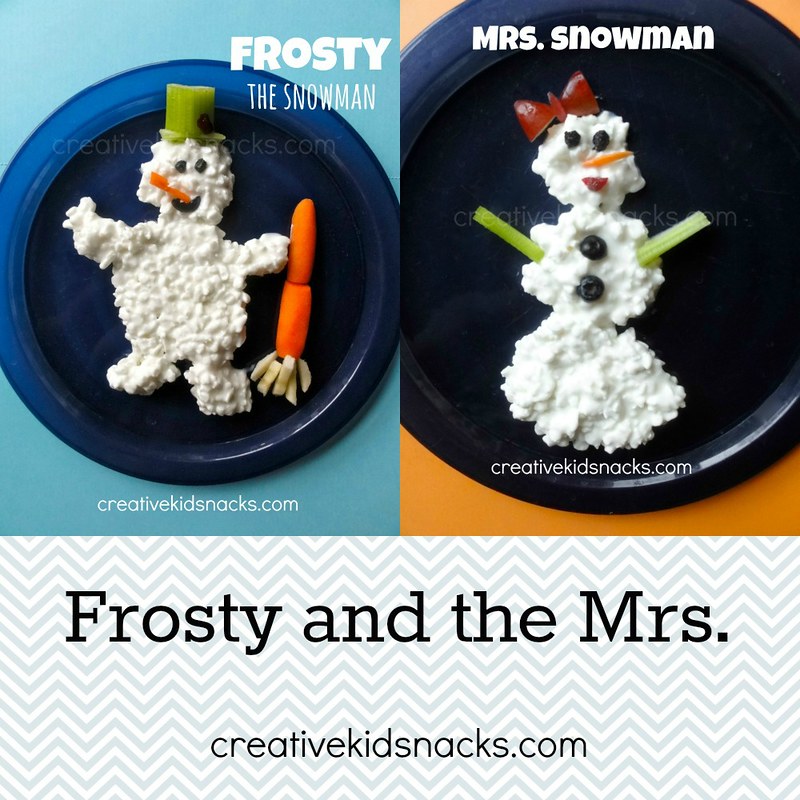
More Snowman Fun!

If you enjoyed these snowmen, check out our other snowman creations, (our snowman milk chugs are super easy and fun), along with the rest of our Winter and Christmas snacks!

(Linking up HERE)

Filed Under: christmas, holidays, snowman, Winter Tagged With: banana, blueberries, Carrot, Celery, Christmas, cottage cheese, Holidays, snowman, Winter

Santa Hat Poppers

November 13, 2013 by Amy Hudson

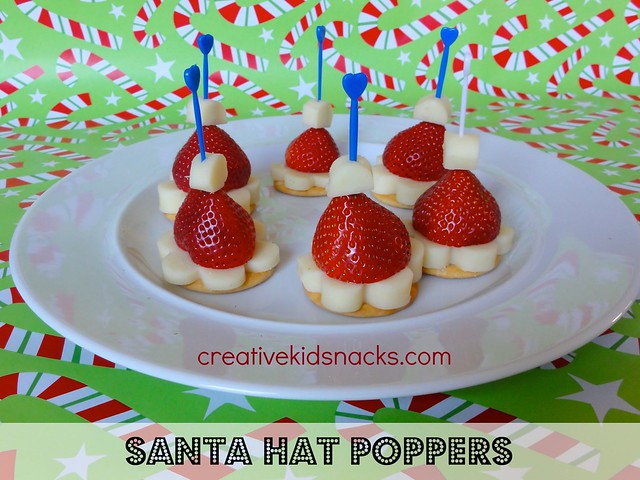
Looking for cute Christmas Party Food?  Today’s Santa Hat Poppers would be the perfect Christmas Party food for kids.  Make these Santa Claus inspired party poppers for your next holiday party or put them out at your next playdate to get the kids excited for Christmas.

By the way, you’ll probably love these other cute Christmas Party food ideas for kids: Grinch Party Poppers, Santa Party Poppers, Popcorn Snowman Cups, Snowman Party Poppers
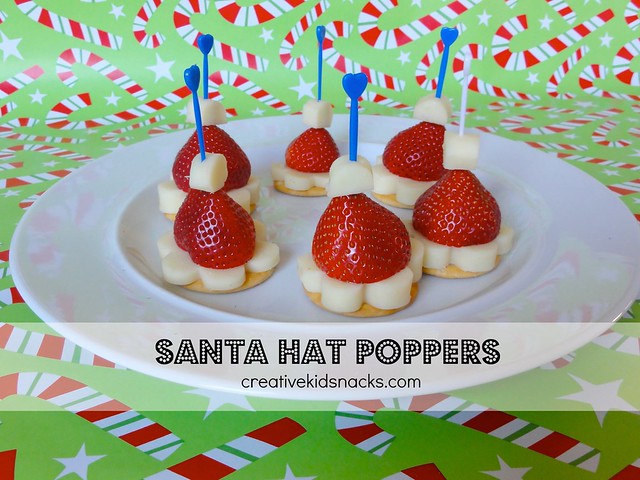
Santa Hat Poppers

Creative Kid Snacks: Santa Hat Poppers - perfect kids finger food for a Christmas party!

Ingredients: (6 poppers)

10-15 oz block mozzarella cheese (sliced from a large block)

6 fresh strawberries

6 round crackers (Ritz, Toasteds, etc.)

Directions:

Creative Kid Snacks: Santa Hat Poppers - perfect kids finger food for a Christmas party!

Using a large block of mozzarella cheese from the grocery store, slice 1/8- 1/4 inch slices of cheese.  You want the slices to be large enough to be able to punch two hat bases (using 2 inch cookie cutter shown below) out of each slice.

Creative Kid Snacks: Santa Hat Poppers - perfect kids finger food for a Christmas party!

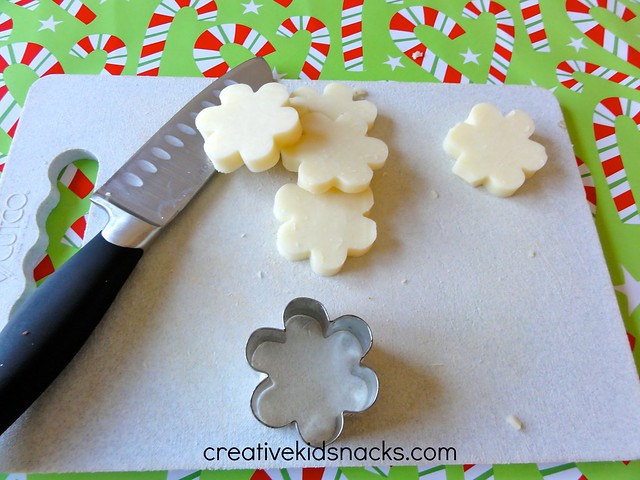
Use a cookie cutter shaped like a flower or a circle (the one shown here is about 2″ wide), and punch out little bases for your Santa hats.  A flower has a cute look once the hats are assembled because it looks like fluffy white fur.
Creative Kid Snacks: Santa Hat Poppers - perfect kids finger food for a Christmas party!

Your bases are now ready!

Creative Kid Snacks: Santa Hat Poppers - perfect kids finger food for a Christmas party!

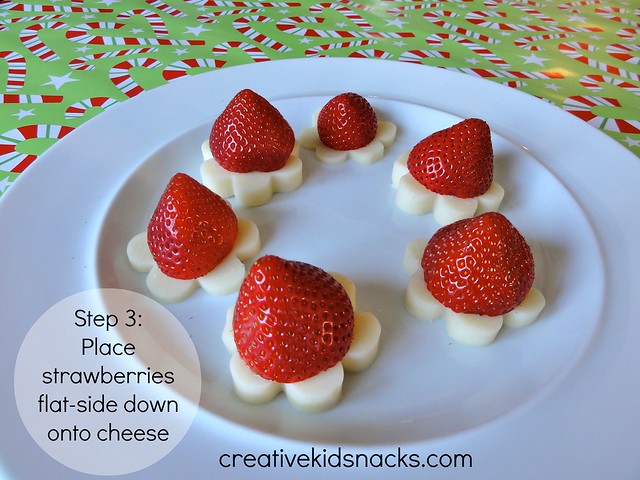
Slice the stem off of your fresh strawberries.  Try to use strawberries with a width that would allow you to see your cute little hat base and not cover it up entirely, or look too small on the base you made.
Creative Kid Snacks: Santa Hat Poppers - perfect kids finger food for a Christmas party!

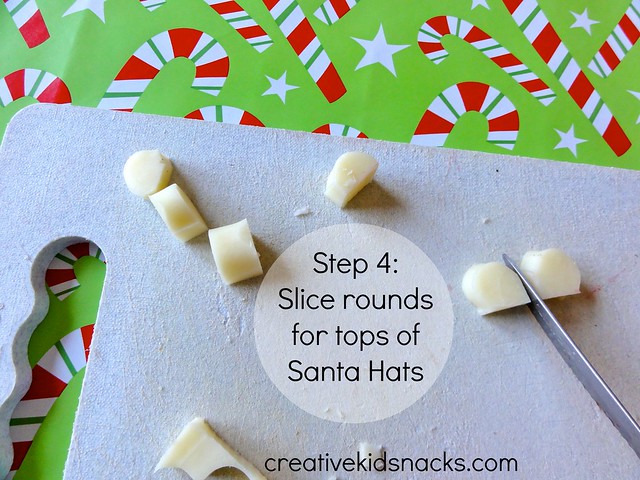
I punched one more “flower” or Santa Hat base out than I needed, and sliced the little round edges into semicircles for the tops of Santa’s Hat.
Creative Kid Snacks: Santa Hat Poppers - perfect kids finger food for a Christmas party!

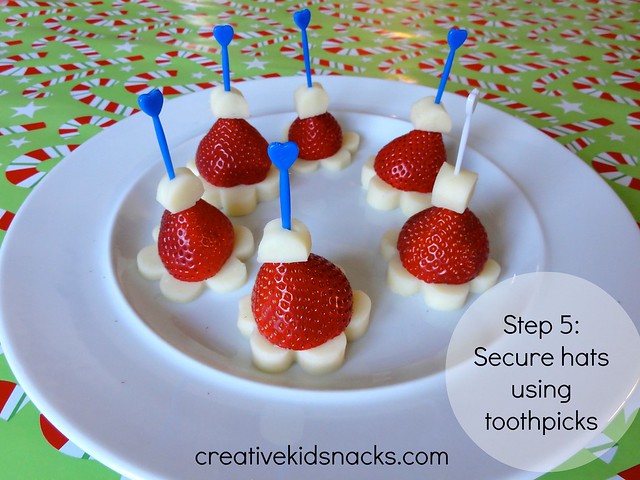
I love to use the little plastic toothpicks from the dollar store.  They are not too sharp, and look adorable to hold these little guys together.  Note:  Make sure the top semicircle of cheese is thick enough to allow the toothpick to go through without the cheese falling apart.  The block mozzarella cheese I used worked great and did not fall apart.  I kept my semicircle cheese hat toppers to at least 1 cm thick.
Creative Kid Snacks: Santa Hat Poppers - perfect kids finger food for a Christmas party!

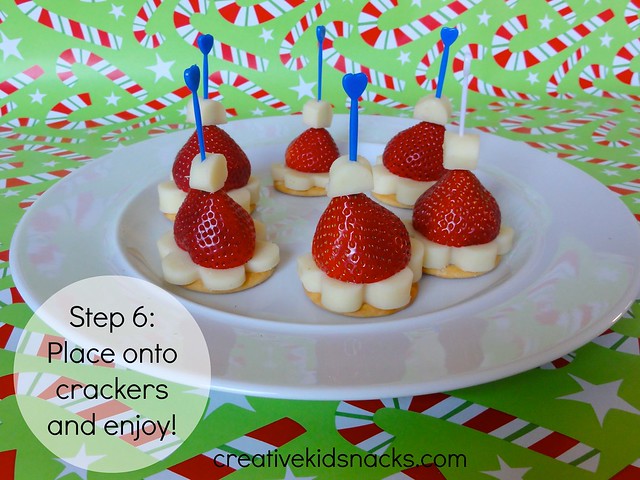
 Although the Santa Hats look great and are ready to eat by step 5, I would suggest placing a cracker beneath each one.  The saltiness of the cracker tastes great with the cheese, and also the cracker makes for each pick-up from the plate.  This part is optional, but that’s my recommendation.

Your Santa Hat Poppers are now complete and ready to put out at your Christmas party or play date!  The kids will love them!  Mine sure did!

Creative Kid Snacks: Santa Hat Poppers - perfect kids finger food for a Christmas party!

Enjoy!

Make sure you also check out these fun Christmas Snacks and Lunches:

Grinch Party Poppers

Santa Party Poppers

Popcorn Snowman Cups

Snowman Party Poppers

3 Kings Lunch

Baby Jesus in the Manger

5 Healthy Christmas Snacks for Kids

Jingle Bells Lunch

Creative Kid Snacks: Santa Hat Poppers - perfect kids finger food for a Christmas party!

(Sharing HERE)

Did you enjoy today’s snack?  Learn more about this blog here.

Filed Under: cheese, christmas, holidays, strawberries Tagged With: cheese, Christmas, Holidays, Santa Hat Poppers, Strawberries

Snowman Milk Chugs

December 26, 2012 by Amy Hudson

Need a great kids drink for a Winter Party?  While the adults sip their spiced eggnog, serve the kids milk in the form of little snowmen!

Perhaps you’re hosting winter play date and looking for something to serve.
Making them is so simple, and the kids will love to drink them as they decorate cookies or snack on some healthy play date snacks.
The best part is, the kids can help you get them ready to serve to their friends!


We bought two different kinds of milk drinks.  The lucerne brand were 4 for $5, which was a great price, and the Deans were a little closer to $2 each.  I decided to try both in order to see which shape came out cuter.


We used some pipe cleaners and a black, brown, and orange sharpie in order to create our snowmen.  How much simpler can you get when it comes to supplies?


Next, remove the wrappers.  I’m very partial to my cute little assistant!


Take two pipe cleaners of matching color and wrap around the bottle two thirds of the way up.  This will create your snowman’s scarf.  My four year old girl did a great job of choosing a color for each snowman and wrapping each one.
Take your sharpie and draw your faces using black for the eyes, smile, and buttons; orange for the nose; and brown for their stick arms.
As you can see, the two different bottles both come out cute, so you can use either brand depending on your preference.
I actually liked the bigger bottles better, since the “scarf” stayed in place better.  There is a groove in the bottle at just the right spot!
Hope you enjoy the Snowman Milk Chugs!
(Linking up HERE)


Filed Under: beverages, christmas, holidays, snowman Tagged With: beverages, Holidays, snowman

Jingle Bells

December 21, 2012 by Amy Hudson

Jingle Bells, Jingle Bells, Jingle all the way!

It’s almost Christmas!
If you have older kids who will be home from school for winter break, and you are new to the creative lunches thing, here is a perfect one to make for them!
For this lunch, we will re-purpose those cookie cutters we’ve undoubtedly been using to make our cookies this season.


My cookie cutters are a little on the thin side, so I used them for one slice at a time.
Using whole wheat bread, we pressed the cookie cutter into each piece, then added our turkey and cheese.  That’s it!


Little Emma (age 2) loved pressing the cookie cutter into each piece of bread to help me!
Finally, we placed some holly around the top of the plate to make it look even more festive.
To make the bow, slice a strawberry in half so you have two triangles for the loops.  Slice the remaining portion into two thin rectangles for the ties, and add one last bit in the center to complete the bow.
Sweet, easy, healthy, and merry!

Filed Under: christmas, holidays, Uncategorized Tagged With: Christmas, jingle bells, Winter

Snowman Party Poppers

December 17, 2012 by Amy Hudson

Are you having a winter party?  Tis the season to celebrate the snow with a cute snowman snack I like to call Snowman Party Poppers.
We’ve already introduced you to the Christmas Snacks we like to call Grinch Party Poppers and Santa party poppers; so today it’s time for the snowmen!


These guys are made of mozzarella cheese, blackberry jam, pretzels, and fruit – a winning combination of flavors if you ask me!
Here’s how to make your own.
Ingredients needed (for 15+ poppers):
-large chunk mozzarella cheese – the largest size available at most grocery stores
-pretzel sticks
-2-3 tablespoons seedless blackberry preserves (may substitute other seedless preserves)
-grapes (or other desired fruit) for hats
Assembly:
Step 1:  Cut mozzarella into groups of 3 chunk sizes.
Start with deciding the size you’d like the head chunk to be and cut those equally.
Next, cut slightly larger chunks for the middle, and repeat for the bottom.
Tip:  think about how much cheese would be desirable to eat for one child in one sitting.  Make sure your bottom chunk is not so big that it would be too much for the average person to want to finish.
Step 2:  Fill piping bag or plastic baggie with corner sliced off for piping with blackberry preserves, and pipe faces onto smallest chunks of cheese.
 The fruit and cheese combo is classic and tastes fantastic.
The preserves, once piped onto the cheese for faces, stay in place very well, and they should not dribble as long as you do not make the dots too large.  I used the smallest tip on my piping bags.
Step 3:  Build Snowmen
Because they stay together so well, these guys don’t even require a toothpick!  If you are serving them at a party, however, I would use one in order to be able to quickly grab one from a serving plate.
Layer your three chunks of cheese, largest on bottom, and work up.  Slice the bottoms off of as many grapes as you have snowmen and add to the top to look like hats.
Insert toothpicks and you are ready to go!
(Sharing HERE)


Filed Under: cheese, christmas, holidays, snowman, Uncategorized Tagged With: cheese, Christmas, Holidays, snowman, Winter

3 Creative Christmas Veggie Trays

December 13, 2012 by Amy Hudson

Today is all about creative veggie trays for the holidays.  Transform your traditional relish tray with these three vegetable platters that rock!

This year, volunteer to bring the vegetable platter to Christmas dinner!
Create an awesome veggie tray that everyone will love!  The kids will LOVE to help you!

 Use a large round serving platter.  Start with the celery, and create several zig-zaggy rows going accross.

Next, fill in the yellow peppers, saving one for the “hook” on top, then carrots, then cherry tomatoes, and you are all set!

I got the idea for this Christmas present veggie tray when I found the following little boxes at Walmart.

I bought the boxes with the inspiration for this veggie tray, but knowing I could eventually use them as gift boxes down the road.

What I did to create the present was to place all four boxes onto a larger platter, tie a nice thick ribbon around them to make them look like a present and then LINE them.

To line each box, simply open a baggie, roll the top zipper part over so it lays on the outside of the bag, and fill with the veggies.  This will ensure the boxes stay dry and, the best news of all, the veggies are easy to put away once the tray is done being used!

Try this fun and popular idea with the kids this year!

For this tree, I first created the outside branches of the tree with cut celery.  It is just the perfect shape and look to go on the outside.
Next, add sliced cucumber to fill in the middle of the tree.  This cucumber layer can be 2-3 layers deep if you have a large crowd to serve.
Add broccoli to fill in any gaps between the cucumbers and celery, and place some nice red cherry tomatoes to look like ornaments.
To ensure the baby carrots used to make the tree’s “trunk” stand up, cut them in half so they sit flat on the tray.
Finish with a yellow pepper star, and you are all ready to dig in!
Variations:
Use deli meat for the trunk by placing thin rolls next to each other in a vertical pattern.
To feed a bigger group, use celery for the entire bottom layer, cucumbers for a second layer on top of that, etc.

To me, the very best part of making these fun trays with your kids is the fact that they are munching on veggies the whole time!

Check out more Christmas food!
(Sharing HERE)


Filed Under: broccoli, carrots, celery, christmas, Christmas tree, cucumber, Party food, tomato, yellow pepper Tagged With: broccoli, carrots, Celery, Christmas, Christmas tree, cucumber, Party Food, super healthy, tomato, veggie tray, yellow pepper

Snowman Popcorn Cups

December 10, 2012 by Amy Hudson

Introducing the Snowman Popcorn Cup!
Try this one for your next winter play date, party, or simply for a fun family movie night at home!
In order to create these guys, all you will need is the following:
-clear containers:  I used clear plastic cups and a clean, clear vase
-ribbon or fabric for scarves
-black and orange sharpie markers, or orange construction paper if you don’t have an orange sharpie
-white popcorn
Note:  popcorn is not terribly nutritious, yet neither is it terrible for you.  The more oil, salt, and butter it is made with, the worse it is for you.  This article mentions the best way of preparing popcorn being to air pop it and then add some extra virgin olive oil and sea salt for taste.  I went the easy route and bought some Vic’s All Natural Light White Popcorn for this snack.  The rule of thumb is, the less steps and ingredients to produce the popcorn, the better.
To transform this vase into a large popcorn snowman, I simply placed some tape onto where the eyes, smile, and buttons would be, then I drew them right on.  I found that the clear packing tape (which I used for the eyes in the picture above, was much easier to take off and much less visible against the glass than regular scotch tape, so use the packing tape if you have it.
For the nose, I used a small triangle of orange construction paper and taped it right on.  Like I mentioned above, an orange sharpie could be used for this too (along with a piece of tape to protect your vase, of course).
 For the small plastic cups, I used a package from Walmart that cost under $3 for 100.
The little cups are equivalent to 1 1/2 cups or so of popcorn, a great serving for the kids.
 I hope you enjoy creating your own snowman popcorn cups.  Be creative with your supplies, and show me what you came up!  I’d love a link to a photo in the comments from you!
Variations:
Tie a brown pipe cleaner around the middle of the cup to create some arms
Glue eyeballs (from the craft supplies aisle) onto the plastic cups
Use your imagination!

(Linking up HERE)

Filed Under: christmas, popcorn, snowman, Winter Tagged With: Christmas, popcorn, snowman, Winter

Santa Party Poppers

December 7, 2012 by Amy Hudson

Meet our cute little Santa Party Popper.

I’ve taken to calling anything on a short stick a “popper” because you can pop it into your mouth and enjoy in one or two bites.

These guys are a dessert for the kids to help make after dinner one night or in preparation for a little party.
*Note:  Santa Party Poppers should be assembled within an hour of when you plan to serve them, because the bananas will brown being out in the air too long.
To make 10 Santa Poppers you will need:
10 regular sized marshmallows (not minis)
2 additional regular sized marshmallows cut into eights (for puff on Santa’s hat)
10 one inch tall banana chunks
10 red mini M&Ms
1/2 cup chocolate chips (for melting)
10 strawberries cut to appropriate size for a hat


Before assembly, slice each full sized marshmallow in half lengthwise.  You will need 2 halves per Santa.
To assemble, slide the small marshmallow bit (from those cut into eights) to the top of a decorative toothpick.  Next, slide the strawberry (flat side down), one half marshmallow, the banana, and lastly the other half marshmallow.

Make sure you slice your banana into chunks evenly and straight to ensure that they do not lean or tip over once assembled.

Tip:  Sliding the bottom marshmallow on with the sticky side down will allow it to stand up better on the serving plate because it will stick!
Next, melt your half cup of chocolate chips in the microwave.  I melted mine for a total of 45-50 seconds on high, stopping to stir every 20 seconds.
Once melted, spoon chocolate into a Ziploc bag and snip a TINY triangle off one of the corners.  You will pipe the chocolate out through this hole.
Pipe two eyes and dot for his nose on every Santa.  I placed the nose dot right above the bottom marshmallow.
Place a red M&M on each chocolate dot and press to stick down for Santa’s nose.
Once this step is complete, refrigerate for 10 minutes and serve (see *note above)
The kids will love this dessert, and you can feel good knowing it is mostly fruit.  The only refined sugar they will be getting is the equivalent of 1 1/8 marshmallow and a tiny bit of chocolate.

(Linking up HERE)

Photobucket

Filed Under: banana, christmas, desserts, holidays, Party food, Santa Claus, strawberries Tagged With: banana, Christmas, desserts, Holidays, Party Food, Santa Claus, Strawberries

Next Page »

I'm Amy. One of my passions is serving my two little girls healthy, wholesome food in unexpected ways. Lunch time has become a time of learning, imagining, and bonding for us as we use great food to create little works of art... Read More…

facebooktwitterpinterest instagram google+

Tags

animals Apple avocado banana Biblical Birthday Parties blueberries Books Breakfasts carrots Celery cheese Christmas cottage cheese desserts Disney Easter educational Eggs everyday scenes grapes ham history Holidays Lunches movies nature Oatmeal Party Food peanut butter peanut butter sandwich raisin Raspberries Snacks snowman Sports Strawberries super healthy teaching and learning turkey TV shows Valentines Day Weekly Kids Co-op Winter yogurt

Best of

Best Of

Copyright Note

Please feel free to use any of these ideas with your children at home, school, church, or anywhere you are inspired to make fun of lunch. If you would like to share a post on a blog or site, you may use one picture so long as you include a link to the original post. Please do not re-post the whole article or distribute printed-out content without written permission from the original author.

Grab our button!

Creative Kid Snacks Button

© Copyright Creative Kid Snacks · Design & Development by 4th & Market