• Home
  • New? Start Here!
  • Holidays
  • Parties
  • Contact
  • Facebook
  • Twitter
  • Pinterest
  • Google+
  • Instagram

Creative Kid Snacks

make fun of lunch!

  • Breakfasts
  • Lunches
  • Dinner
  • Snacks
  • Desserts

Volcano Lunch

February 8, 2014 by Amy Hudson

My daughter (5 years old), is really into volcanoes.  She likes to study them, watch videos online about them, and find out all about how they work.  For awhile, she was saying that she wanted to be a geologist when she grew up!  We had made a volcano lunch last year, (click right here to see it), but I decided it was time for an upgrade to that version.

Volcano Lunch

Volcano Lunch - creative way to teach kids about how volcanoes work during lunch time!

This updated version of our volcano has more veggies and healthy ingredients than our first one.  The volcano itself is a grilled cheese sandwich (well, the equivalent of half of a sandwich as it was sliced into a triangle shape) – and this is because my girls are just crazy about grilled cheese.  I try to buy organic cheddar cheese and minimally processed bread to use in their sandwiches.  Place thinly sliced red pepper atop the volcano to look like lava.  Fresh red bell pepper is packed with vitamins and has a sweet, refreshing taste that my kids really like.  The “ground” beneath the volcano is made up of avocado, which is a great source of healthy fat and considered a superfood.  A sliced boiled egg as the sun in the sky will provide some good protein, and thin strips of baby carrot provide the sun’s rays.

Make Your Own Volcano

 When my daughter Grace first heard about lava on a Disney show called “Little Einsteins”, she suddenly wanted to know everything about it.   I explained to her how a volcano works, talked about the magma underneath the earth’s surface and all of the details about how pressure forms inside the volcano until it erupts.  She asked tons of questions, and that evening when we got home she asked to watch videos of lava.


Thanks to Youtube, we were able to see all kinds of lava flows.  This was one of my favorite ones (if your kiddo is into volcanoes too).  Or, check out these great general videos on how volcanoes work.

After several days on the lava bandwagon, I had the idea to actually make a volcano with her.  Why not right?

 Here is what we made, followed by some instructions on how to make your own:

Volcano Lunch - creative way to teach kids about how volcanoes work during lunch time!

Materials to gather:

Cardboard

Plastic (disposable) cup, cut down to half it’s original height

2 teaspoons baking soda

4-5 drops of red food coloring

1/4 – 1/2 cup vinegar (any kind)

Large surface to catch the flowing “lava”

Directions:

First, build a “volcano”.   

We used a cardboard box, (rolled up and taped together), but you could mold one out of play-dough, use paper maché, or even a mound of real dirt.

Next, place a small cup inside the top hole.  The cup should sit snugly in the opening at the top of the volcano.  I used a plastic cup that I cut to be shorter (about the size of a cup measurement).  The cup is where your explosion ingredients are mixed.

Add 2 teaspoons of baking soda.

Next, add 4-5 drops of red food coloring.

Finally, take about 1/4 cup of vinegar and slowly pour into cup over the baking soda.  

The explosion fizzes out and runs all the way down the volcano.

The “lava” is red because the food coloring mixes with the baking soda as the eruption happens so no need to mix the food coloring all the way through.

Have fun learning all about volcanoes, and then eating one!

Volcano Lunch - creative way to teach kids about how volcanoes work during lunch time!

Tell me what some of your favorite “experiments” or learning activities are for the kiddos.  I know you all have great ideas!  Feel free to link to a post you wrote about it in your comment.  I’d love to check it out!

Filed Under: lunches, nature, Science, volcano Tagged With: avocado, carrots, education, Eggs, Lunches, nature, red pepper, Science, teaching and learning, volcano

Learning about Cells

May 14, 2013 by Amy Hudson

I remember learning about cells when I was in 7th grade.  For extra credit, I made a cell cake.  My mom helped me decorate a round cake and create all of the cell components on top using different colored icing and piping instruments.

The cake turned out so well that my teacher decided to place it in a display case in a prominent area of the school.  I laugh thinking back at that because the cake sat in there for so long that it started to decompose, and we were never able to eat any of that delicious cell cake!

Aside from earning me those extra credit points, that cake helped me to remember and love learning about the cell.

Today’s snack is a healthy version of that same experience, and it could be done in a science classroom as a test on the parts of a cell, or at home as part of a home school curriculum.  You could also make it for your younger kids just to teach them about the cell and how it all works, like we did!

Make a cell out of healthy foods from the fridge - great for a science lesson for home schoolers, science classroooms, or simple reinforcement at home when your student learns about cells.

As I was creating this snack for my 5 year-old, I pulled up this great site which gives clear explanations of each part of the cell, along with easy-to-understand drawings and diagrams.  I modeled today’s plate after this diagram on the site:

Click photo to be taken to source

Cells have lots of different components, and can be made using just about anything you have on hand in the kitchen.   Since we were going for a healthy snack today, here is the list of ingredients we used:

Ingredients

celery (1 stalk)

turkey breast (2 slices)

yellow pepper

strawberry (1 small slice)

orange (1 slice)

carrots (2)

green grapes (1)

yogurt (1 tablespoon)

hot dog slices (3 thin slices)

string cheese (2-3 small slices)

Make a cell out of healthy foods from the fridge - great for a science lesson for home schoolers, science classroooms, or simple reinforcement at home when your student learns about cells.

Create your cell by arranging each element on the plate as shown.

The carrots are sliced in half so that they lay flat on the plate.

To create the shape of the centrioles (green grapes), slice a green grape into wheels, then slice tiny triangles out of the edges.

The ribosomes (yogurt) are made using the following technique (which we absolutely love!):

The finished product:

Make a cell out of healthy foods from the fridge - great for a science lesson for home schoolers, science classroooms, or simple reinforcement at home when your student learns about cells.

How to use this snack / activity

Challenge your (older) student to create a cell at home for a snack using some of the ingredients pictured here.  Your student can see if he can name each part of the cell and what its function is when he is done.

Teach your younger children about the human body using this snack.  You could draw the different parts on index cards, and write the function of the part on the back.  Your children can pick up one card at a time to learn what that part of the cell does.  They can even eat that part as you explain what its job is.

Science teachers could use this as an assessment activity.  Provide foods such as those pictured here, and assign students to create a plate of the animal cell, and be prepared to explain what each part is and its function.

Use resources like this to dig deeper and learn even more together with your child!

More Science Related Snacks

Solar System

Volcano

Under the Sea ecosystem

(Sharing HERE)

Did you enjoy today’s snack?  Learn more about this blog here.


Filed Under: cells, snacks Tagged With: Celery, cells, educational, grapes, orange, Science, Strawberries, super healthy, teaching and learning, turkey, Weekly Kid, Weekly Kid's Co-op, yogurt

Rocketship lunch

April 14, 2013 by Amy Hudson

3-2-1 Blastoff! What kid wouldn’t love a rocket ship going off into space for their lunch?

Awhile back I guest posted over at Build a Menu sharing this Rocket Ship Lunch.  I made a new one that is even better!  Today’s plate incorporates carrots, yellow pepper, fresh turkey breast, a high-protein wrap, and greek yogurt.  I made this lunch for my girls several times and each time I did, they were so excited!  I think it is one of their favorites!

Rocket kids lunch by CreativeKidSnacks.com | Turkey breast in a whole wheat tortilla wrap (high fiber and protein) 
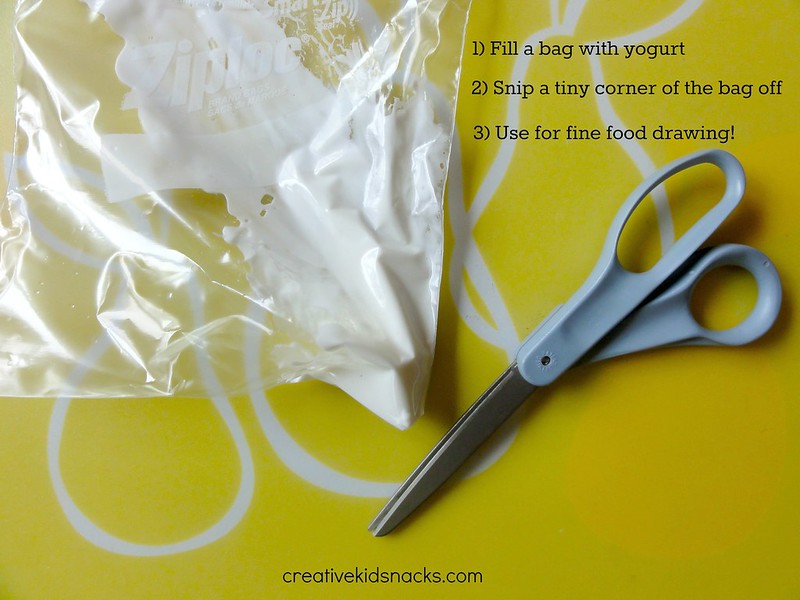
with carrots & yellow peppers.  Made this for my own kids using technique shown in post with unsweetened GREEK yogurt and they ate it all upIngredients:

1 whole grain tortilla wrap (I use the Ole Xtreme wellness Multi-Grain.  It has the highest protein and fiber bang for your buck)

2 baby carrots

3 thin slices yellow bell pepper

1 T yogurt (any kind – I used greek for the high protein content)

To make Rocket Lunch:

Assemble your turkey wrap by placing some mayo or miracle whip,turkey breast and any other desired elements into tortilla.  Roll as you would a burrito.  Slice off one end completely so you have a straight bottom edge for your rocket.  For the top of the rocket, slice your wrap into a point shape.  Take a small portion of the tortilla you cut off and slice two thin triangles to place on the sides of your main wrap as shown above.

Next, slice a baby carrot into wheels.  Use two wheels for windows on the rocket.  Slice another baby carrot in half lengthwise and cut about 1/3 off of the top of each half to create a straight edge.  Place one half carrot in the center beneath the rocket, and slice your other remaining half in half again.  Arrange carrots with two thin slices of yellow bell pepper as shown.  Now you have your flames coming from the rocket!

Finally, it’s time to make your smoke trail and stars.  Spoon 1-2 tablespoons of yogurt into a plastic bag.  Snip off a tiny corner of the bag, and use the bag to pipe little stars all around the rocket as well as little trails of smoke beneath the rocket.

*I’ve mentioned before that I can get away using any kind of yogurt when it becomes a design piped on a plate.  Although my kids would never reach for a cup of unsweetened Greek yogurt from the fridge, they lick it all up when it’s served on a creative plate like this! *

If you enjoyed today’s snack about outer space, you might like our Solar System snack as well!

(Sharing HERE)

Did you enjoy today’s snack?  Learn more about this blog here.

Filed Under: carrots, everyday scenes, more fun stuff, Rocketship, Science, solar system, Space, turkey, yogurt Tagged With: carrots, Rocketship, Science, solar system, teaching and learning, turkey, yogurt

I'm Amy. One of my passions is serving my two little girls healthy, wholesome food in unexpected ways. Lunch time has become a time of learning, imagining, and bonding for us as we use great food to create little works of art... Read More…

facebooktwitterpinterest instagram google+

Tags

animals Apple avocado banana Biblical Birthday Parties blueberries Books Breakfasts carrots Celery cheese Christmas cottage cheese desserts Disney Easter educational Eggs everyday scenes grapes ham history Holidays Lunches movies nature Oatmeal Party Food peanut butter peanut butter sandwich raisin Raspberries Snacks snowman Sports Strawberries super healthy teaching and learning turkey TV shows Valentines Day Weekly Kids Co-op Winter yogurt

Best of

Best Of

Copyright Note

Please feel free to use any of these ideas with your children at home, school, church, or anywhere you are inspired to make fun of lunch. If you would like to share a post on a blog or site, you may use one picture so long as you include a link to the original post. Please do not re-post the whole article or distribute printed-out content without written permission from the original author.

Grab our button!

Creative Kid Snacks Button

© Copyright Creative Kid Snacks · Design & Development by 4th & Market