• Home
  • New? Start Here!
  • Holidays
  • Parties
  • Contact
  • Facebook
  • Twitter
  • Pinterest
  • Google+
  • Instagram

Creative Kid Snacks

make fun of lunch!

  • Breakfasts
  • Lunches
  • Dinner
  • Snacks
  • Desserts

Space Party Food

April 21, 2015 by Amy Hudson

A friend asked for some creative food ideas to serve at her kids’ space themed birthday party.  It’s actually a NASA themed party, which is very cool for a theme.  Here are some of the best healthy foods to serve at a space themed kids birthday party.

Space Themed Party Food #healthy #birthday party #menu #earth

Rocket Wraps

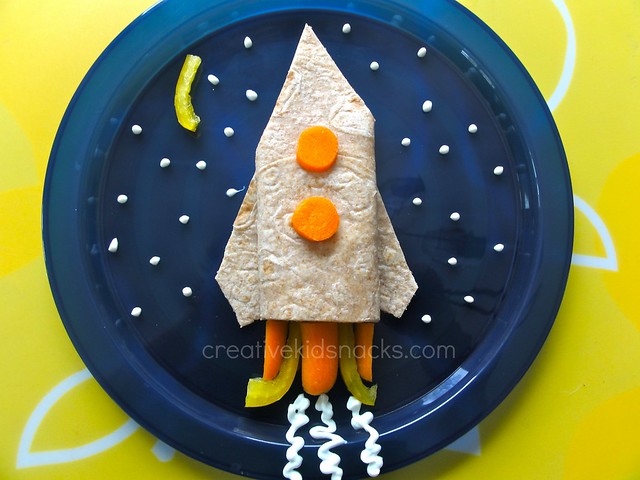
(Via Creative Kid Snacks)

Serve turkey and cheese wraps for a main course.  This individual plate can be created by following the recipe here.

Alternatively, you can arrange wraps onto a larger platter as shown in the photo below.  You can make as many rockets out of two wraps as desired, and omit the cottage cheese smoke trail and stars.

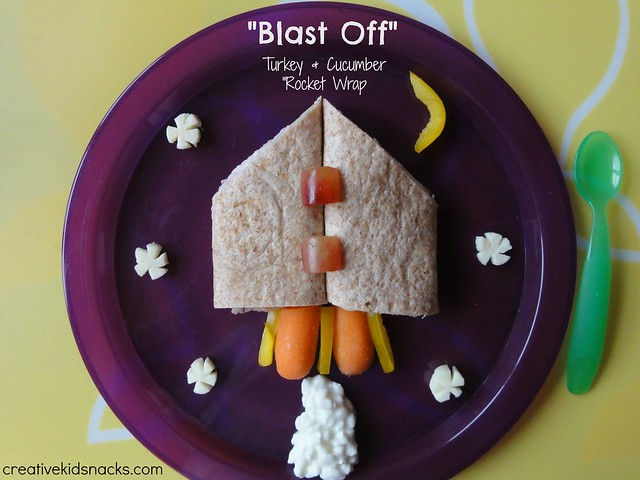
 (Via Creative Kid Snacks for Build-a-menu)

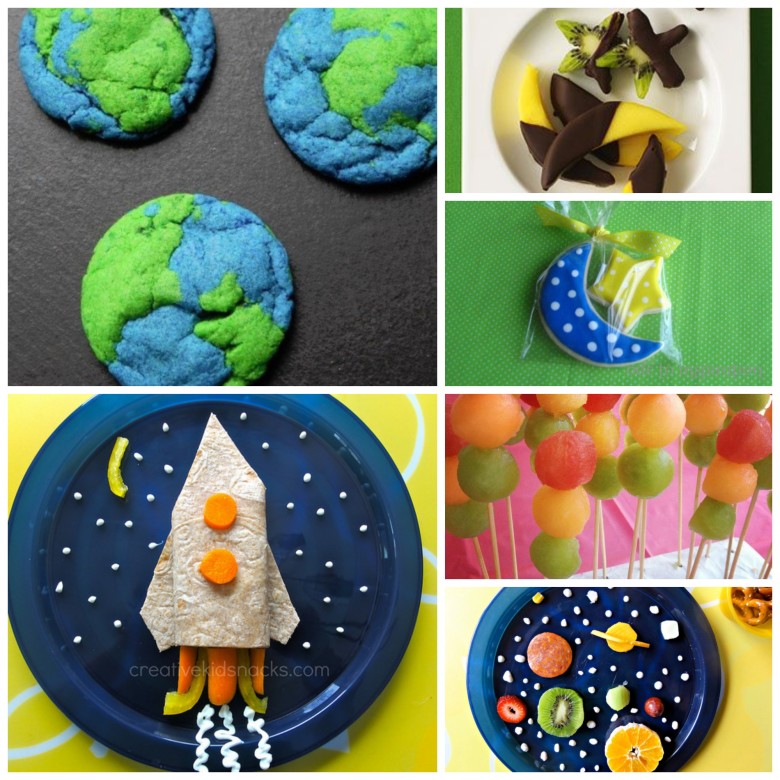
Fruit Stars and Moon

fruit stars and moons

(via Amy on Pinterest)

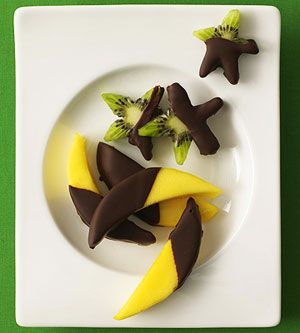
I love this idea.  Serve Mango Moons and Kiwi stars dipped in chocolate!  Who can resist?

Planet Kabobs

fruit planets

(Via Amy on Pinterest)

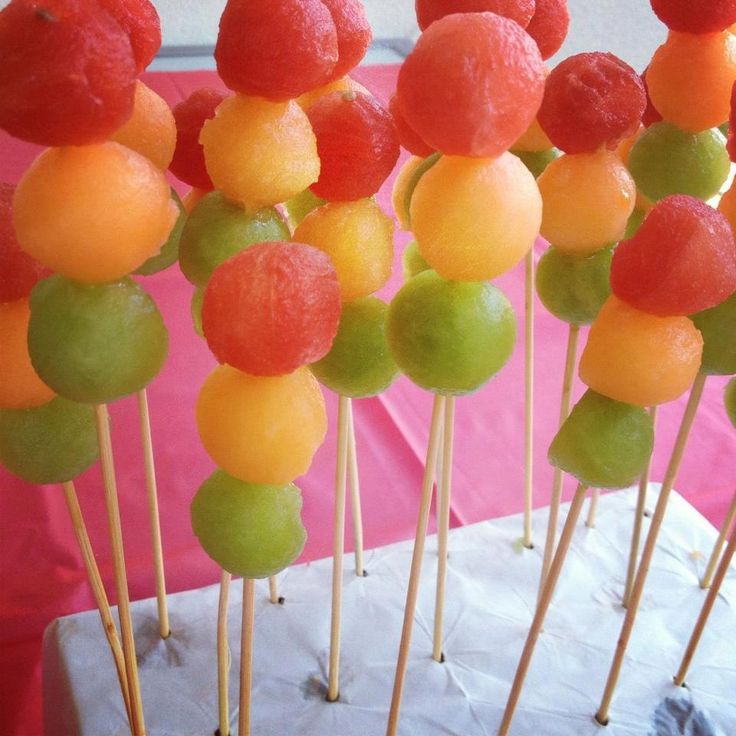
Scoop Melon into balls and add to skewers.  Place in a foam holder and label “Planet Kabobs”.  In addition to melon, you can use red or green grapes, as they are also a great round shape.

Earth Cookies

Earth Cookies

(via Amy on Pinterest)

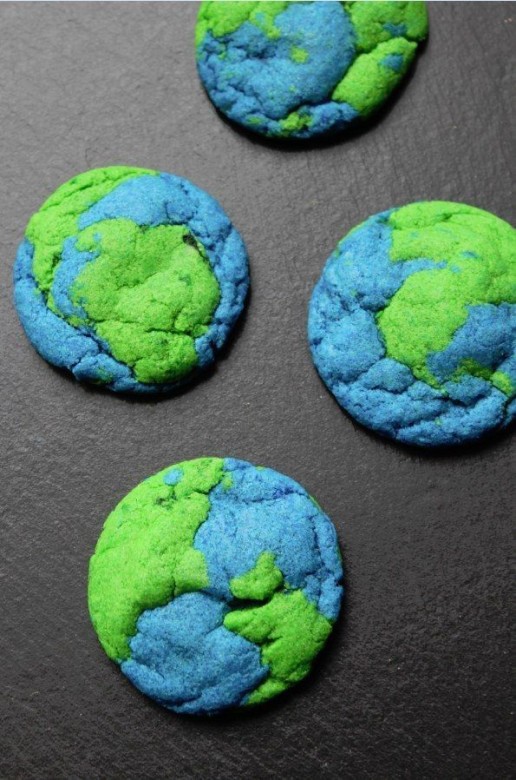
Nasa is famous for its amazing photography of planets and stars in our galaxy, so make these earth cookies and display on a black plate or platter for a great addition to your party menu.

Food Craft

Solar System Snack

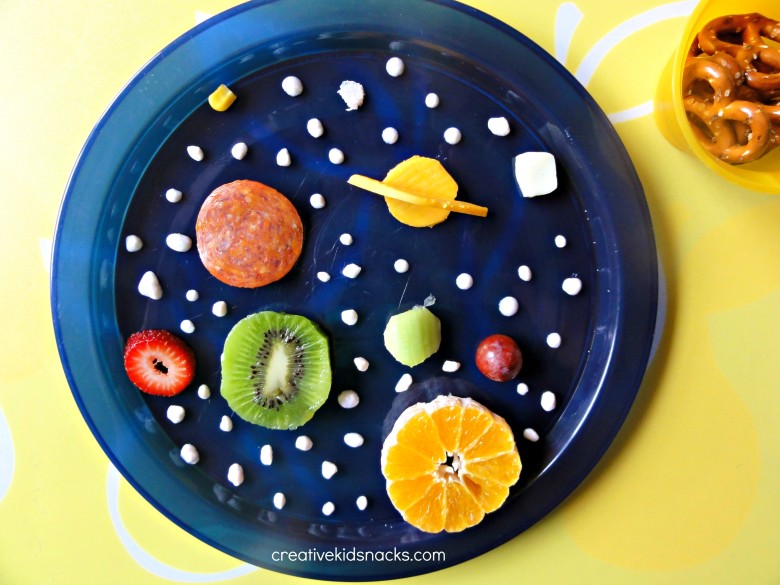
Have the kids create their own Solar System with finger foods!  Teach them the names of each planet as they arrange them on their plates and then allow them to add their own stars!  Solar System Snack directions here.

Party Favors

stars and moon

(via Amy on Pinterest)

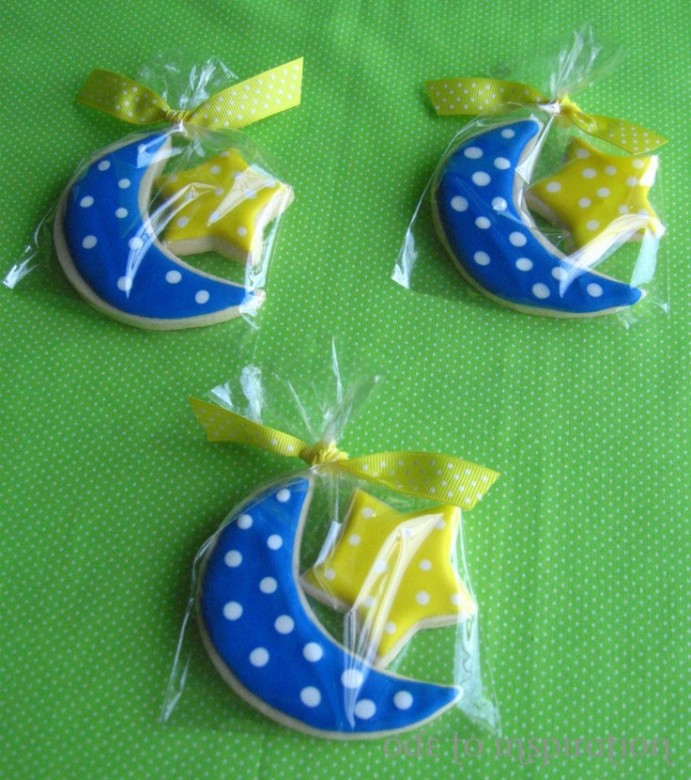
Send the kids home with a bag of sugar cookies shaped like a star and a moon.  Be sure to use the right kind of icing, as typical buttercream may stick to the clear baggie!

Hosting a themed birthday and looking for healthy and creative menu ideas?  Leave a comment on today’s post or on our Facebook wall and let us help you plan a delicious and healthy menu!  Be sure to let us know at least 3 weeks before the party to give us time to prepare a post just for you!

Follow my Pinterest board on Kids Party Themes and Ideas

Filed Under: Birthday Parties, Party food, solar system, Space, Uncategorized Tagged With: Birthday Parties, Party Food, solar system, Space, Space Birthday Party

Princess Food for a Princess Party

April 25, 2013 by Amy Hudson

What little girl doesn’t love princesses?  There’s princess Belle, Cinderella, Snow White, and all of the other Disney princesses, along with the fun of dancing around the living room wearing your princess crown.  My girls own several dress-up gowns inspired by the Disney princesses, and love wearing them around the house.

Today, we are sharing some princess birthday party food ideas for a facebook fan planning her daughter’s upcoming event.

Princess Party Food

Cheese Princess CrownsSimple Cheddar Cheese Princess Crowns - perfect for a princess party | CreativeKidSnacks.com

Simply purchase a package of sliced cheddar cheese.  Use a firm cheese, (so not packaged American cheese) so that you will be able to cut it into the shape of little crowns.  I made 6 little crowns to show you, and for those I only needed 3 cheese slices.  Lay 3 slices on top of each other, then slice in half.  Next, on one stack of 3 halves, take your knife and slice little triangles out of the tops.

Carefully separate.  Repeat with the other 3 halves, and continue until you have the desired amount.

Princess Castle Sandwiches

Castle sandwiches - perfect to serve at a princess party | CreativeKidSnacks.com

Serve these little sandwiches shaped like castles.  Simply make a simple turkey sandwich, (or PB&J’s to make it easy for a birthday party), and slice little squares out of the top of the sandwich.  Finish the look by adding some cheese on top to look like doors and windows.  If you are serving a larger group, you can skip the flags all together, or use some toothpick flags for a cute presentation.  These castle sandwiches are perfect little accompaniments to your tea.

Royal JewelsServe fruit labeled as "Royal Jewels" for an easy Princess Party menu item | CreativeKidSnacks.com

A simple and easy idea (plus a good way to incorporate fresh fruit into your princess party), is to serve mixed fruit in a bowl and label it “Royal Jewels”.  Super easy, right?

“Tea Time” Drinks

(click image for source)

Serve your drinks in a tea set and label it “Princess Tea Time”.  The princess party guests will love sipping their drink from a special princess teacup.  If you don’t feel like risking using the ceramic ones, go with the plastic kids set.  They will love it, and the castle “tea sandwiches” will be perfect alongside!

More Princess Party Ideas:

Princess Parties: Kara’s Party Ideas

Pinterest: Princess Parties Search

And now it’s time for the Weekly Kids Co-op!

As moms, we are constantly on the lookout for great teaching tools and resources to use with our children.  I know I always benefit from seeing the creativity of others as they share lessons, activities, crafts, food, and more in their various blogs.  Mommy bloggers have become popular for a good reason: information is power.  Right, ladies?

The Weekly Kids Co-Op

The Weekly Kids Co-op is one of my very favorite such resources.  I have been linking my snacks to this link party for months now, and I am excited to be able to co-host it here at Creative Kid Snacks.

If you are a blogger, link up your kid related posts to share with all of us eager beaver mommas.  If you are a mom, take some time to look through all of the great ideas for teaching and playing with our kids.  Pin what you love.  Like I said before, information is power!

This party will take place every Thursday at Creative Kid Snacks.  You will find it hosted on several other blogs, but the days the party goes live will vary from blog to blog.

Get ready for all the great ideas!  Link, share, and enjoy!


Filed Under: Birthday Parties, Party food, Princess Party Food Tagged With: Birthday Parties, Party Food, Princess Party Food

Superbowl Snack

January 31, 2013 by Amy Hudson

Looking for a cute, healthy Superbowl Snack you can make with the kids?  I’ve got a Superbowl inspired veggie tray you can make with the kids before the big game.  This is not too fancy, but I’m sure people will get a “kick” out of extra effort you put into it!

Superbowl Snack

First, lay celery along the center of your platter for the field.  If you have a big crowd, you could use two layers of celery.

Next, create the lines across the field.  I used white string cheese sliced into thinner sections and just laid them across the celery.  An almond football goes down right onto the line of scrimmage.

To make the “fans” I used several serving cups to stand some red bell pepper and baby carrots in to look like they are slightly elevated from the field.  I filled in the extra areas with some cashews.

As a finishing touch, I just laid some pretzel sticks down to look like a goal post.  (I tried to make them stand in the air, but it was just too much work – even for me!)

What are your plans for the Superbowl this year?  What Superbowl Snacks are you ready to chow down on?

Check out a few of our other Sporty Snacks:

Downhill Skier
 
 (Sharing HERE)

Filed Under: carrots, celery, cheese, nuts, Party food, sports Tagged With: Football, healthy snack, Party Food, Sports, super healthy, Superbowl

3 Creative Christmas Veggie Trays

December 13, 2012 by Amy Hudson

Today is all about creative veggie trays for the holidays.  Transform your traditional relish tray with these three vegetable platters that rock!

This year, volunteer to bring the vegetable platter to Christmas dinner!
Create an awesome veggie tray that everyone will love!  The kids will LOVE to help you!

 Use a large round serving platter.  Start with the celery, and create several zig-zaggy rows going accross.

Next, fill in the yellow peppers, saving one for the “hook” on top, then carrots, then cherry tomatoes, and you are all set!

I got the idea for this Christmas present veggie tray when I found the following little boxes at Walmart.

I bought the boxes with the inspiration for this veggie tray, but knowing I could eventually use them as gift boxes down the road.

What I did to create the present was to place all four boxes onto a larger platter, tie a nice thick ribbon around them to make them look like a present and then LINE them.

To line each box, simply open a baggie, roll the top zipper part over so it lays on the outside of the bag, and fill with the veggies.  This will ensure the boxes stay dry and, the best news of all, the veggies are easy to put away once the tray is done being used!

Try this fun and popular idea with the kids this year!

For this tree, I first created the outside branches of the tree with cut celery.  It is just the perfect shape and look to go on the outside.
Next, add sliced cucumber to fill in the middle of the tree.  This cucumber layer can be 2-3 layers deep if you have a large crowd to serve.
Add broccoli to fill in any gaps between the cucumbers and celery, and place some nice red cherry tomatoes to look like ornaments.
To ensure the baby carrots used to make the tree’s “trunk” stand up, cut them in half so they sit flat on the tray.
Finish with a yellow pepper star, and you are all ready to dig in!
Variations:
Use deli meat for the trunk by placing thin rolls next to each other in a vertical pattern.
To feed a bigger group, use celery for the entire bottom layer, cucumbers for a second layer on top of that, etc.

To me, the very best part of making these fun trays with your kids is the fact that they are munching on veggies the whole time!

Check out more Christmas food!
(Sharing HERE)


Filed Under: broccoli, carrots, celery, christmas, Christmas tree, cucumber, Party food, tomato, yellow pepper Tagged With: broccoli, carrots, Celery, Christmas, Christmas tree, cucumber, Party Food, super healthy, tomato, veggie tray, yellow pepper

Santa Party Poppers

December 7, 2012 by Amy Hudson

Meet our cute little Santa Party Popper.

I’ve taken to calling anything on a short stick a “popper” because you can pop it into your mouth and enjoy in one or two bites.

These guys are a dessert for the kids to help make after dinner one night or in preparation for a little party.
*Note:  Santa Party Poppers should be assembled within an hour of when you plan to serve them, because the bananas will brown being out in the air too long.
To make 10 Santa Poppers you will need:
10 regular sized marshmallows (not minis)
2 additional regular sized marshmallows cut into eights (for puff on Santa’s hat)
10 one inch tall banana chunks
10 red mini M&Ms
1/2 cup chocolate chips (for melting)
10 strawberries cut to appropriate size for a hat


Before assembly, slice each full sized marshmallow in half lengthwise.  You will need 2 halves per Santa.
To assemble, slide the small marshmallow bit (from those cut into eights) to the top of a decorative toothpick.  Next, slide the strawberry (flat side down), one half marshmallow, the banana, and lastly the other half marshmallow.

Make sure you slice your banana into chunks evenly and straight to ensure that they do not lean or tip over once assembled.

Tip:  Sliding the bottom marshmallow on with the sticky side down will allow it to stand up better on the serving plate because it will stick!
Next, melt your half cup of chocolate chips in the microwave.  I melted mine for a total of 45-50 seconds on high, stopping to stir every 20 seconds.
Once melted, spoon chocolate into a Ziploc bag and snip a TINY triangle off one of the corners.  You will pipe the chocolate out through this hole.
Pipe two eyes and dot for his nose on every Santa.  I placed the nose dot right above the bottom marshmallow.
Place a red M&M on each chocolate dot and press to stick down for Santa’s nose.
Once this step is complete, refrigerate for 10 minutes and serve (see *note above)
The kids will love this dessert, and you can feel good knowing it is mostly fruit.  The only refined sugar they will be getting is the equivalent of 1 1/8 marshmallow and a tiny bit of chocolate.

(Linking up HERE)

Photobucket

Filed Under: banana, christmas, desserts, holidays, Party food, Santa Claus, strawberries Tagged With: banana, Christmas, desserts, Holidays, Party Food, Santa Claus, Strawberries

Grinch Party Poppers

December 4, 2012 by Amy Hudson

The Grinch is one of Dr. Suess’ most beloved characters, and at Christmas we love to watch “How the Grinch Stole Christmas”.
Just like we love to make Christmas trees, wreathes, snowmen, Santa, and reindeer for snacks this time of the year, we also love Mr. Grinch.

Today’s snack is a perfect finger food to put out for the kids at a Christmas party.
These would also be perfect for a Christmastime sleepover, featuring popcorn, the Grinch movie, and these scrumptious little poppers.
Healthy, cute, and super fun, you know these little guys will be a hit.
Here’s how to make them.

Step 1: Collect your ingredients and assemble Grinches

 
(Depending on how many Grinch poppers you would like to make, you will need that many of the following):
 
-slice of white string cheese (at least 1/3 inch thick)
-strawberry
-banana slice (at least 1/3 inch thick)
-green grape (with bottom sliced off so it lays flat)
-melted chocolate. (1/2 of a Hershey’s bar, broken into pieces and microwaved until melted, stirring at 20 second intervals will be plenty to make up to 25 poppers)
 
Assemble each Grinch by sliding each piece up a plastic toothpick.  I get mine from the dollar store.  They come in a package of assorted colors with little hearts on the top.  They are the perfect size, and not too sharp for the kids to eat off of.
 

 Step 2: Melt Chocolate

 
 Depending on how many poppers you are making, melt the appropriate amount of chocolate.  I used a simple Hershey bar in this recipe.

1/2 of a Hershey’s bar, broken into pieces and microwaved until melted, stirring at 20 second intervals will be plenty to make up to 25 poppers.

  Step 3: Pipe Grinch faces

Place your melted chocolate into a piping bag with a very small tip attachment; 
or do it the easy way by using a ziploc bag with a tiny snip off of one corner to pipe your faces.
Make 2 eyes with frowning eyebrows above them.  Next, make a wide smile with bumps and a little point at the bottom middle.

Step 4:  Chill, serve, and enjoy!

 
Chill in the refridgerator for at least 15 minutes.
 

 My little girls LOVED these guys.  I made about 10 of them for today’s post, and they had to be cut off after 4 each!  (They still hadn’t had their lunch yet)!
 
TIP: Pipe Grinch faces onto grapes and chill in advance if you want to work ahead and prevent the rest of the ingredients from being out in the air too long.
 
(Sharing HERE)
 
Follow us on Facebook / Pinterest
 

Filed Under: banana, books, cheese, christmas, desserts, holidays, movies, Party food, popular snacks, snacks, strawberries Tagged With: banana, Books, cheese, Christmas, desserts, Dr. Seuss, Grinch Party Poppers, Holidays, movies, Party Food, Snacks, Strawberries

I'm Amy. One of my passions is serving my two little girls healthy, wholesome food in unexpected ways. Lunch time has become a time of learning, imagining, and bonding for us as we use great food to create little works of art... Read More…

facebooktwitterpinterest instagram google+

Tags

animals Apple avocado banana Biblical Birthday Parties blueberries Books Breakfasts carrots Celery cheese Christmas cottage cheese desserts Disney Easter educational Eggs everyday scenes grapes ham history Holidays Lunches movies nature Oatmeal Party Food peanut butter peanut butter sandwich raisin Raspberries Snacks snowman Sports Strawberries super healthy teaching and learning turkey TV shows Valentines Day Weekly Kids Co-op Winter yogurt

Best of

Best Of

Copyright Note

Please feel free to use any of these ideas with your children at home, school, church, or anywhere you are inspired to make fun of lunch. If you would like to share a post on a blog or site, you may use one picture so long as you include a link to the original post. Please do not re-post the whole article or distribute printed-out content without written permission from the original author.

Grab our button!

Creative Kid Snacks Button

© Copyright Creative Kid Snacks · Design & Development by 4th & Market