• Home
  • New? Start Here!
  • Holidays
  • Parties
  • Contact
  • Facebook
  • Twitter
  • Pinterest
  • Google+
  • Instagram

Creative Kid Snacks

make fun of lunch!

  • Breakfasts
  • Lunches
  • Dinner
  • Snacks
  • Desserts

Angels we have heard on high

December 26, 2012 by Amy Hudson

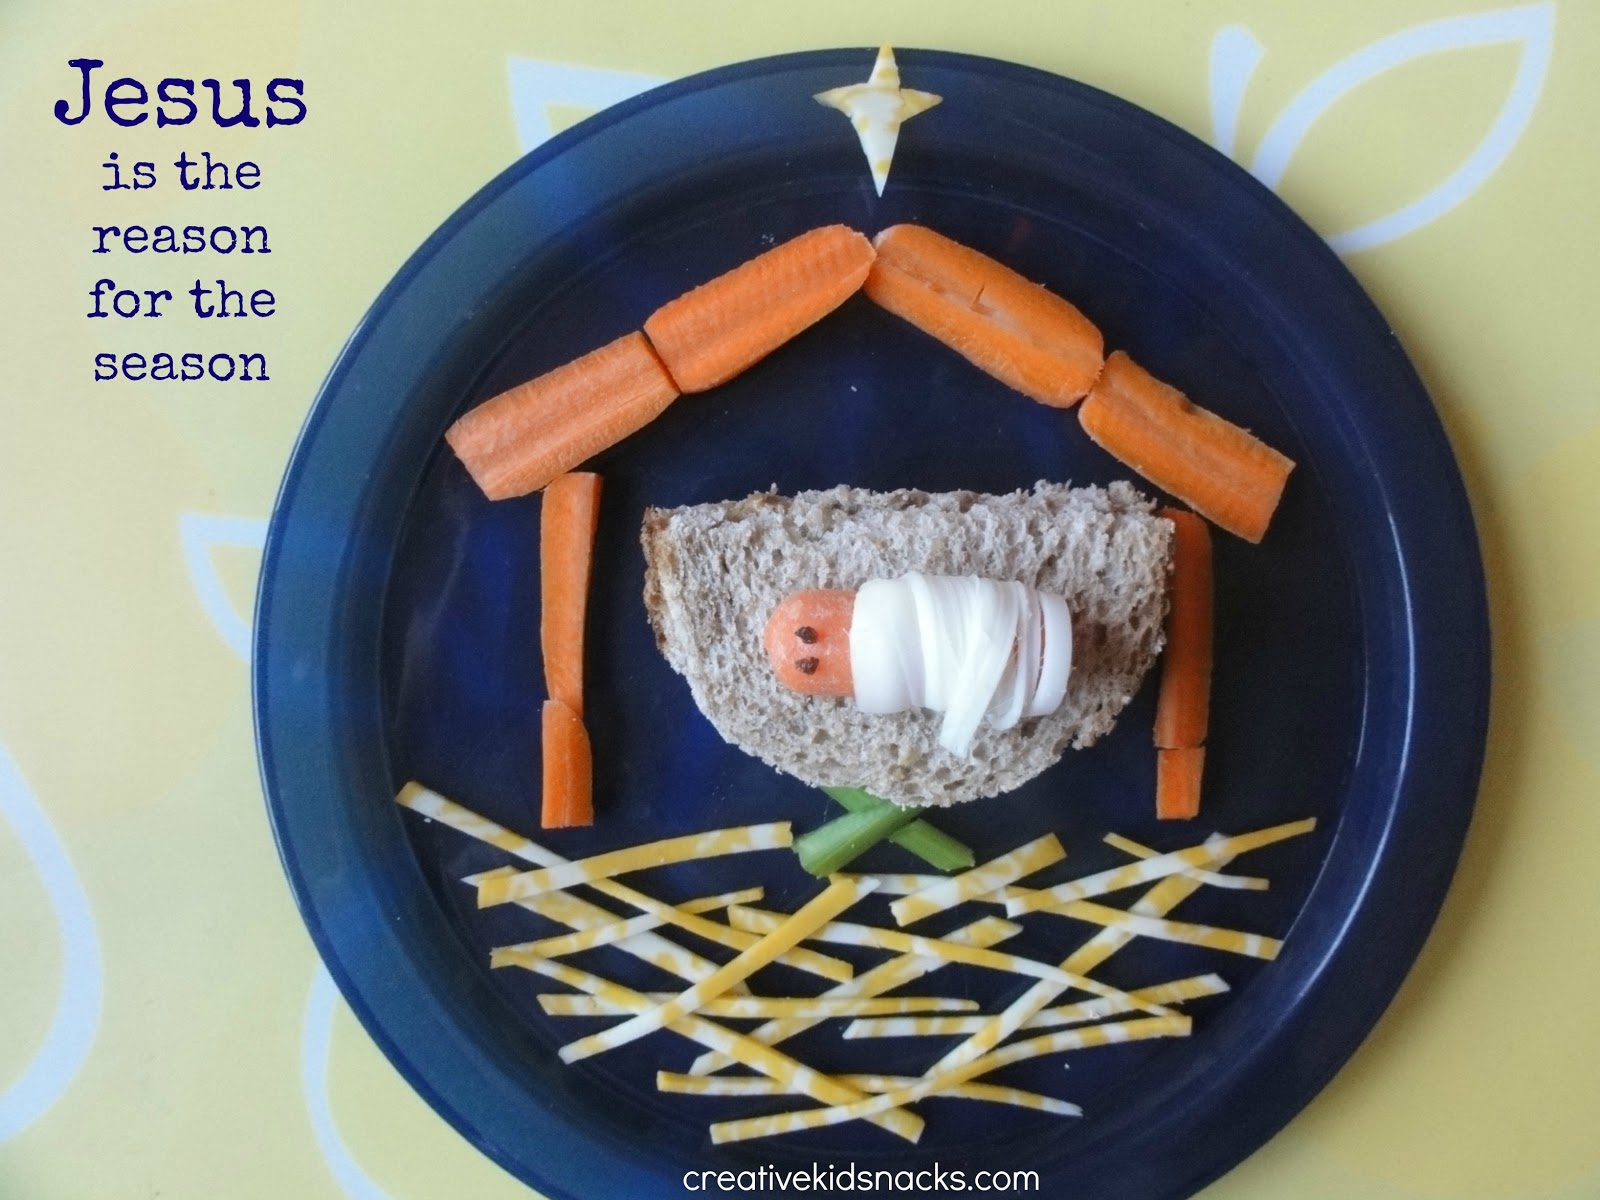
This healthy and fun little snack celebrates the birth of Jesus as recorded in Luke 2:8-14.  Read the story of the angel choir appearing in the heavens to announce that baby Jesus had been born, and then make this snack to continue the celebration!


“And in the same region there were shepherds out in the field, keeping watch over their flock by night. And an angel of the Lord appeared to them, and the glory of the Lord shone around them, and they were filled with great fear.  And the angel said to them, “Fear not, for behold, I bring you good news of great joy that will be for all the people.  For unto you is born this day in the city of David a Savior, who is Christ the Lord.  And this will be a sign for you: you will find a baby wrapped in swaddling cloths and lying in a manger.”  And suddenly there was with the angel a multitude of the heavenly host praising God and saying,
 “Glory to God in the highest,
    and on earth peace among those with whom he is pleased!”  

Luke 2: 8-14


Ingredients:

2 hard boiled eggs
2 baby carrots
1 t cottage cheese
2 raisins
1 strawberry
1/s banana
1 slice white cheese
1 t miracle whip or mayo

Directions:

Slice hard boiled eggs in half lengthwise.  Carefully remove yolk.  Place one half yolk onto top corner of plate for moon.  Place remaining yolk from the 2 eggs into a small bowl and mix with mayo.  Spoon mixture into a zip baggie with a corner sliced off, and set aside. 
Slice bottom off of egg white halves.  Use sliced off section to cut triangular arms/wings for the angels.  Arrange all on the plate as shown. 
Slice baby carrots in half lengthwise.  Slice in half again width-wise.  Use for shepherd’s bodies.  Slice one of the carrot quarters into thin strips for the shepherd’s arms and legs and arrange on the plate as shown. 
Slice little rectangles with tiny triangles sliced out for sheep’s legs.  Top with 1/2 teaspoon of cottage cheese each to look like sheep bodies.
Top angel’s bodies with banana slices for heads, then add raisin eyes and thin strips of strawberry for a smile.  Now take piping bag with egg mixture in it and pipe hair and halo for each angel. 
Use a pizza cutter to slice remaining slice of white cheese into lots of tiny pieces.  Sprinkle around the plate to look like stars.

Nutritional Benefits of this Snack:

Eggs are full of benefits, including being rich in protein, vitamin B, and omega-3’s.  See more about health benefits of eggs here.


Filed Under: banana, biblical, carrots, Easter, eggs Tagged With: Biblical, carrots, cheese, Easter, Eggs, raisins, Snacks

Jingle Bells

December 21, 2012 by Amy Hudson

Jingle Bells, Jingle Bells, Jingle all the way!

It’s almost Christmas!
If you have older kids who will be home from school for winter break, and you are new to the creative lunches thing, here is a perfect one to make for them!
For this lunch, we will re-purpose those cookie cutters we’ve undoubtedly been using to make our cookies this season.


My cookie cutters are a little on the thin side, so I used them for one slice at a time.
Using whole wheat bread, we pressed the cookie cutter into each piece, then added our turkey and cheese.  That’s it!


Little Emma (age 2) loved pressing the cookie cutter into each piece of bread to help me!
Finally, we placed some holly around the top of the plate to make it look even more festive.
To make the bow, slice a strawberry in half so you have two triangles for the loops.  Slice the remaining portion into two thin rectangles for the ties, and add one last bit in the center to complete the bow.
Sweet, easy, healthy, and merry!

Filed Under: christmas, holidays, Uncategorized Tagged With: Christmas, jingle bells, Winter

Snowman Party Poppers

December 17, 2012 by Amy Hudson

Are you having a winter party?  Tis the season to celebrate the snow with a cute snowman snack I like to call Snowman Party Poppers.
We’ve already introduced you to the Christmas Snacks we like to call Grinch Party Poppers and Santa party poppers; so today it’s time for the snowmen!


These guys are made of mozzarella cheese, blackberry jam, pretzels, and fruit – a winning combination of flavors if you ask me!
Here’s how to make your own.
Ingredients needed (for 15+ poppers):
-large chunk mozzarella cheese – the largest size available at most grocery stores
-pretzel sticks
-2-3 tablespoons seedless blackberry preserves (may substitute other seedless preserves)
-grapes (or other desired fruit) for hats
Assembly:
Step 1:  Cut mozzarella into groups of 3 chunk sizes.
Start with deciding the size you’d like the head chunk to be and cut those equally.
Next, cut slightly larger chunks for the middle, and repeat for the bottom.
Tip:  think about how much cheese would be desirable to eat for one child in one sitting.  Make sure your bottom chunk is not so big that it would be too much for the average person to want to finish.
Step 2:  Fill piping bag or plastic baggie with corner sliced off for piping with blackberry preserves, and pipe faces onto smallest chunks of cheese.
 The fruit and cheese combo is classic and tastes fantastic.
The preserves, once piped onto the cheese for faces, stay in place very well, and they should not dribble as long as you do not make the dots too large.  I used the smallest tip on my piping bags.
Step 3:  Build Snowmen
Because they stay together so well, these guys don’t even require a toothpick!  If you are serving them at a party, however, I would use one in order to be able to quickly grab one from a serving plate.
Layer your three chunks of cheese, largest on bottom, and work up.  Slice the bottoms off of as many grapes as you have snowmen and add to the top to look like hats.
Insert toothpicks and you are ready to go!
(Sharing HERE)


Filed Under: cheese, christmas, holidays, snowman, Uncategorized Tagged With: cheese, Christmas, Holidays, snowman, Winter

3 Creative Christmas Veggie Trays

December 13, 2012 by Amy Hudson

Today is all about creative veggie trays for the holidays.  Transform your traditional relish tray with these three vegetable platters that rock!

This year, volunteer to bring the vegetable platter to Christmas dinner!
Create an awesome veggie tray that everyone will love!  The kids will LOVE to help you!

 Use a large round serving platter.  Start with the celery, and create several zig-zaggy rows going accross.

Next, fill in the yellow peppers, saving one for the “hook” on top, then carrots, then cherry tomatoes, and you are all set!

I got the idea for this Christmas present veggie tray when I found the following little boxes at Walmart.

I bought the boxes with the inspiration for this veggie tray, but knowing I could eventually use them as gift boxes down the road.

What I did to create the present was to place all four boxes onto a larger platter, tie a nice thick ribbon around them to make them look like a present and then LINE them.

To line each box, simply open a baggie, roll the top zipper part over so it lays on the outside of the bag, and fill with the veggies.  This will ensure the boxes stay dry and, the best news of all, the veggies are easy to put away once the tray is done being used!

Try this fun and popular idea with the kids this year!

For this tree, I first created the outside branches of the tree with cut celery.  It is just the perfect shape and look to go on the outside.
Next, add sliced cucumber to fill in the middle of the tree.  This cucumber layer can be 2-3 layers deep if you have a large crowd to serve.
Add broccoli to fill in any gaps between the cucumbers and celery, and place some nice red cherry tomatoes to look like ornaments.
To ensure the baby carrots used to make the tree’s “trunk” stand up, cut them in half so they sit flat on the tray.
Finish with a yellow pepper star, and you are all ready to dig in!
Variations:
Use deli meat for the trunk by placing thin rolls next to each other in a vertical pattern.
To feed a bigger group, use celery for the entire bottom layer, cucumbers for a second layer on top of that, etc.

To me, the very best part of making these fun trays with your kids is the fact that they are munching on veggies the whole time!

Check out more Christmas food!
(Sharing HERE)


Filed Under: broccoli, carrots, celery, christmas, Christmas tree, cucumber, Party food, tomato, yellow pepper Tagged With: broccoli, carrots, Celery, Christmas, Christmas tree, cucumber, Party Food, super healthy, tomato, veggie tray, yellow pepper

Snowman Popcorn Cups

December 10, 2012 by Amy Hudson

Introducing the Snowman Popcorn Cup!
Try this one for your next winter play date, party, or simply for a fun family movie night at home!
In order to create these guys, all you will need is the following:
-clear containers:  I used clear plastic cups and a clean, clear vase
-ribbon or fabric for scarves
-black and orange sharpie markers, or orange construction paper if you don’t have an orange sharpie
-white popcorn
Note:  popcorn is not terribly nutritious, yet neither is it terrible for you.  The more oil, salt, and butter it is made with, the worse it is for you.  This article mentions the best way of preparing popcorn being to air pop it and then add some extra virgin olive oil and sea salt for taste.  I went the easy route and bought some Vic’s All Natural Light White Popcorn for this snack.  The rule of thumb is, the less steps and ingredients to produce the popcorn, the better.
To transform this vase into a large popcorn snowman, I simply placed some tape onto where the eyes, smile, and buttons would be, then I drew them right on.  I found that the clear packing tape (which I used for the eyes in the picture above, was much easier to take off and much less visible against the glass than regular scotch tape, so use the packing tape if you have it.
For the nose, I used a small triangle of orange construction paper and taped it right on.  Like I mentioned above, an orange sharpie could be used for this too (along with a piece of tape to protect your vase, of course).
 For the small plastic cups, I used a package from Walmart that cost under $3 for 100.
The little cups are equivalent to 1 1/2 cups or so of popcorn, a great serving for the kids.
 I hope you enjoy creating your own snowman popcorn cups.  Be creative with your supplies, and show me what you came up!  I’d love a link to a photo in the comments from you!
Variations:
Tie a brown pipe cleaner around the middle of the cup to create some arms
Glue eyeballs (from the craft supplies aisle) onto the plastic cups
Use your imagination!

(Linking up HERE)

Filed Under: christmas, popcorn, snowman, Winter Tagged With: Christmas, popcorn, snowman, Winter

Santa Party Poppers

December 7, 2012 by Amy Hudson

Meet our cute little Santa Party Popper.

I’ve taken to calling anything on a short stick a “popper” because you can pop it into your mouth and enjoy in one or two bites.

These guys are a dessert for the kids to help make after dinner one night or in preparation for a little party.
*Note:  Santa Party Poppers should be assembled within an hour of when you plan to serve them, because the bananas will brown being out in the air too long.
To make 10 Santa Poppers you will need:
10 regular sized marshmallows (not minis)
2 additional regular sized marshmallows cut into eights (for puff on Santa’s hat)
10 one inch tall banana chunks
10 red mini M&Ms
1/2 cup chocolate chips (for melting)
10 strawberries cut to appropriate size for a hat


Before assembly, slice each full sized marshmallow in half lengthwise.  You will need 2 halves per Santa.
To assemble, slide the small marshmallow bit (from those cut into eights) to the top of a decorative toothpick.  Next, slide the strawberry (flat side down), one half marshmallow, the banana, and lastly the other half marshmallow.

Make sure you slice your banana into chunks evenly and straight to ensure that they do not lean or tip over once assembled.

Tip:  Sliding the bottom marshmallow on with the sticky side down will allow it to stand up better on the serving plate because it will stick!
Next, melt your half cup of chocolate chips in the microwave.  I melted mine for a total of 45-50 seconds on high, stopping to stir every 20 seconds.
Once melted, spoon chocolate into a Ziploc bag and snip a TINY triangle off one of the corners.  You will pipe the chocolate out through this hole.
Pipe two eyes and dot for his nose on every Santa.  I placed the nose dot right above the bottom marshmallow.
Place a red M&M on each chocolate dot and press to stick down for Santa’s nose.
Once this step is complete, refrigerate for 10 minutes and serve (see *note above)
The kids will love this dessert, and you can feel good knowing it is mostly fruit.  The only refined sugar they will be getting is the equivalent of 1 1/8 marshmallow and a tiny bit of chocolate.

(Linking up HERE)

Photobucket

Filed Under: banana, christmas, desserts, holidays, Party food, Santa Claus, strawberries Tagged With: banana, Christmas, desserts, Holidays, Party Food, Santa Claus, Strawberries

Cottage Cheese Snowman

December 5, 2012 by Amy Hudson

Celebrate Winter by using cottage cheese as it was truly meant to be used in the creative snack world: as snow!

Ingredients:

Our sweet snowman has a cottage cheese body , raisin eyes and buttons, 1/2 a baby carrot for a nose, and celery sticks for arms.

Directions:

Scoop the cottage cheese onto the plate with a small spoon into three circles.  Slice your baby carrot in half and add for his nose.  Place his eyes and buttons on, and finish with arms.  Done!

You can’t get much healthier than this for a festive winter snack!

Variations:
Use pretzels for his arms to look more like sticks
Use yogurt for his body
Use blueberries for his buttons

Filed Under: snow, snowman, Winter Tagged With: Christmas, Holidays, snow, snowman, Winter

Grinch Party Poppers

December 4, 2012 by Amy Hudson

The Grinch is one of Dr. Suess’ most beloved characters, and at Christmas we love to watch “How the Grinch Stole Christmas”.
Just like we love to make Christmas trees, wreathes, snowmen, Santa, and reindeer for snacks this time of the year, we also love Mr. Grinch.

Today’s snack is a perfect finger food to put out for the kids at a Christmas party.
These would also be perfect for a Christmastime sleepover, featuring popcorn, the Grinch movie, and these scrumptious little poppers.
Healthy, cute, and super fun, you know these little guys will be a hit.
Here’s how to make them.

Step 1: Collect your ingredients and assemble Grinches

 
(Depending on how many Grinch poppers you would like to make, you will need that many of the following):
 
-slice of white string cheese (at least 1/3 inch thick)
-strawberry
-banana slice (at least 1/3 inch thick)
-green grape (with bottom sliced off so it lays flat)
-melted chocolate. (1/2 of a Hershey’s bar, broken into pieces and microwaved until melted, stirring at 20 second intervals will be plenty to make up to 25 poppers)
 
Assemble each Grinch by sliding each piece up a plastic toothpick.  I get mine from the dollar store.  They come in a package of assorted colors with little hearts on the top.  They are the perfect size, and not too sharp for the kids to eat off of.
 

 Step 2: Melt Chocolate

 
 Depending on how many poppers you are making, melt the appropriate amount of chocolate.  I used a simple Hershey bar in this recipe.

1/2 of a Hershey’s bar, broken into pieces and microwaved until melted, stirring at 20 second intervals will be plenty to make up to 25 poppers.

  Step 3: Pipe Grinch faces

Place your melted chocolate into a piping bag with a very small tip attachment; 
or do it the easy way by using a ziploc bag with a tiny snip off of one corner to pipe your faces.
Make 2 eyes with frowning eyebrows above them.  Next, make a wide smile with bumps and a little point at the bottom middle.

Step 4:  Chill, serve, and enjoy!

 
Chill in the refridgerator for at least 15 minutes.
 

 My little girls LOVED these guys.  I made about 10 of them for today’s post, and they had to be cut off after 4 each!  (They still hadn’t had their lunch yet)!
 
TIP: Pipe Grinch faces onto grapes and chill in advance if you want to work ahead and prevent the rest of the ingredients from being out in the air too long.
 
(Sharing HERE)
 
Follow us on Facebook / Pinterest
 

Filed Under: banana, books, cheese, christmas, desserts, holidays, movies, Party food, popular snacks, snacks, strawberries Tagged With: banana, Books, cheese, Christmas, desserts, Dr. Seuss, Grinch Party Poppers, Holidays, movies, Party Food, Snacks, Strawberries

Santa Claus Panini

December 1, 2012 by Amy Hudson

Ingredients:

1-2 slices turkey breast
2 slices of cheese
2 raisins
5 strawberries
1/2 cup cottage cheese

Directions:

First, assemble a turkey and cheese panini sandwich by placing meat between two slices of cheese (so that cheese is between meat and each slice of bread).  Cook sandwich in a panini press or on the stovetop as you would a grilled cheese.

After placing it on the plate, spoon some cottage cheese around the bottom of the plate and leave a little gap where Santa’s mouth would be. Note: the sandwich is placed with the rounded side of the bread down.

Next, create his hat and nose with some strawberries.  Finish the look of the hat with a little whipped cream (or cottage cheese), and finish with some raisin eyes.

This one was a favorite!

Filed Under: Uncategorized Tagged With: Christmas, Holidays, Santa

Baby Jesus in the Manger

November 30, 2012 by Amy Hudson

“For to us a child is born, to us a son is given, and the government will be on his shoulders. And he will be called Wonderful Counselor, Mighty God, Everlasting Father, Prince of Peace.”  Isaiah 9:6
The true meaning of Christmas is awesome story of God sending his son Jesus to be born into the world, in a humble stable, to save the world from sin.  
I’ve always loved the way Linus tells the story in the Peanuts Christmas special!


I’ve already shared some of the festive Christmas snacks I’ve made for my kids to get them excited about the season (as if they need any help with that)!  However, the real reason we celebrate Christmas is because Jesus was born!  The miracle of His birth and the story of God’s amazing love for mankind still blows me away. 
Luke 2 tells this awesome story.  Read that or read about the birth of Jesus in the Children’s Bible.  
After that, make this lunch together.

Baby Jesus is a baby carrot sliced in half to lay flat.  He is lying in a manger made of a peanut butter sandwich.  He is wrapped in swaddling clothes of string cheese peeled and wrapped around him.  His eyes are raisins.  The stable is made of carrots sliced to lay flat, and the hay and the star are made of organic colby jack cheese.  I use a pizza slicer to create the thin strips of cheese to look like hay.  The support for the manger is celery shaped like an “x”.

As a finishing touch, Grace and I sang “Away in a Manger” together right before she ate!

(Linking up HERE)


Photobucket

Filed Under: biblical, carrots, cheese, christmas, holidays, lunches, movies, peanut butter sandwich Tagged With: Biblical, carrots, cheese, Christmas, Holidays, Lunches, movies, peanut butter sandwich

« Previous Page
Next Page »

I'm Amy. One of my passions is serving my two little girls healthy, wholesome food in unexpected ways. Lunch time has become a time of learning, imagining, and bonding for us as we use great food to create little works of art... Read More…

facebooktwitterpinterest instagram google+

Tags

animals Apple avocado banana Biblical Birthday Parties blueberries Books Breakfasts carrots Celery cheese Christmas cottage cheese desserts Disney Easter educational Eggs everyday scenes grapes ham history Holidays Lunches movies nature Oatmeal Party Food peanut butter peanut butter sandwich raisin Raspberries Snacks snowman Sports Strawberries super healthy teaching and learning turkey TV shows Valentines Day Weekly Kids Co-op Winter yogurt

Best of

Best Of

Copyright Note

Please feel free to use any of these ideas with your children at home, school, church, or anywhere you are inspired to make fun of lunch. If you would like to share a post on a blog or site, you may use one picture so long as you include a link to the original post. Please do not re-post the whole article or distribute printed-out content without written permission from the original author.

Grab our button!

Creative Kid Snacks Button

© Copyright Creative Kid Snacks · Design & Development by 4th & Market