• Home
  • New? Start Here!
  • Holidays
  • Parties
  • Contact
  • Facebook
  • Twitter
  • Pinterest
  • Google+
  • Instagram

Creative Kid Snacks

make fun of lunch!

  • Breakfasts
  • Lunches
  • Dinner
  • Snacks
  • Desserts

Frosty the Snowman and Friends

December 4, 2013 by Amy Hudson

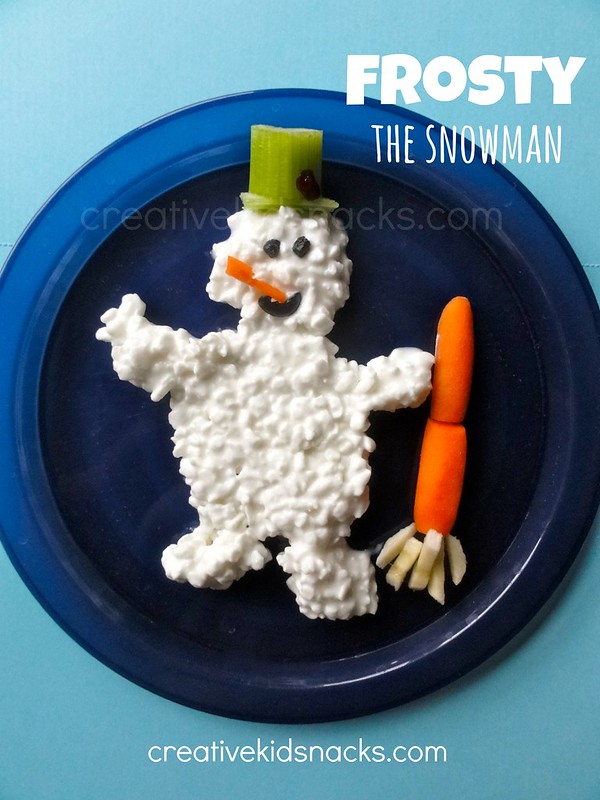
My girls love the Frosty the Snowman movie.  We have a DVD of the same version that was on TV all the way back in the 80’s when I was a kid.  They love to sing the song, “Frosty the Snowman, was a jolly happy soul . . .”  The other day I decided to make them a snack inspired by their favorite snowman.  (Even though we’ve already made these snowman snacks last year, today’s snowman looks just like Frosty from the movie).

Frosty the Snowman

Ingredients:

3/4 to 1 cup cottage cheese

1-2 baby carrots

1 slice of banana

1 dried blueberry (I buy the large bag available at Costco)

1 fresh blueberry

2 small slices celery

1 dried cranberry

Directions:

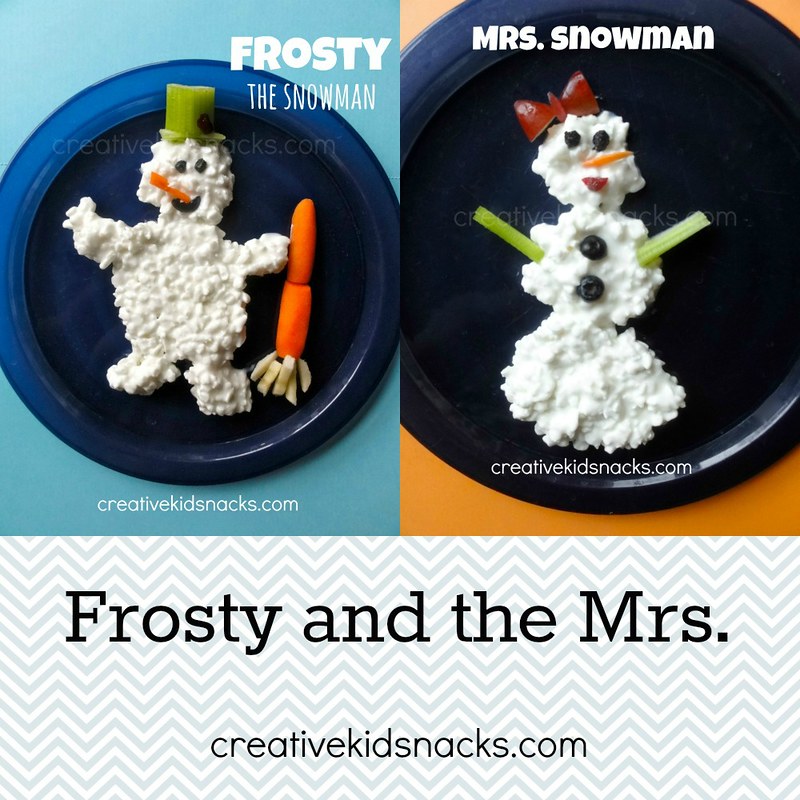
Use a small spoon to scoop the cottage cheese onto the center of the plate.  Gently spread it out to make the largest part of Frosty’s body – his tummy.  Next, spoon each leg on and gently slide cottage cheese into shape if needed.  Follow the same process for his arms.  Cottage cheese is great, because it naturally falls into the shape of fingers at the end of an arm.  You won’t have to use your fine motor skills for this step!  Slice one square piece of celery, along with one thin rectangular piece, and place atop Frosty’s head.  Add a dried cranberry to look like a flower.  Slice a small dried blueberry in half and place onto Frosty’s head for eyes.  Slice your fresh blueberry in half, then slice a crescent shape out of one of the halves, and lay that flat onto Frosty’s face for his smile.

Slice a baby carrot in half lengthwise.  Lay one above the other next to Frosty to look like his broomstick.  Slice one banana wheel.  Carefully take your knife and slice thin sections from the wheel.  Place onto plate to be the bottom of the broom.  To make Frosty’s pipe, slice a baby carrot in half lengthwise, then slice one of those halves again (lengthwise), so you have a flat rectangular piece of carrot to work with.  Slice a pipe shape, aiming to get a thin rectangular piece with a squared piece at the end.  Place the pipe right into Frosty’s smile, and he is complete and ready to delight your little ones!
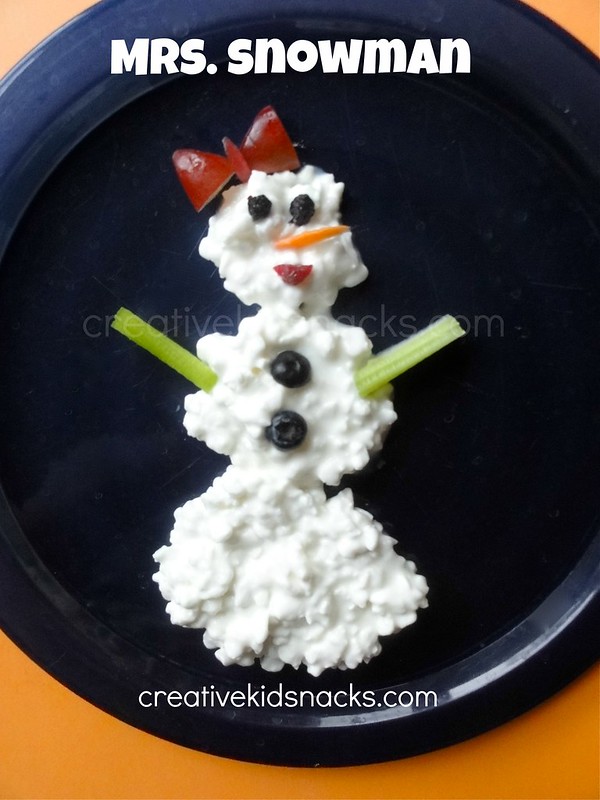
Frosty’s Wife

After I made Frosty for my oldest, I decided to make him a little friend.  She was easier and faster to make than even him.  Meet Mrs. Frosty.

Ingredients:

3/4 cup cottage cheese

2 fresh blueberries

1 red grape

1 dried blueberry

1 small section of celery

1 dried cranberry

1 baby carrot

Directions:

Use a spoon to scoop and carefully shape three cottage cheese circles onto the plate for Mrs. Snowman’s body.  Next, thinly slice a section of celery and place onto plate for her arms.  Slice a dried blueberry in half and place onto her head for eyes.  Slice a dried cranberry in half width-wise and place beneath eyes for Mrs. Snowman’s mouth.  Add two fresh blueberry buttons and a red grape bow.  To make the bow, slice a red grape in half lengthwise, then slice a triangle out of each half and add a remaining sliver of grape for tie of hair bow.  Complete her with a tiny sliver of a baby carrot (proportional to her face), and you are done!

Enjoy!

More Snowman Fun!

If you enjoyed these snowmen, check out our other snowman creations, (our snowman milk chugs are super easy and fun), along with the rest of our Winter and Christmas snacks!

(Linking up HERE)

Filed Under: christmas, holidays, snowman, Winter Tagged With: banana, blueberries, Carrot, Celery, Christmas, cottage cheese, Holidays, snowman, Winter

Snowman Milk Chugs

December 26, 2012 by Amy Hudson

Need a great kids drink for a Winter Party?  While the adults sip their spiced eggnog, serve the kids milk in the form of little snowmen!

Perhaps you’re hosting winter play date and looking for something to serve.
Making them is so simple, and the kids will love to drink them as they decorate cookies or snack on some healthy play date snacks.
The best part is, the kids can help you get them ready to serve to their friends!


We bought two different kinds of milk drinks.  The lucerne brand were 4 for $5, which was a great price, and the Deans were a little closer to $2 each.  I decided to try both in order to see which shape came out cuter.


We used some pipe cleaners and a black, brown, and orange sharpie in order to create our snowmen.  How much simpler can you get when it comes to supplies?


Next, remove the wrappers.  I’m very partial to my cute little assistant!


Take two pipe cleaners of matching color and wrap around the bottle two thirds of the way up.  This will create your snowman’s scarf.  My four year old girl did a great job of choosing a color for each snowman and wrapping each one.
Take your sharpie and draw your faces using black for the eyes, smile, and buttons; orange for the nose; and brown for their stick arms.
As you can see, the two different bottles both come out cute, so you can use either brand depending on your preference.
I actually liked the bigger bottles better, since the “scarf” stayed in place better.  There is a groove in the bottle at just the right spot!
Hope you enjoy the Snowman Milk Chugs!
(Linking up HERE)


Filed Under: beverages, christmas, holidays, snowman Tagged With: beverages, Holidays, snowman

Snowman Party Poppers

December 17, 2012 by Amy Hudson

Are you having a winter party?  Tis the season to celebrate the snow with a cute snowman snack I like to call Snowman Party Poppers.
We’ve already introduced you to the Christmas Snacks we like to call Grinch Party Poppers and Santa party poppers; so today it’s time for the snowmen!


These guys are made of mozzarella cheese, blackberry jam, pretzels, and fruit – a winning combination of flavors if you ask me!
Here’s how to make your own.
Ingredients needed (for 15+ poppers):
-large chunk mozzarella cheese – the largest size available at most grocery stores
-pretzel sticks
-2-3 tablespoons seedless blackberry preserves (may substitute other seedless preserves)
-grapes (or other desired fruit) for hats
Assembly:
Step 1:  Cut mozzarella into groups of 3 chunk sizes.
Start with deciding the size you’d like the head chunk to be and cut those equally.
Next, cut slightly larger chunks for the middle, and repeat for the bottom.
Tip:  think about how much cheese would be desirable to eat for one child in one sitting.  Make sure your bottom chunk is not so big that it would be too much for the average person to want to finish.
Step 2:  Fill piping bag or plastic baggie with corner sliced off for piping with blackberry preserves, and pipe faces onto smallest chunks of cheese.
 The fruit and cheese combo is classic and tastes fantastic.
The preserves, once piped onto the cheese for faces, stay in place very well, and they should not dribble as long as you do not make the dots too large.  I used the smallest tip on my piping bags.
Step 3:  Build Snowmen
Because they stay together so well, these guys don’t even require a toothpick!  If you are serving them at a party, however, I would use one in order to be able to quickly grab one from a serving plate.
Layer your three chunks of cheese, largest on bottom, and work up.  Slice the bottoms off of as many grapes as you have snowmen and add to the top to look like hats.
Insert toothpicks and you are ready to go!
(Sharing HERE)


Filed Under: cheese, christmas, holidays, snowman, Uncategorized Tagged With: cheese, Christmas, Holidays, snowman, Winter

Snowman Popcorn Cups

December 10, 2012 by Amy Hudson

Introducing the Snowman Popcorn Cup!
Try this one for your next winter play date, party, or simply for a fun family movie night at home!
In order to create these guys, all you will need is the following:
-clear containers:  I used clear plastic cups and a clean, clear vase
-ribbon or fabric for scarves
-black and orange sharpie markers, or orange construction paper if you don’t have an orange sharpie
-white popcorn
Note:  popcorn is not terribly nutritious, yet neither is it terrible for you.  The more oil, salt, and butter it is made with, the worse it is for you.  This article mentions the best way of preparing popcorn being to air pop it and then add some extra virgin olive oil and sea salt for taste.  I went the easy route and bought some Vic’s All Natural Light White Popcorn for this snack.  The rule of thumb is, the less steps and ingredients to produce the popcorn, the better.
To transform this vase into a large popcorn snowman, I simply placed some tape onto where the eyes, smile, and buttons would be, then I drew them right on.  I found that the clear packing tape (which I used for the eyes in the picture above, was much easier to take off and much less visible against the glass than regular scotch tape, so use the packing tape if you have it.
For the nose, I used a small triangle of orange construction paper and taped it right on.  Like I mentioned above, an orange sharpie could be used for this too (along with a piece of tape to protect your vase, of course).
 For the small plastic cups, I used a package from Walmart that cost under $3 for 100.
The little cups are equivalent to 1 1/2 cups or so of popcorn, a great serving for the kids.
 I hope you enjoy creating your own snowman popcorn cups.  Be creative with your supplies, and show me what you came up!  I’d love a link to a photo in the comments from you!
Variations:
Tie a brown pipe cleaner around the middle of the cup to create some arms
Glue eyeballs (from the craft supplies aisle) onto the plastic cups
Use your imagination!

(Linking up HERE)

Filed Under: christmas, popcorn, snowman, Winter Tagged With: Christmas, popcorn, snowman, Winter

Cottage Cheese Snowman

December 5, 2012 by Amy Hudson

Celebrate Winter by using cottage cheese as it was truly meant to be used in the creative snack world: as snow!

Ingredients:

Our sweet snowman has a cottage cheese body , raisin eyes and buttons, 1/2 a baby carrot for a nose, and celery sticks for arms.

Directions:

Scoop the cottage cheese onto the plate with a small spoon into three circles.  Slice your baby carrot in half and add for his nose.  Place his eyes and buttons on, and finish with arms.  Done!

You can’t get much healthier than this for a festive winter snack!

Variations:
Use pretzels for his arms to look more like sticks
Use yogurt for his body
Use blueberries for his buttons

Filed Under: snow, snowman, Winter Tagged With: Christmas, Holidays, snow, snowman, Winter

Healthy Christmas Snacks for the Kids

November 26, 2012 by Amy Hudson

Looking for some healthy snacks to serve this Christmas?

Get the kids into the Christmas season with these fun snacks and lunches!

#1:  Veggie Christmas Tree

Use cut celery arrange on an angle to create the shape of the tree.  Slice a baby carrot into wheels for the ornaments.  Cut a yellow pepper into the shape of a star for the top of the tree.
Create the trunk by rolling a slice of deli ham into a one inch wide roll-up and folding it in half.  Slice the bottom off to create a straight line if you wish.
My favorite part of this snack are the snowflakes.  I created them by slicing some string cheese into wheels, then carefully slicing little triangles out of them (from the outside in).
Serve with a little ranch for dipping, and enjoy!
(My kids ate this whole snack up!  So much good fiber and protein!)
Variations:
Use cucumbers for the tree (sliced in “sticks”)
Use a carrot or two for the trunk and cherry tomatoes for the ornaments
Use yogurt for the snowflakes

#2: Santa Panini Sandwich

I made this snack by first making a turkey and cheese panini sandwich on our Cuisinart Panini grill.

After placing it on the plate, I spooned some cottage cheese around the bottom of the plate and left a little gap where Santa’s mouth would be. Note: the sandwich is placed with the rounded side of the bread down.

Next, I created his hat and nose with some strawberries.  Finish the look of the hat with a little whipped cream and finish with some raisin eyes.

This one was a favorite!

#3: Rudolph the Red-Nosed Reindeer

I made Rudolph out of a peanut butter sandwich.  Leave the round (top) part of the bread in tact, then slice into an oval for the main part of the body as shown.

From the remaining portion, slice four thin legs and a head.  Think of cutting the shape of a shoe for the head.  Add a raisin eye, a strawberry nose, and two pretzel antlers.

A little pine tree made of sugar snap peas completes the look of Rudolph’s flight through the air!

#4: Cottage Cheese Snowman

Meet one of the first creative snacks ever created.

Our sweet snowman has a cottage cheese body , raisin eyes and buttons, 1/2 a baby carrot for a nose, and celery sticks for arms.

Scoop the cottage cheese onto the plate with a small spoon into three circles.  Slice your baby carrot in half and add for his nose.  Place his eyes and buttons on, and finish with arms.  Done!

You can’t get much healthier than this for a festive winter snack!

Variations:
Use pretzels for his arms to look more like sticks
Use yogurt for his body
Use blueberries for his buttons

#5: Holiday Wreath

My daughter Grace asked for a wreath for lunch.  I decided to go with celery for the greenery as opposed to lettuce or cucumbers, which, depending upon your child’s taste buds, you could definitely use.  My girls love celery, so I went with that.

Next I added carrots and grapes sliced up for the “berries” of the wreath.  You could use cherry tomatoes, red bell peppers, or even strawberries here, but I used what I had on hand.

The bow was made out of a slice of ham.  I cut one full slice from the deli into quarters, and rolled each up as big as I wanted it to be for the parts of the bow.

Once all that was done, I snapped the photo.

Before I served it, though, I had the idea to add some background “snow”!

This is how I served it, and, as usual, it was gobbled up!

Which version do you like better?  I really can’t decide.  This second one is definitely more filling for lunch, though, and the girls do love their cottage cheese.   So for that reason alone, I know my kids would vote version 2!

(Linking up HERE)

Filed Under: christmas, Christmas tree, cottage cheese, holidays, panini, raisin, reindeer, Santa Claus, snowman, strawberries, whipped cream, wreath Tagged With: Christmas, Christmas tree, cottage cheese, Holidays, panini, raisin, reindeer, Santa Claus, snowman, Strawberries, super healthy, whipped cream, wreath

Snowman

June 13, 2012 by Amy Hudson

Who’s ready for a fun winter edible craft?  Today we are making a cottage cheese snowman.  I can’t think of a better way to get the kids to eat cottage cheese than making it into a little snowman!
Snowman edible craft | Creative Kid Snacks

Ingredients:

1/2 – 3/4 cup cottage cheese
raisins (4-5)
1/2 a baby carrot
2 celery sticks
Scoop the cottage cheese onto the plate with a small spoon into three circles.  Slice your baby carrot in half and add for his nose.  Place his eyes and buttons on, and finish with arms.  Done!
This guy was one of the first creative snacks ever created.  You can’t get much healthier than this for a festive winter snack!
 

Variations:

Use pretzels for his arms to look more like sticks
Use yogurt for his body
Use blueberries for his buttons
Did you enjoy today’s snack?  Check out our other winter snacks.
Learn more about this blog here.
 

Filed Under: christmas, holidays, snacks, snowman Tagged With: carrots, Celery, Christmas, cottage cheese, Holidays, raisin, Snacks, snowman, super healthy

I'm Amy. One of my passions is serving my two little girls healthy, wholesome food in unexpected ways. Lunch time has become a time of learning, imagining, and bonding for us as we use great food to create little works of art... Read More…

facebooktwitterpinterest instagram google+

Tags

animals Apple avocado banana Biblical Birthday Parties blueberries Books Breakfasts carrots Celery cheese Christmas cottage cheese desserts Disney Easter educational Eggs everyday scenes grapes ham history Holidays Lunches movies nature Oatmeal Party Food peanut butter peanut butter sandwich raisin Raspberries Snacks snowman Sports Strawberries super healthy teaching and learning turkey TV shows Valentines Day Weekly Kids Co-op Winter yogurt

Best of

Best Of

Copyright Note

Please feel free to use any of these ideas with your children at home, school, church, or anywhere you are inspired to make fun of lunch. If you would like to share a post on a blog or site, you may use one picture so long as you include a link to the original post. Please do not re-post the whole article or distribute printed-out content without written permission from the original author.

Grab our button!

Creative Kid Snacks Button

© Copyright Creative Kid Snacks · Design & Development by 4th & Market